Overview
Freshchat now lets you embed a widget in any site - the Web Messenger. The Web Messenger lets you engage with and manage queries from your website visitors - both anonymous and logged in users. It will appear as a widget on the bottom right corner of your web page. Every message that comes in from the Web Messenger will be treated as a separate conversation in the Freshchat inbox.
Setup Widget
Get widget code:
- Log in to your Freshchat account as Admin
- Go to Admin Settings
- Choose Channels
- You will be directed to the Web Widget and page.
- To chat with your website visitors, you will have to embed the widget on your website
- Copy the JavaScript code snippet before the </body> tag on every page to initialize the Web Messenger widget on your website
![]()
Advanced Widget Customizations
After you have completed the widget configuration from the admin page , you can perform following advanced customizations to the widget such as changing the widget launcher logo, enabling a pre-chat form, changing values/strings in the UI.
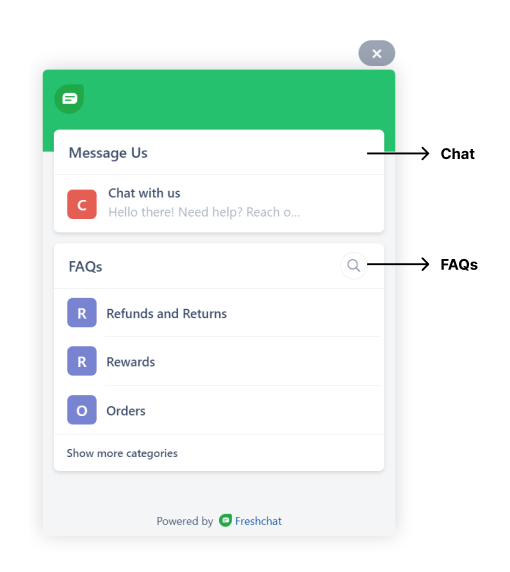
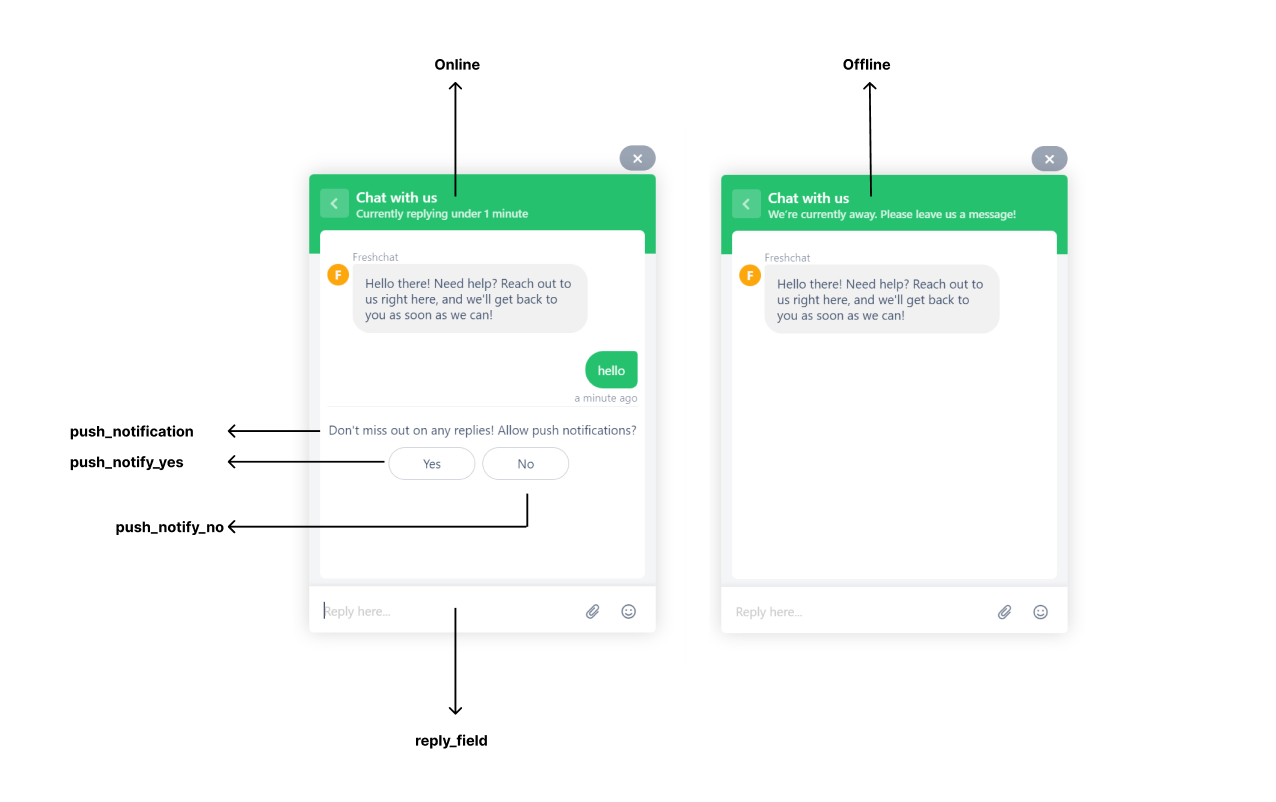
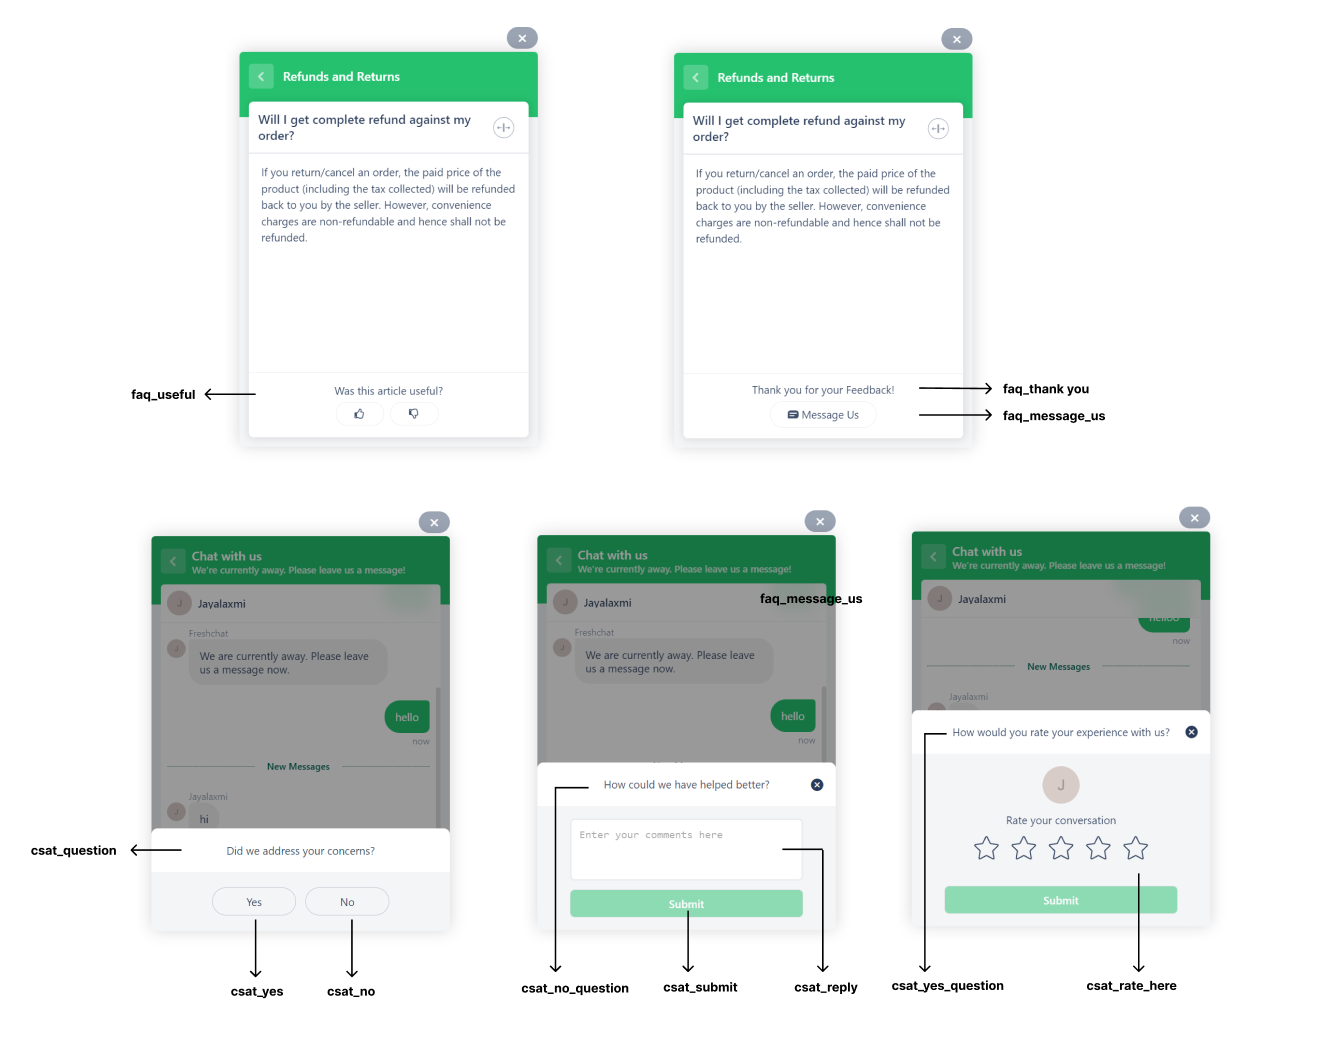
Screenshots
Below are a few screenshots of a widget where the values/strings that can be customised are highlighted.
How to set user properties (including externalID)- for Shopify?
Use this command to set user properties on Freshchat for users.
Sample code
1 2 3 4 5 6 7 8 9 10 11 12 | <script src='//fw-cdn.com/1*****7/2*****9.js' chat='true'></script> <script> window.fwcrm.on("user:created", function () { window.fcWidget.setExternalId("john.doe1987"); window.fcWidget.user.setFirstName("John"); window.fcWidget.user.setEmail("john.doe@gmail.com"); window.fcWidget.user.setProperties({ plan: "Pro", // meta property 1 status: "Active" // meta property 2 }); }); </script> |
How to use different chat widgets in different websites/webpages?
If you are a multi-brand commerce company or simply have multiple sites you need to use Freshchat on - while still using the same account and team to engage with your customers across these sites, Freshchat offers a way for you to separate the chat conversations / users across these sites.
By declaring a site ID as part of the configuration as shown below, users across the sites with different site IDs will be treated as different users, while all pages/sites using the same site ID will have a common user/common conversations.
Sample code
1 2 3 4 5 6 | <script> window.fcWidgetMessengerConfig = { siteId: ‘newsiteId’ } </script> <script src='//fw-cdn.com/1*****7/2*****4.js' chat='true'></script> |
If you just want to have different branding but don’t want users to be differentiated across different pages, you can now create multiple widgets from our new admin configuration.
How to show different Topics and FAQs on different pages?
You can assign tags to different articles, article categories and topics. Using this code, you can pass the specific tags on the pages where you want the specific topics and articles/categories to show up.
FAQ filtering
Sample code
1 2 3 4 5 6 7 8 9 10 11 12 13 | <script> window.fcWidgetMessengerConfig = { // Setting FAQ Tags in the object below. faqTags : { // Array of Tags tags : ['paidusers'], //For articles, the below value should be article. //For article category, the below value should be category. filterType:'category' //Or filterType: 'article' } } </script> <script src='//fw-cdn.com/1*****7/2*****4.js' chat='true'></script> |
Topic filtering
Sample code
1 2 3 4 5 6 7 | <script> window.fcWidgetMessengerConfig = { tags: ["public", "paid"], externalId: <externalId> } </script> <script src='//fw-cdn.com/1*****7/2*****4.js' chat='true'></script> |
How to change the chat bubble position to the left?
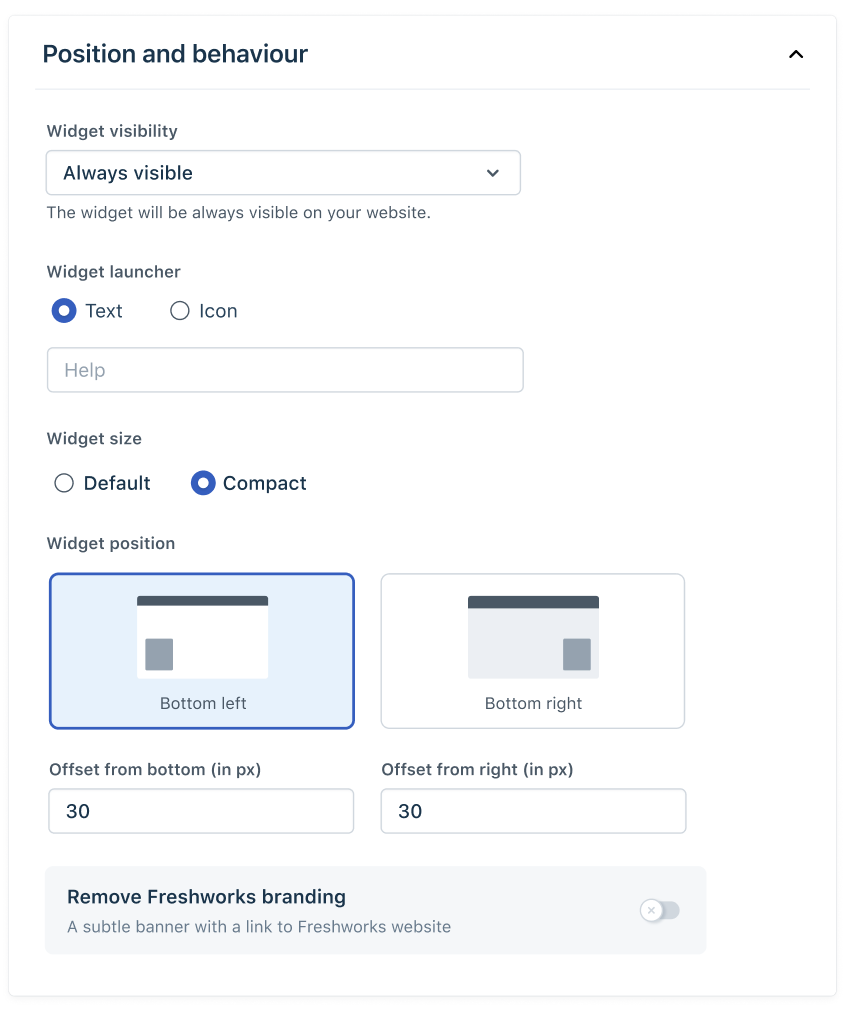
The web widget is positioned on the bottom-right corner by default. You can change the position to the bottom-left instead.
You can use the following code snippet to do this. Use this code within the body tag of your website.
Sample code
1 2 3 4 5 6 7 8 9 10 11 12 13 14 15 16 17 18 19 20 21 22 23 24 25 26 27 28 29 30 31 32 | <script> window.fcSettings = { token: "WEB_CHAT_TOKEN”, host: "WEB_HOST_URL", config: { headerProperty: { direction: 'ltr' //will move widget to left side of the screen } } }; </script> <script src="WEB_HOST_URL/js/widget.js" async></script> CSS <style> .custom_fc_frame { right: 50px !important; bottom: 30px !important; } </style> HTML window.fcWidgetMessengerConfig = { config: { cssNames: { widget: "custom_fc_frame" } } } </script> <script src='//fw-cdn.com/1*****7/2*****4.js' chat='true'></script> |
Also, Using the new revamped admin interface, admins can now go to the Widget Appearance section and can change the position of the chat bubble to the left and even set different offset values.
How to change the default text being shown on the widget?
Sample code
1 2 3 4 5 6 7 8 9 10 11 12 13 14 15 16 17 18 19 20 21 22 23 24 25 26 27 28 29 30 31 32 33 34 35 36 37 38 39 40 41 42 43 44 45 46 47 48 49 50 51 52 53 | <script> window.fcWidgetMessengerConfig = { config: { headerProperty: { //If you have multiple sites you can use the appName and appLogo to overwrite the values. appName: 'Gadget God', appLogo: 'https://d1qb2nb5cznatu.cloudfront.net/startups/i/2473-2c38490d8e4c91660d86ff54ba5391ea-medium_jpg.jpg?buster=1518574527', }, content: { placeholders: { search_field: 'Search', reply_field: 'Reply', csat_reply: 'Add your comments here' }, actions: { csat_yes: 'Yes', csat_no: 'No', push_notify_yes: 'Yes', push_notify_no: 'No', csat_submit: 'Submit' }, headers: { chat: 'Chat with Us', faq: 'Solution Articles', faq_search_not_available: 'No articles were found for {{query}}', faq_useful: 'Was this article helpful?', faq_thankyou: 'Thank you for your feedback', faq_message_us: 'Message Us', push_notification: 'Don\'t miss out on any replies! Allow push notifications?', csat_question: 'Did we address your concerns??', csat_yes_question: 'How would you rate this interaction?', csat_no_question: 'How could we have helped better?', csat_thankyou: 'Thanks for the response', csat_rate_here: 'Submit your rating here', channel_response: { offline: 'We are currently away. Please leave us a message', online: { minutes: { one: "Currently replying in {!time!} minutes ", more: "Typically replies in {!time!} minutes" }, hours: { one: "Currently replying in under an hour", more: "Typically replies in {!time!} hours", } } } } } } } </script> <script src='//fw-cdn.com/1*****7/2*****4.js' chat='true'></script> |
How to load the widget in full-screen mode?
You can show the widget in full-screen mode using this code
Sample code
1 2 3 4 5 6 7 8 9 | <script> window.fcWidgetMessengerConfig = { config: { fullscreen: true, } } </script> <script src='//fw-cdn.com/1*****7/2*****4.js' chat='true'></script> |
How to setup a pre-chat form on the web widget?
Sample code
1 2 3 4 5 6 7 8 9 10 11 12 13 14 15 16 17 18 19 20 21 22 23 24 25 26 27 28 29 30 31 32 33 34 35 36 37 38 39 40 41 42 43 44 45 46 47 48 49 50 51 52 53 54 55 56 57 58 59 60 61 62 63 64 65 66 67 68 69 70 71 72 73 74 75 76 | <script> window.prechatTemplate = { "SubmitLabel": "Start Chat", "fields": { "0": { "error": "Please Enter a valid Title", "fieldId": "title", "label": "Title", "required": "yes", "type": "text" }, "1": { "error": "Please Enter a valid name", "fieldId": "name", "label": "Name", "required": "yes", "type": "text" }, "2": { "error": "Please Enter a valid Email", "fieldId": "email", "label": "Email", "required": "yes", "type": "email" }, "3": { "error": "Please Enter a valid Phone Number", "fieldId": "phone", "label": "Phone", "required": "no", "type": "phone" }, "4": { "error": "Please select an option", "fieldId": "plan", "label": "Plan", "options": [ "Sprout", "Blossom", "Garden", "Estate", "Forest" ], "required": "no", "type": "dropdown" } }, "heading": "Chat with Us", "mainbgColor": "#0aa4db", "maintxColor": "#fff", "textBanner": "We can't wait to talk to you. But first, please take a couple of moments to tell us a bit about yourself." }; window.fcSettings = { onInit: function() { window.fcPreChatform.fcWidgetInit(window.prechatTemplate); } }; window.fcWidgetMessengerConfig = { config: { content: { actions: { tab_chat: "Chat" }, headers: { chat: "Chat With Us" } }, cssNames: { expanded: "custom_fc_expanded", widget: "custom_fc_frame" } } }; </script> <script src="https://snippets.freshchat.com/js/fc-pre-chat-form-v2.js"></script> <script src='//fw-cdn.com/1628939/2527989.js' chat='true'></script> |
How to open widget automatically on load of the website?
If you want to open it on load of the website please add the below code
Sample code
1 2 3 4 5 6 7 | <script> window.fcWidgetMessengerConfig = { open: true, } </script> <script src='//fw-cdn.com/1*****7/2*****4.js' chat='true'></script> |
If you want the widget to open in x seconds, then make use of the following code
Sample code
1 2 3 4 5 6 7 8 9 | <script> var timeInMillis = 5000; setTimeout(function() { window.fcWidgetMessengerConfig = { open: true, } },timeInMillis); </script> <script src='//fw-cdn.com/1*****7/2*****4.js' chat='true'></script> |
How to show FAQ'S first on widget load?
Sample code
1 2 3 4 5 6 7 8 | <script> window.fcWidgetMessengerConfig = { config: { showFAQOnOpen: true, } } </script> <script src='//fw-cdn.com/1*****7/2*****4.js' chat='true'></script> |
How to provide RTL support on the widget?
Yes, Freshchat supports right-to-left language. If you want to change the widget launcher position to the left, refer to the section above.
How to hide the widget launcher and open widget on the click of a button?
Sample code
1 2 3 4 5 6 7 8 9 10 11 12 | <script> window.fcWidgetMessengerConfig = { config: { headerProperty:{ hideChatButton: true, } } } </script> <script src='//fw-cdn.com/1*****7/2*****4.js' chat='true'></script> <button id="pingpongchat" onClick="window.fcWidget.open();">Open Widget</div> |
How to disable push notifications for customers in Freshchat?
Sample code
1 2 3 4 5 6 7 8 | <script> window.fcWidgetMessengerConfig = { config: { disableNotifications: true } } </script> <script src='//fw-cdn.com/1*****7/2*****4.js' chat='true'></script> |
How to hide the widget on certain pages of my website?
Sample code
1 2 3 4 5 6 7 8 9 10 | <script> window.fcWidgetMessengerConfig = { config: { headerProperty:{ hideChatButton: true, } } } </script> <script src='//fw-cdn.com/1*****7/2*****4.js' chat='true'></script> |
How to obscure agent details in GUI and disable event tracking?
Sample code
1 2 3 4 5 6 7 8 9 10 11 12 13 14 15 16 17 18 19 20 21 22 23 24 25 26 | <script src='//au.fw-cdn.com/20129460/69859.js' chat='true'></script> <script> window.fcWidgetMessengerConfig = { //Have the widget open on load by default by setting the below value to true open: false, config: { //Disable Events Tracking disableEvents: true, showFAQOnOpen: false, agent: { hideName: true, hidePic: true, hideBio: true, }, headerProperty: { backgroundColor: '#FFFF00', foregroundColor: '#333333', backgroundImage: 'WEB_HOST_URL/assets/images/texture_background_1-bdc7191884a15871ed640bcb0635e7e7.png', //Hide the chat button on load hideChatButton: false, //Set Widget to be left to right. direction: 'ltr' } } } </script> |
How to customize my app name/app logo?
Whenever a chat is initiated on a topic, the default app name / logo is visible. You can choose to override it using this code.
Sample code
1 2 3 4 5 6 7 8 9 10 11 12 | <script> window.fcWidgetMessengerConfig = { config: { headerProperty:{ //If you have multiple sites you can use the appName and appLogo to overwrite the values. appName: 'New App Name', appLogo: 'https://d1qb2nb5cznatu.cloudfront.net/startups/i/2473-2c38490d8e4c91660d86ff54ba5391ea-medium_jpg.jpg?buster=1518574527', } } } </script> <script src='//fw-cdn.com/1*****7/2*****4.js' chat='true'></script> |
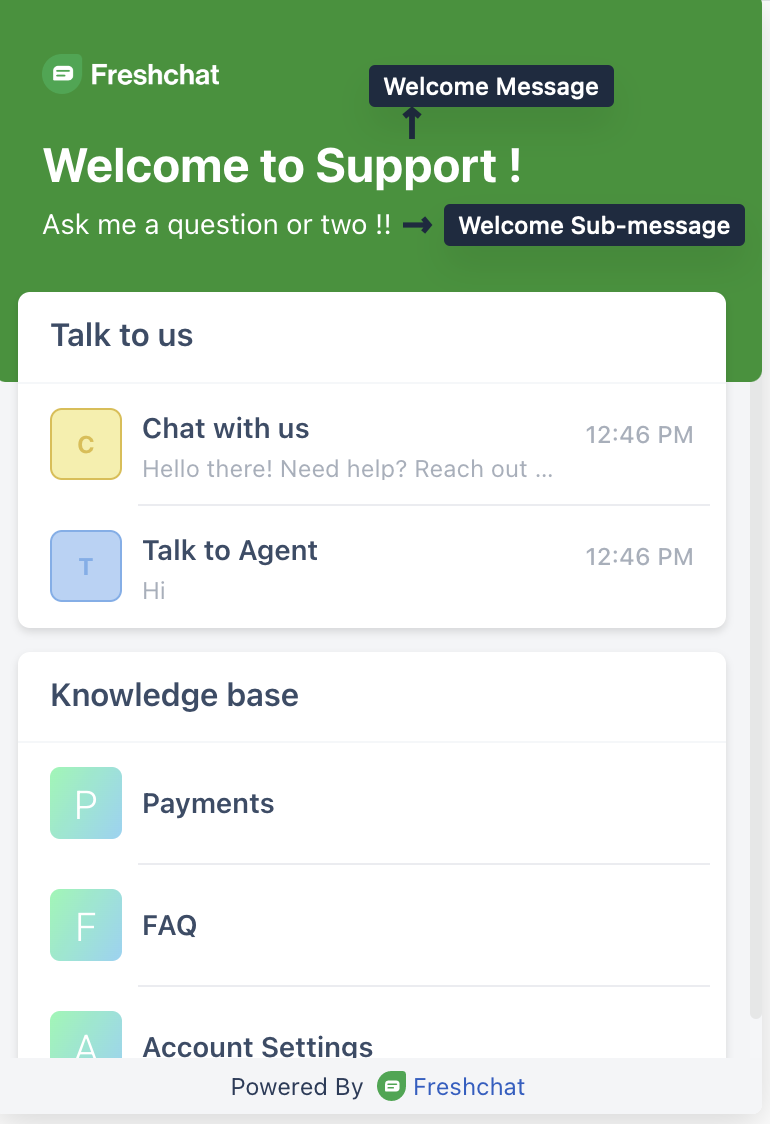
How to change the welcome message and welcome sub-message? (New)
Sample code
1 2 3 4 5 6 7 8 9 10 11 | <script> window.fcWidgetMessengerConfig = { config: { content: { welcomeMessage: 'Chat with Us', welcomeSubMessage: 'Solution Articles' } } } </script> <script src='//fw-cdn.com/1*****7/2*****4.js' chat='true'></script> |
How to use Custom logo change instead of Freshchat bubble?
Sample code
1 2 3 4 5 6 7 8 9 10 11 12 13 14 15 16 17 18 19 20 21 22 23 24 25 26 27 28 29 30 31 32 33 34 35 36 37 38 39 40 41 42 43 44 45 46 47 48 49 50 | <html> <head> <style type="text/css"> #custom_fc_button { width: 10%; position: fixed; right: -5%; bottom: 18px; float: right; cursor: pointer; } #imageicon { height: 30%; width: 30%; } </style> </head> <body> <div id="custom_fc_button"> <a id="open_fc_widget" onClick="openWidget()" style="cursor: pointer;"><img id="imageicon" src="https://i.ibb.co/R9FYnL4/2203537-chat-conversation-message-talk-icon.png" /></a> </div> </body> <script> window.fcWidgetMessengerConfig = { config: { headerProperty: { hideChatButton: true, }, }, }; </script> <script src="//fw-cdn.com/1866539/2676358.js" chat="true"></script> <script type="text/javascript"> var openWidget = function () { document.getElementById("fc_frame").style.visibility = "visible"; window.fcWidget.open(); initEvents(); }; var initEvents = function () { window.fcWidget.on("widget:opened", function (resp) { document.getElementById("custom_fc_button").style.visibility = "hidden"; }); window.fcWidget.on("widget:closed", function (resp) { document.getElementById("custom_fc_button").style.visibility = "visible"; }); }; </script> </html> |
How to stop tracking a user on my website when I use Freshchat?
There are two kinds of events tracked by Freshchat.
- - All custom events
- - Page transitions events (this is triggered when a webpage from the same website is visited)
Sample code
1 2 3 4 5 6 7 8 9 10 11 12 13 14 15 | To block all the events, use this code. window.fcWidgetMessengerConfig = { config: { disableEvents: true, } } To block only page transition events, use this code window.fcWidgetMessengerConfig = { config: { disablePageTransition: true, } } |
How to integrate freshchat with Google tag manager?
Sample code
1 2 3 4 5 6 7 8 9 10 11 12 | <script> var s = document.createElement('script'); s.type = 'text/javascript'; try { s.appendChild(document.createTextNode(code)); document.body.appendChild(s); } catch (e) { s.src = '//fw-cdn.com/1*****7/2*****4.js'; s.chat = true; document.body.appendChild(s); } </script> |
How to integrate freshchat with Google tag manager along with google analytics (GA4)?
Sample code
1 2 3 4 5 6 7 8 9 10 11 12 13 14 15 16 17 18 19 20 21 22 23 24 25 26 27 28 29 30 31 32 33 34 35 36 37 38 39 40 41 42 43 44 45 46 47 48 49 50 51 52 53 | <script> window.fcSettings = { onInit: function() { window.fcWidget.on("widget:loaded", function(resp) { window.fcWidget.on("user:created", function(resp) { console.log("User created."); console.log(resp); gtag('event', 'User Create', { 'send_to': 'G-RLQ7N070Q8', 'event_category': 'Freshchat widget', 'event_label': resp.action }); }); window.fcWidget.on("widget:opened", function(resp) { console.log('Widget Opened'); gtag('event', 'Widget Open', { 'send_to': 'G-RLQ7N070Q8', 'event_category': 'Freshchat widget', 'event_label': 'widget_open' }); }); window.fcWidget.on("widget:closed", function(resp) { console.log('Widget Closed'); gtag('event', 'Widget Closed', { 'send_to': 'G-RLQ7N070Q8', 'event_category': 'Freshchat widget', 'event_label': 'widget_closed' }); //Function to do some task }); }); } }; </script> <script> var s = document.createElement('script'); s.type = 'text/javascript'; try { s.appendChild(document.createTextNode(code)); document.body.appendChild(s); } catch (e) { s.src = '//fw-cdn.com/1*****7/2*****4.js'; s.chat = true; document.body.appendChild(s); } </script> <script async src="https://www.googletagmanager.com/gtag/js?id=G-RL***70Q8"></script> <script> window.dataLayer = window.dataLayer || []; function gtag(){dataLayer.push(arguments);} gtag('js', new Date()); gtag('config', 'G-RL***70Q8'); </script> |
How to integrate freshchat with Google tag manager along with google analytics (Old GA)?
Sample code
1 2 3 4 5 6 7 8 9 10 11 12 13 14 15 16 17 18 19 20 21 22 23 24 25 26 27 28 29 30 31 32 33 34 35 36 37 38 39 40 41 42 43 44 | <script> window.fcSettings = { onInit: function() { window.fcWidget.on("widget:loaded", function(resp) { window.fwcrm.on("user:created", function(resp) { console.log("User created."); console.log(resp); ga('FreshchatEvents.send', 'event', 'Freshchat widget', 'User Create', resp.action); }); window.fwcrm.on("widget:opened", function(resp) { console.log('Widget Opened'); ga('FreshchatEvents.send', 'event', 'Freshchat widget', 'Widget Open', 'widget_open'); }); window.fwcrm.on("widget:closed", function(resp) { console.log('Widget Closed'); ga('FreshchatEvents.send', 'event', 'Freshchat widget', 'Widget Closed', 'widget_closed'); }); }); } }; </script> <script> var s = document.createElement('script'); s.type = 'text/javascript'; try { s.appendChild(document.createTextNode(code)); document.body.appendChild(s); } catch (e) { s.src = '//fw-cdn.com/1*****7/2*****4.js'; s.chat = true; document.body.appendChild(s); } </script> <!-- Google Analytics --> <script> (function(i,s,o,g,r,a,m){i['GoogleAnalyticsObject']=r;i[r]=i[r]||function(){ (i[r].q=i[r].q||[]).push(arguments)},i[r].l=1*new Date();a=s.createElement(o), m=s.getElementsByTagName(o)[0];a.async=1;a.src=g;m.parentNode.insertBefore(a,m) })(window,document,'script','https://www.google-analytics.com/analytics.js','ga'); ga('create', 'G-N****0Q8', 'auto'); ga('send', 'pageview'); </script> <!-- End Google Analytics --> |
How to defer widget load to improve SEO (Beta)
Though the Freshchat Widget size is competitively developed, we want to ensure that the website load time and performance score of our customers’ websites are not impacted because of the Freshchat widget. Widget Lite will ensure that the website’s SEO performance is not impacted and the site can get a better ranking in Performance Scores and Core Web Vital Metrics (Eg. In Lighthouse Reports, Page Speed Insights).
Widget Lite can be enabled by passing eagerLoad as true during the Chat initialisation, as shown in the code snippet below.
Sample code
1 2 3 4 5 6 7 8 | <script> window.fcWidgetMessengerConfig = { config: { eagerLoad: true } } </script> <script src='//fw-cdn.com/1*****7/2*****4.js' chat='true'></script> |
How it works
By enabling Eager Load as part of your widget code, the widget icon will load when the website loads. But other widget elements, such as icons, text, and other elements within the Freshchat widget screen, which might contribute to a load time of the Freshchat Widget, will load only after the page load.
These widget properties will only start loading when the user is active on your website(will not load if the user has not moved their pointer/scrolled) - this will ensure that if the user is idle when the page loads, their bandwidth is focused on loading the page and not the Freshchat widget elements.
Additionally, if the user is loading your website on a new tab from a backlink, the widget will not load unless the user is on that new tab. These changes will ensure that the page load is not impacted because of the time it takes to load the elements in the Freshchat widget window.
Things To Be Aware Of While Using Widget Lite:
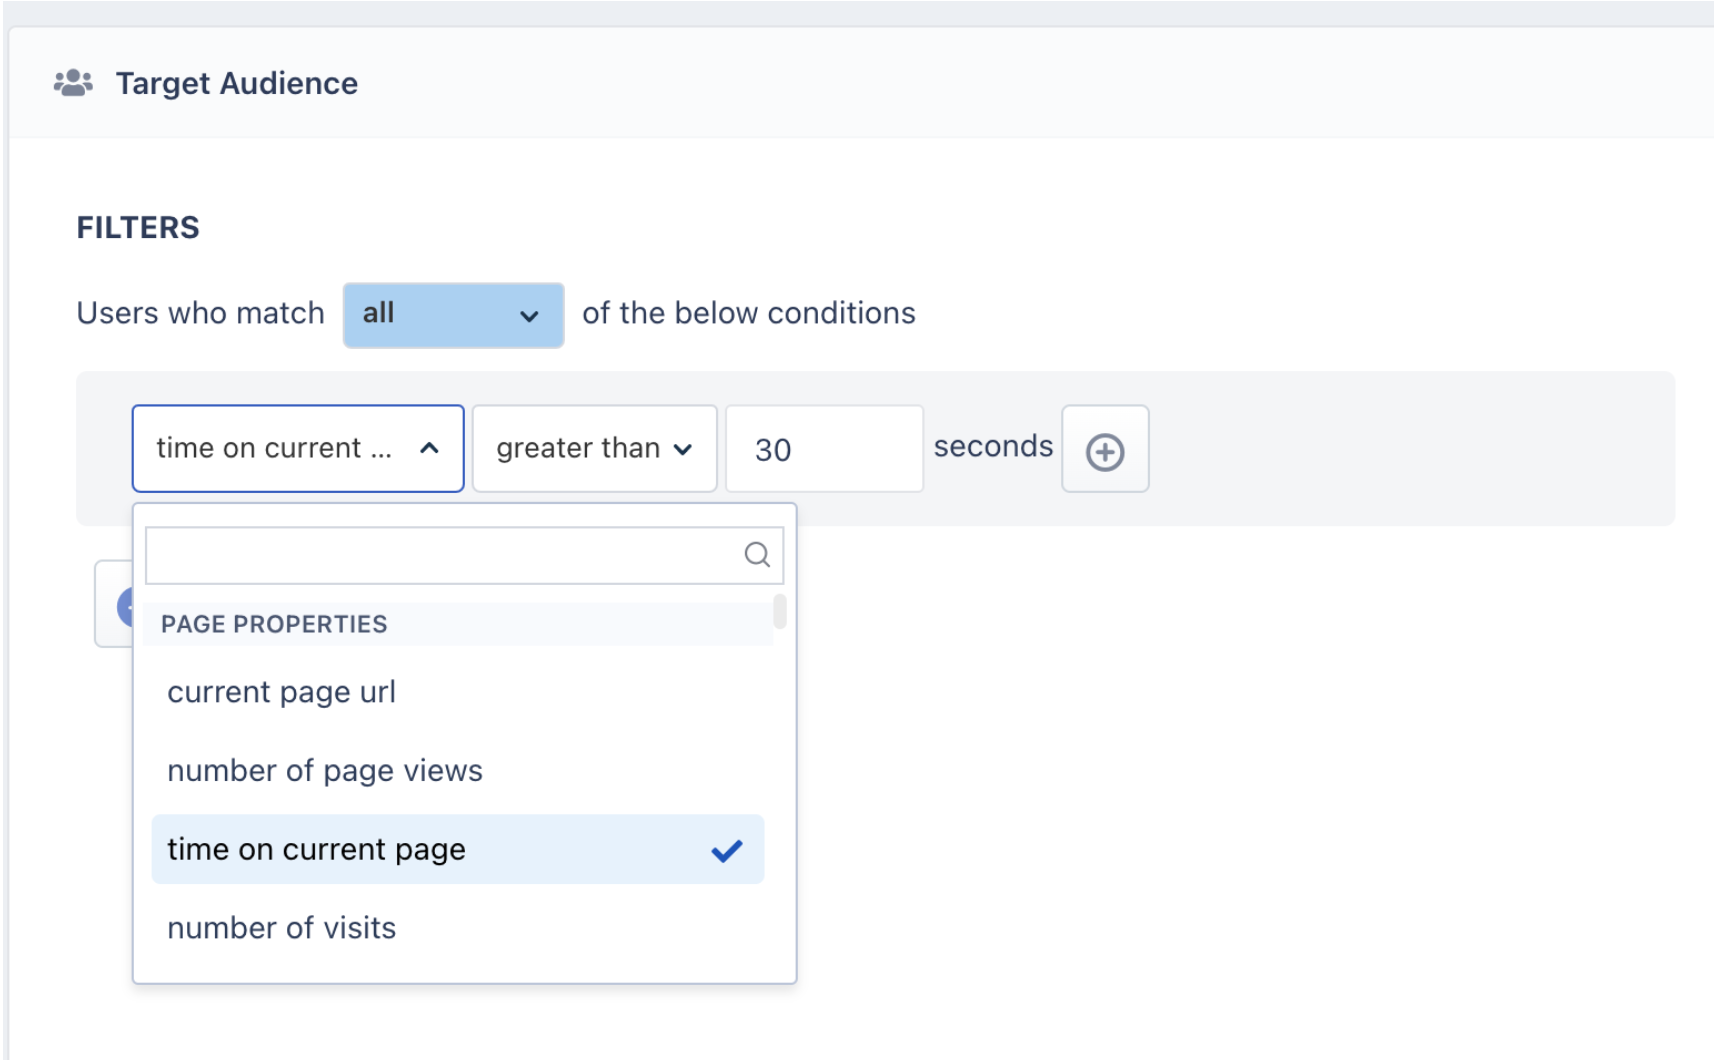
If you have configured triggered campaigns to be sent out to your web visitors based on the time they have spent, there might be a delay in triggering those campaigns for roughly about 5-10% of the web visitors depending on their bandwidth. This is because Freshchat can start tracking the time spent only after the widget elements load. As this will happen only after your website load, the campaign might take longer to trigger for some users.
Note: Widget Lite is still in Beta testing, very rarely there can be some unforeseen issues, which we request you to report to our team by sending an email to support@freshchat.com. We will work with you in resolving these issues.
How to setup parallel messaging on the same topic?
Currently in the Freshchat web widget(conversations widget), you can have multiple topics and your customers can reach out to you at the same time on different topics. But it wasn’t possible to start a parallel conversation on the same topic.
Eg. For an e-commerce business, some of the topics could be Product Queries, Payment Support, Refund Status. The customer might have Payment Support queries for multiple payments which are currently under process. Earlier, they will have to track all these payments in a single conversation thread which is really tedious.
We are addressing this issue as part of the Parallel Messaging. Now, there can be multiple conversation threads for a single topic. We are achieving this by sending an external conversation reference id when the widget gets initialized. For a particular topic, we open a specific conversation based on the conversation_reference_id.
Usage
Customers should provide a unique conversationReferenceId along with the open api. Support representatives should guide the customer for these configurations.
Example: window.fcWidget.open({ conversationReferenceId: 1, name: ‘Test Topic’});
We can have a widget initialisation script that will be run once on page load and open apis like these for each button.
Initialisation Script will be run once when the page loads.
Button 1 - window.fcWidget.open({ conversationReferenceId: ‘1’, name: ‘Payment Issues’ });
Button 2 - window.fcWidget.open({ conversationReferenceId: ‘2’, name: ‘Payment Issues’ });
Now, I can enquire about the payment issues related to Laptop from Button 1 and click on Button 2 to check on Mobile related payment issues.
Sample code
1 2 3 4 5 6 7 8 9 10 11 12 13 14 15 16 17 18 19 20 21 | // Topic name should be provided based on the topic that's available in an account. If wrong topic name is given, then we will open the default channel <div> <button id="button1" onclick="firstScript()">Payment Issues - 1</button> </div> <br> <div> <button id="button2" onclick="secondScript()">Payment Issues - 2</button> </div> <br> // Update this line with your script code <script src='//fw-cdn.com/1*****7/2*****4.js' chat='true'></script> <script> function firstScript() { window.fcWidget.open({ conversationReferenceId: '1', name: 'Payment Issues'}); } function secondScript() { window.fcWidget.open({ conversationReferenceId: '2', name: 'Payment Issues'}); } </script> |
Channel Customisation
CUSTOMIZING WEB WIDGET TOPICS
Set Tags in widget init
If the tags are set when the init is set, relevant topics will appear when the widget loads.
Sample code
1 2 3 4 5 6 7 | <script> window.fcWidgetMessengerConfig = { tags: ["public", "paid"], externalId: <externalId> } </script> <script src='//fw-cdn.com/1*****7/2*****4.js' chat='true'></script> |
Set Tags during page transition:
The tags can also be set later for specific web pages using Set Tags (only the latest selection will be updated for the topic list). For example, if a user is on the 'Payments' page, these tags will show only payment related topics on the Web Messenger. If he's switching to the 'Deliveries' page, Set Tags help show topics relating to deliveries during transition. Once Set Tags are called, the topic list will immediately be updated.
Sample code
1 2 3 4 5 | <script> window.fwcrm.on("widget:loaded", function () { window.fcWidget.setTags(tags); // For ex: ["public", "paid"] }); </script> |
FAQ Customisation
CUSTOMIZING WEB WIDGET FAQs
Tags can be added to FAQ Categories or FAQ Article while creating or adding them. FAQ Tags allow you to filter and display specific FAQs or Categories on web pages.
- For example, a specific set of FAQ categories/articles regarding pricing and billing can be displayed on the pricing page of your website.
- Or a specific set of FAQs can be displayed for Paid Subscribers with additional information on the premium features.
How category and article tags work?
There are two types of FAQ Tags, which can be set to filter FAQs or Categories.
- Category tags ( filterType:'category' ) - Category Level Tags can be used to filter FAQ Categories.
- Article tags ( filterType:'article' ) - Article Level Tags works on two levels. This means if the given tag is associated with any category all the articles in that category will be shown. Then the Article Tags will look for articles with the associated tags under all FAQ Categories.
Set FAQ Tags on widget init
If the FAQ tags are set on initialisation of the Freshchat widget, relevant FAQ categories/articles will be loaded when the widget is opened.
Sample code
1 2 3 4 5 6 7 8 9 10 11 12 13 | <script> window.fcWidgetMessengerConfig = { // Setting FAQ Tags in the object below. faqTags : { // Array of Tags tags : ['paidusers'], //For articles, the below value should be article. //For article category, the below value should be category. filterType:'category' //Or filterType: 'article' } } </script> <script src='//fw-cdn.com/1*****7/2*****4.js' chat='true'></script> |
Set FAQ Tags during page transition:
The tags can also be set later for specific web pages using setFaqTags (only the latest selection will be updated for the topic list). For example, if a user is on the 'Payments' page, you can set FAQ Tags to display payment related FAQs. If a user switches to the 'Deliveries' page, this funciton will help show FAQs relating to deliveries during transition. Once setFaqTags are called, the FAQ list will immediately be updated.
Sample code
1 2 3 4 5 6 7 8 9 10 11 | <script> window.fwcrm.on("widget:loaded", function () { window.fcWidget.setFaqTags({ // For ex: ["public", "paid"] tags : ['hello'], //For articles, the below value should be article. //For article category, the below value should be category. filterType:'article' //Or filterType: 'category' }); }); </script> |
Showing FAQs in Fullscreen Popups
FAQs could also be shown in a full page popup mode. To enable this feature, set faqPopupView to true as below.
Sample code
1 2 3 4 5 6 7 8 | <script> window.fcWidgetMessengerConfig = { config: { faqPopupView: true } ); </script> <script src='//fw-cdn.com/1*****7/2*****4.js' chat='true'></script> |
User Identification
- When integrating with a Single Page Application (SPA).
- When the application operates across multiple subdomains.
- When multiple users access the widget on the same device.
- When users can switch between accounts within the application.
- When the application allows impersonation—for example, an admin or support agent logging into another users account to validate settings.
Improper handling of user properties can lead to inaccurate data or potential data loss during corrections process. These advanced scenarios are not covered in this document. Please contact our support team for guidance and assistance.
FRESHCHAT WEB MESSENGER FOR LOGGED OUT / ANONYMOUS USERS:
To embed the widget on your website, copy the code snippet from the Freshchat Settings page as seen in the above image and paste the JavaScript code snippet before the </body> tag on every page to initialize the Web Messenger on your website
Sample code
1 | <script src='//fw-cdn.com/1*****7/2*****4.js' chat='true'></script> |
FRESHCHAT WEB MESSENGER FOR LOGGED IN USERS:
To embed the widget on your website, copy the code snippet from Freshchat Settings page and paste the JavaScript code snippet before the </body> tag on every page to initialize the Web Messenger on your website
Additionally you can store an "externaIId" with Freshchat. This externalId is unique to your system. It can be a user's handle or the user's phone number or email. This will be used to restore user conversations securely if they login from a different computer or browser.
Note: The example user data has to be replaced with real data that helps in getting actual user information on all of your web pages.
You will now be able to see the Freshchat Web Messenger widget on all pages of your website
Sample code
1 2 3 4 5 6 7 8 9 10 11 12 13 14 | <script> window.fcSettings = { onInit: function() { window.fcWidget.setExternalId("john.doe1987"); window.fcWidget.user.setFirstName("John"); window.fcWidget.user.setEmail("john.doe@gmail.com"); window.fcWidget.user.setProperties({ plan: "Pro", // meta property 1 status: "Active" // meta property 2 }); } } </script> <script src='//fw-cdn.com/1*****7/2*****4.js' chat='true'></script> |
Restoring a User:
You can restore user conversations for logged in users, every time they initiate a conversation from a different browser or device. To do so, for every user, an unique external ID and restore ID has to be defined.
Two attributes needed to restore a user conversation,
- External ID - The external ID has to be unique to each logged in user. This information should be passed to Freshchat from your side. For example, user email ID can be an external ID.
- Restore ID - This will be created by Freshchat when a logged in user (from the customer’s website) initiates a conversation on Freshchat messenger for the first time. Restore ID is also unique to each created user. This ID will be passed to your website on the user creation callback function. You have to store this ID in your database, once it is passed by Freshchat. The next time the website user pings using the Freshchat messenger from a different browser or mobile app, this restore ID, along with the external ID must be passed from your side to Freshchat for the user conversation to be restored. Otherwise every conversation initiated by the user on a new / fresh browser session will create a new user and the conversation history will be lost.
Steps:
1. Paste the entire script from below on your website.
Note: Restore ID won’t be available when a website user logs in for the first time. It gets created only after a user initiates a conversation on the Freshchat messenger for the first time.
2. Define external ID. This step is mandatory.
Note: External ID should be unique for each user. Example: Email ID of each user can be defined as their external ID.
3. init() and fcWidget.user.get() start running when a user logs in for the first time on your website.
4. When a logged in user sends a message on Freshchat messenger for the first time, the user gets created in Freshchat, with information from fcWidget.user.setProperties() and call back function for user creation runs.
5. Parallely, restore ID is created in Freshchat for that user and will be available on fcWidget.on(‘user created’) event.
6. In if (data.restoreId) condition, add your code to save the restore ID from Freshchat to your database.
7. When a user starts a conversation from a different browser or device next time, restore ID should be fetched from your database and sent to Freshchat, to restore user conversation. To do this, you have to add code which fetches the restore ID from your database before init().
8. Finally, pass this restore ID to Freshchat in init().
Sample code
1 2 3 4 5 6 7 8 9 10 11 12 13 14 15 16 17 18 19 20 21 22 23 24 25 26 27 28 29 30 31 32 33 34 35 36 37 | <script> var restoreId = RESTOREID //Which need to be fetched from your DB window.fcWidgetMessengerConfig = { externalId: "john.doe1987", // user's id unique to your system restoreId: restoreId ? restoreId : null } </script> <script src='//fw-cdn.com/1*****7/2*****4.js' chat='true'></script> <script> window.fwcrm.on('widget:loaded',function(){ window.fcWidget.user.get(function(resp) { var status = resp && resp.status, data = resp && resp.data; if (status !== 200) { window.fcWidget.user.setProperties({ firstName: "John", // user's first name lastName: "Doe", // user's last name email: "john.doe@gmail.com", // user's email address phone: "8668323090", // phone number without country code phoneCountryCode: "+1", // phone's country code plan: "Estate", // user's meta property 1 status: "Active", // user's meta property 2 "Last Payment": "12th August" // user's meta property 3 }); window.fcWidget.on('user:created', function(resp) { var status = resp && resp.status, data = resp && resp.data; if (status === 200) { if (data.restoreId) { // Update restoreId in your database } } }); } }); }); </script> |
Setting User Properties
- When integrating with a Single Page Application (SPA).
- When the application operates across multiple subdomains.
- When multiple users access the widget on the same device.
- When users can switch between accounts within the application.
- When the application allows impersonation—for example, an admin or support agent logging into another users account to validate settings.
Improper handling of user properties can lead to inaccurate data or potential data loss during corrections process. These advanced scenarios are not covered in this document. Please contact our support team for guidance and assistance.
Default properties and Custom Properties
Use this command to set user properties on Freshchat for users.
Note that default properties can be set directly on the config object, whereas custom properties need to be set on the meta object as shown in the code snippet below.
- firstName
- lastName
- phone
Incase you would like to recieve more custom user properties, the properties have to first be set in the CRM Contact page. Go to Admin Settings and scroll down to CRM Modules and Automation. Click Contacts. All the properties expected to be passed during initialization can be managed from here. New properties have to be created and set here first.
For detailed information on how to create and manage custom fields in CRM Contacts, Click here
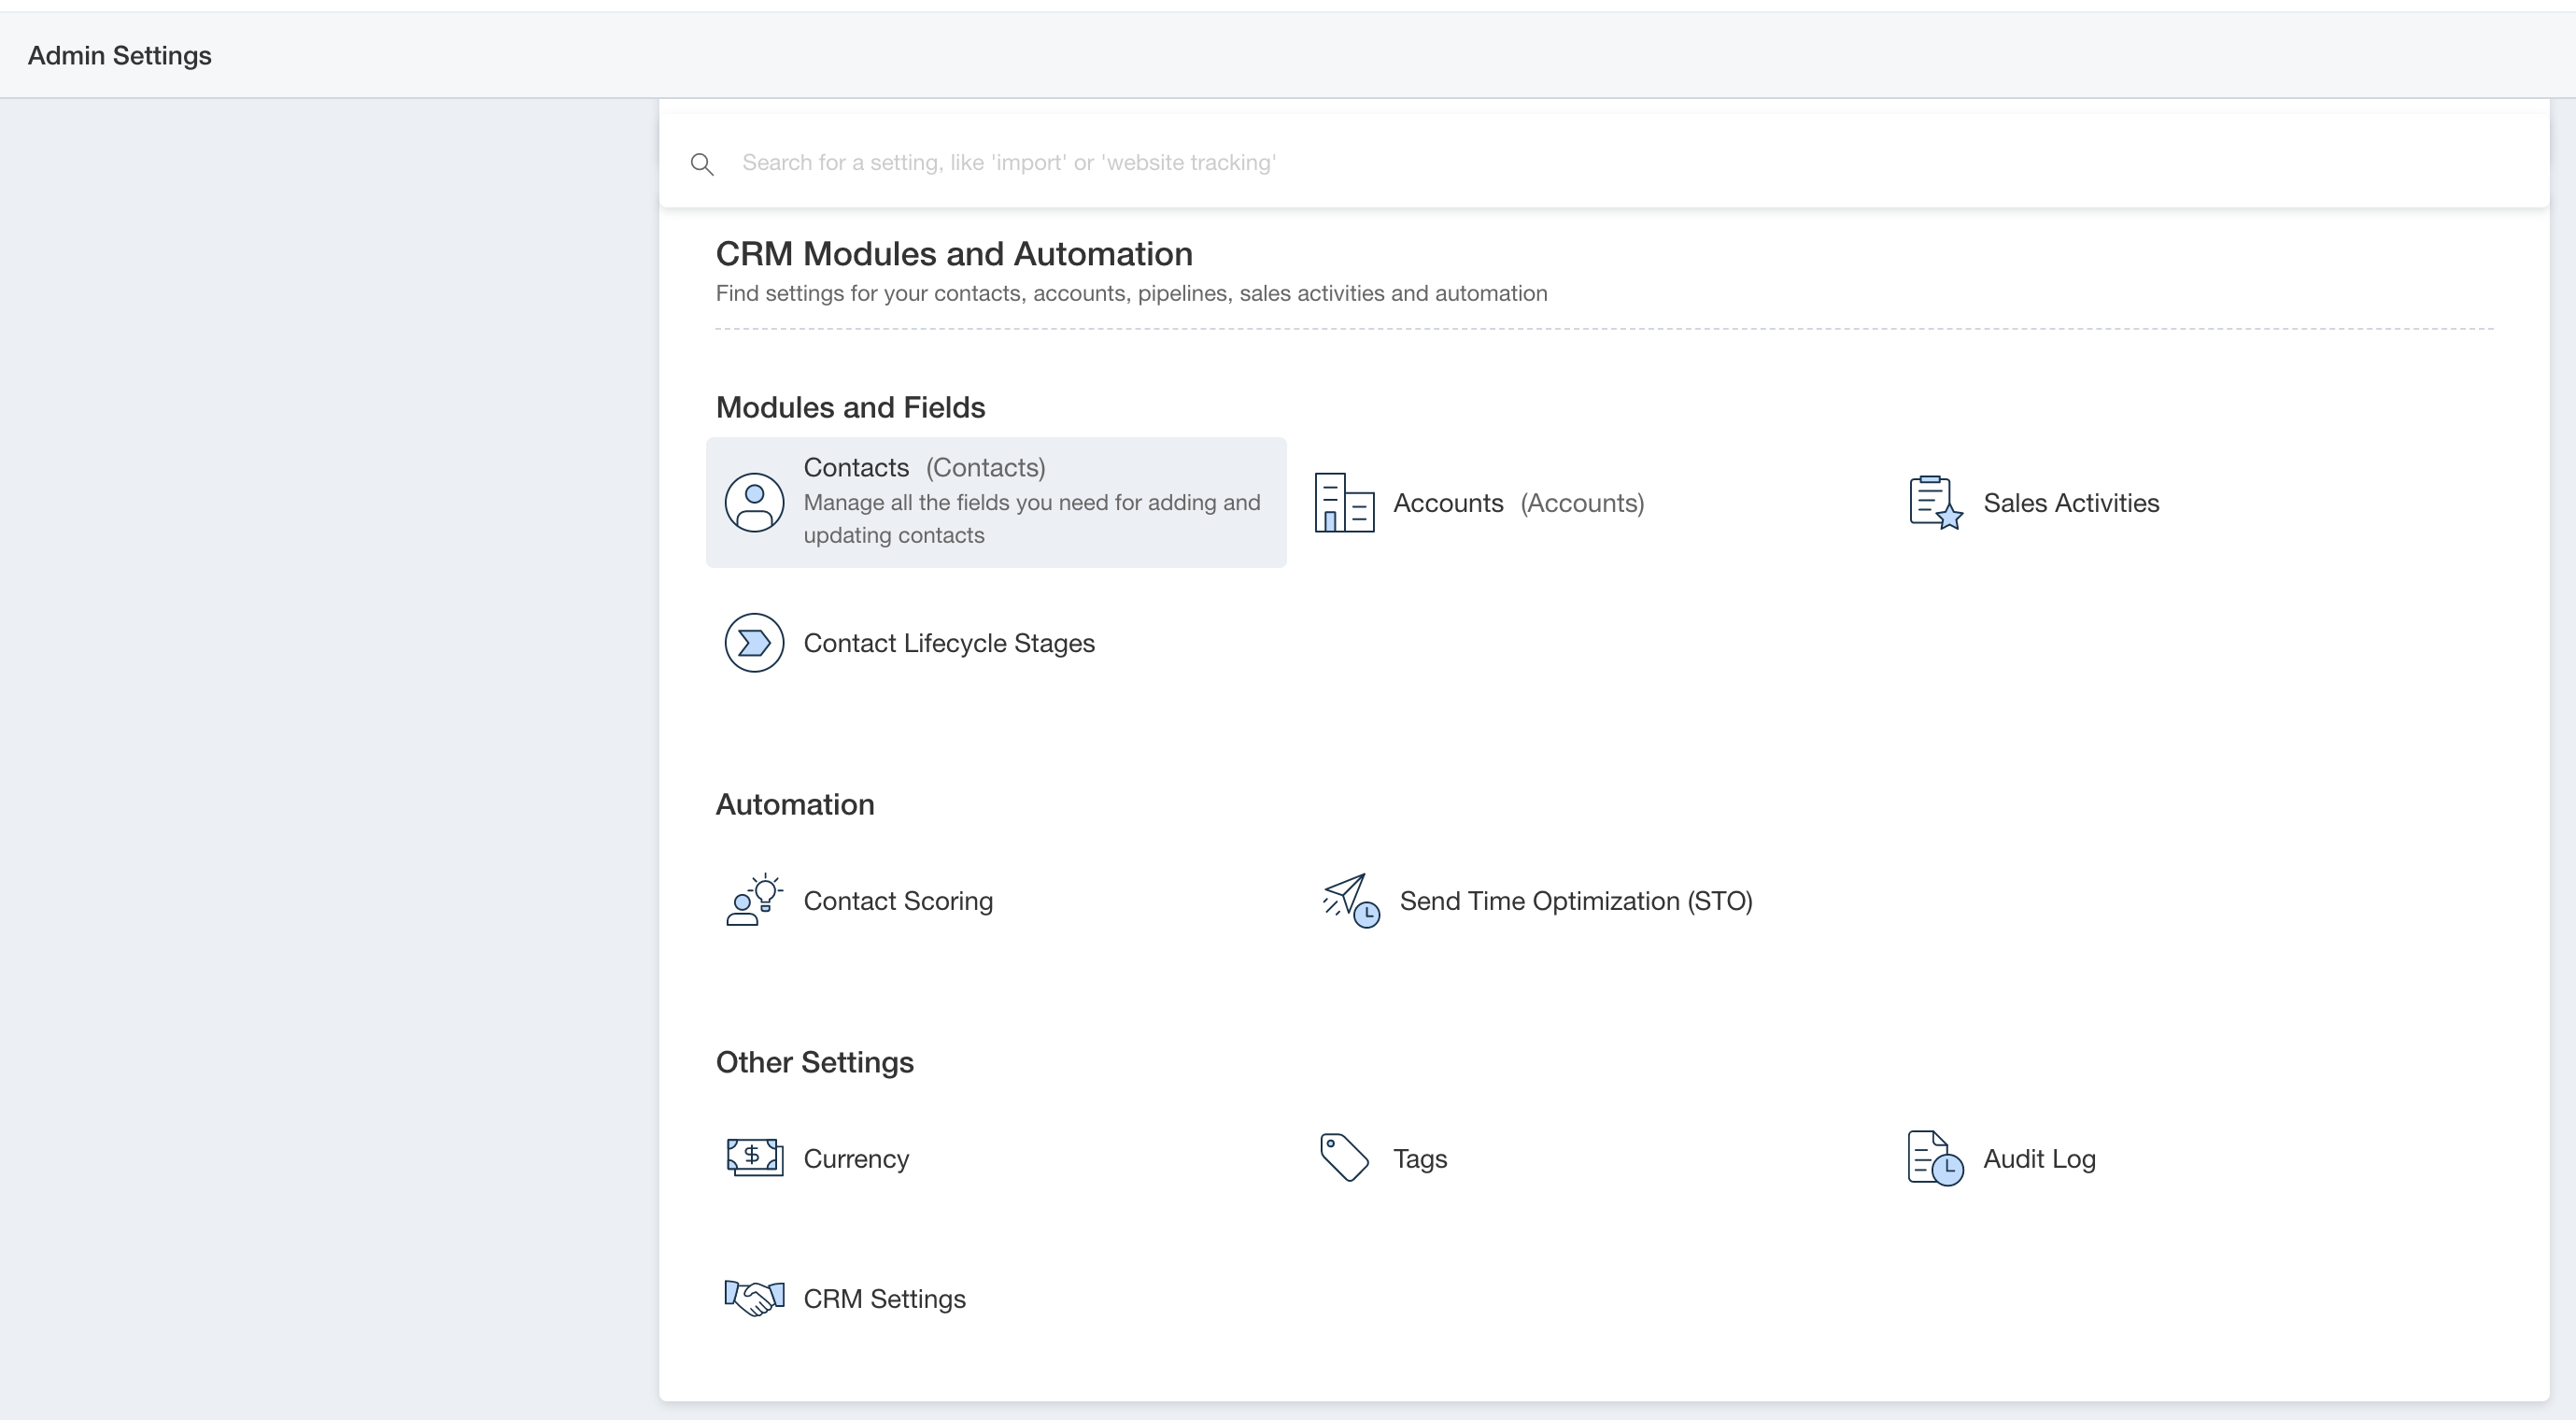
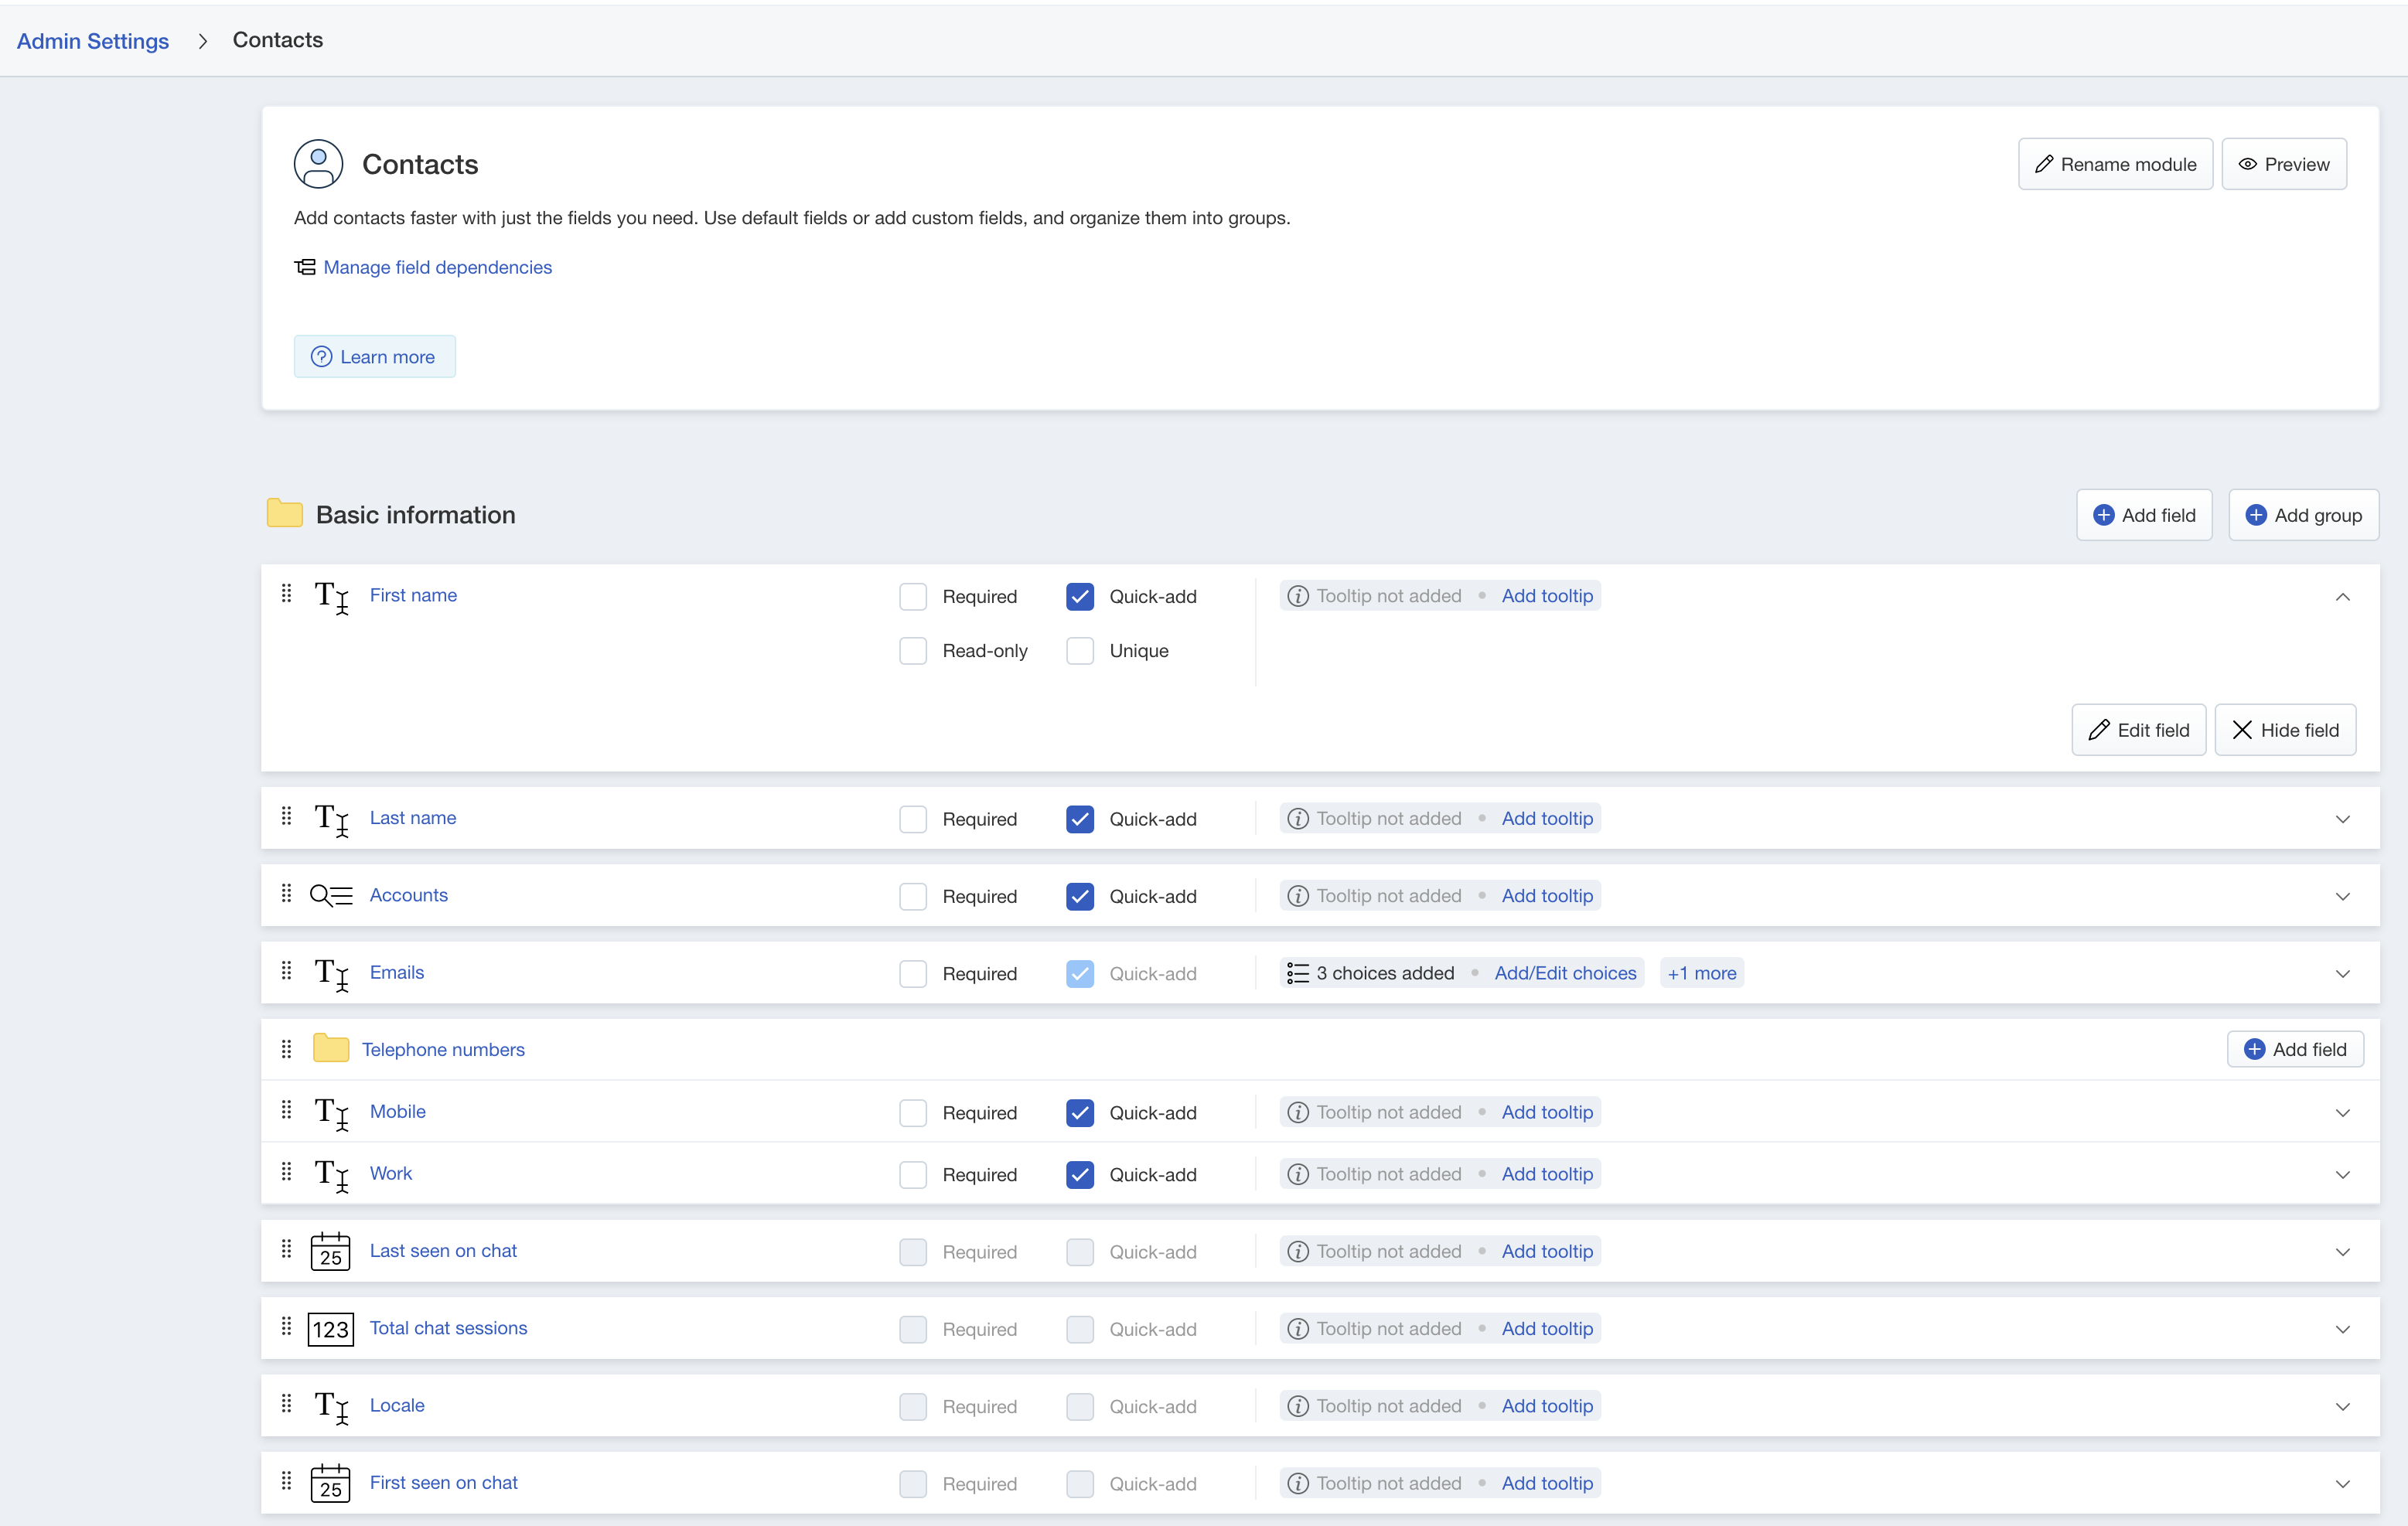
While passing the values during initialization in meta object (see code snippet below), use the respective "Internal name" field as seen in the screenshot below. By default, custom properties start with "cf_".
Note that any other fields passed as properties which are not in the CRM Contact properties already, they will be ignored.
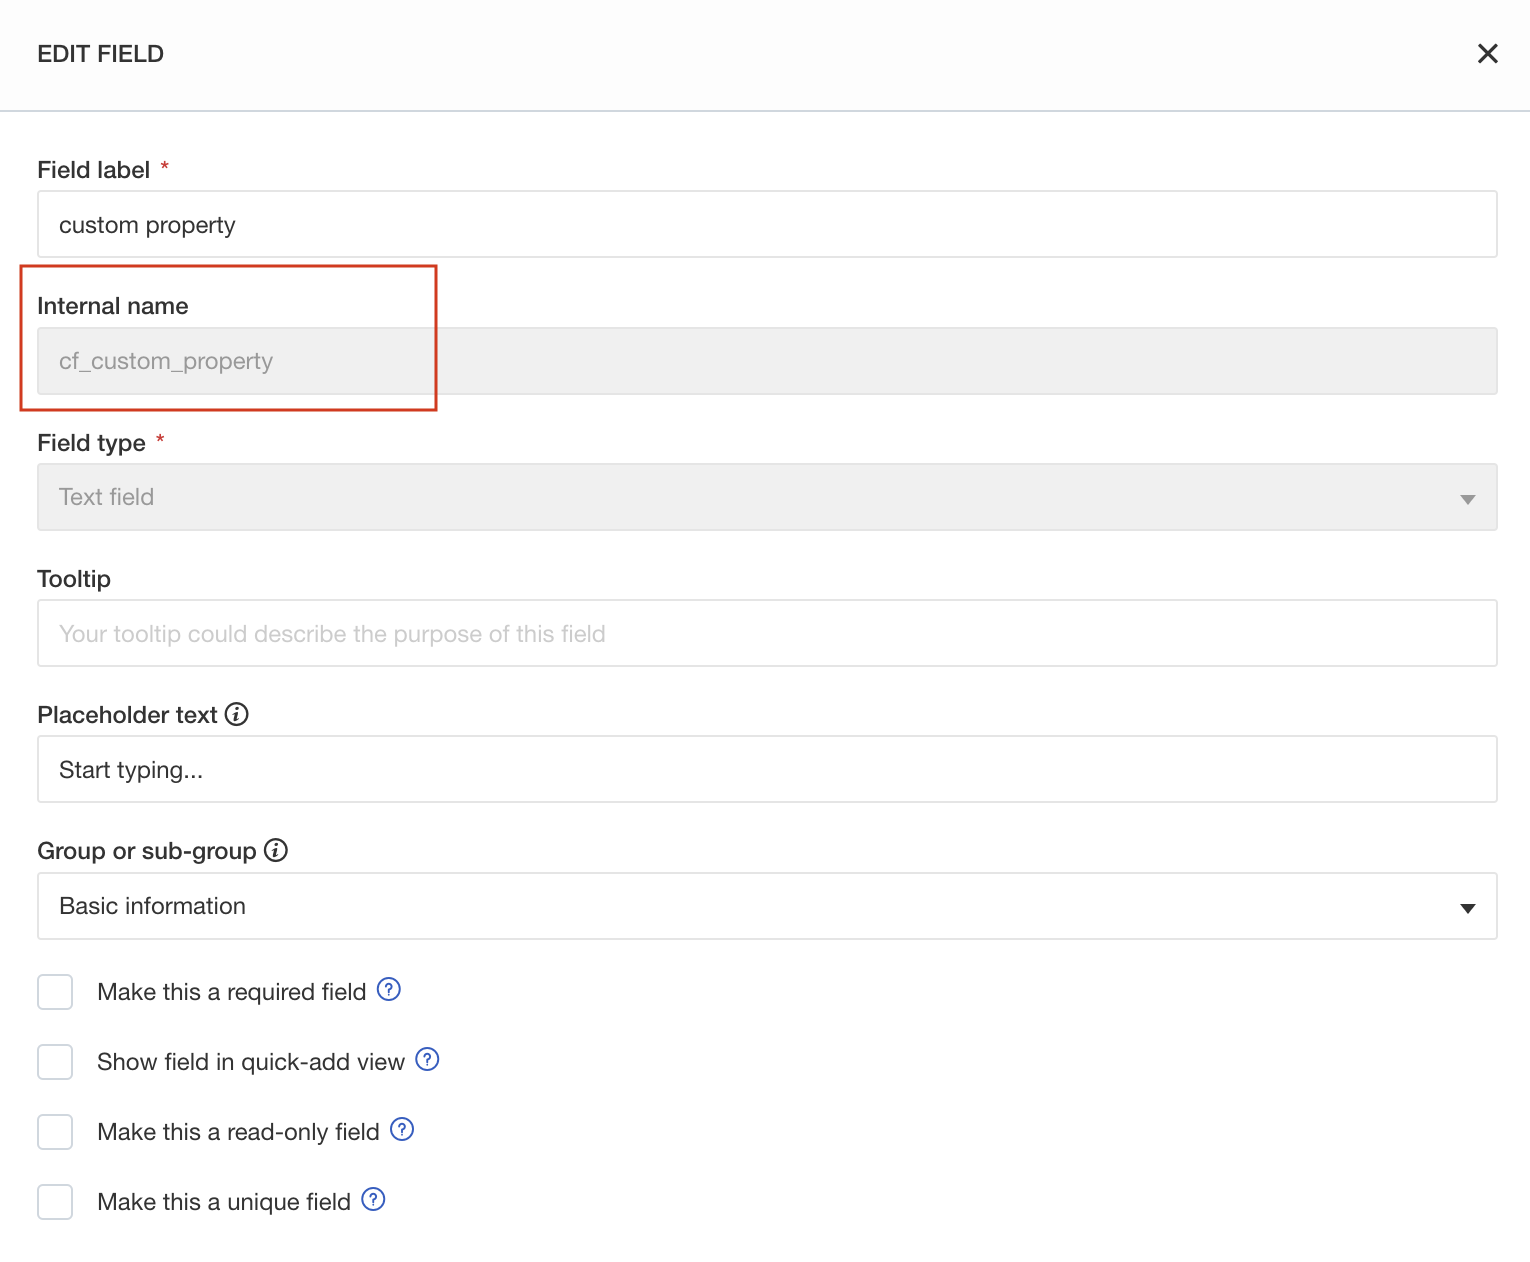
Sample code
1 2 3 4 5 6 7 8 9 10 11 12 13 | <script> window.fcWidgetMessengerConfig = { firstName: <fname>, lastName: <lname>, email: <email>, phone: <phone>, meta: { linkedin: <linkedin_data>, // Note that you can specify the "Internal name" (from CRM Contact page) for any property you would like to set cf_custom_property: <custom_property> } } </script> <script src='//fw-cdn.com/1*****7/2*****4.js' chat='true'></script> |
Setting Bot Variables
How to set custom bot variables using conversations widget
You can now send bot variables using the conversations widget. These properties are currently forwarded to bots which can internally use these properties to route the bot flows. You can also generate the bot conversation properties code from the widget embed page after saving the topics configured for the widget.
Usage:
Customers should provide a unique conversation property to the setProperties API.
Sample code
1 2 3 4 5 6 7 8 9 | <script src='//fm-staging-us-app-cdnjs.s3.amazonaws.com/crm/1400115213/****2.js' chat='true' > </script> <script> window.fwcrm.on('widget:loaded',function(){ window.fcWidget.conversation.setBotVariables({ status: "Active", //status property is passed to the widget }); }); </script> |
Setting Conversation Properties
How to set conversation properties via widget?
You can set values for all the custom properties through the widget. The various custom property types you can set are text, dropdown, number, decimal, date, checkbox, multiline text and multi select dropdown. Additionally, you can set the value for default field priority.
In case of multi select dropdown and dropdown, you can pass the label as the value.
Note: You can use this only if you signed up for Freshchat after “27th June, 2022”.
Sample code
1 2 3 4 5 6 7 8 9 10 11 12 13 14 15 16 17 18 | <script src='//fm-staging-us-app-cdnjs.s3.amazonaws.com/crm/900163811/49709.js' chat='true'> </script> <script> window.fwcrm.on('widget:loaded',function(){ window.fcWidget.conversation.setConversationProperties({ cf_sample: "Example", cf_multi_choice: ["Choice1","Choice2 one"], cf_multi_line_text: "This is a multiline text", cf_number: 33, cf_decimal: 3.5, cf_date: "2023-03-12", cf_checkbox: true, cf_drpdn: "one", priority: "Low" }); }); </script> |
Multilingual Configuration
Multi Language Support
Supported Languages
| Language Code | Language |
|---|---|
| ar | Arabic Language (RTL) |
| en | English |
| ca | Catalan |
| zh-HANS | Chinese (Simplified) |
| zh-HANT | Chinese (Traditional) |
| cs | Czech |
| da | Danish |
| nl | Dutch |
| de | German |
| et | Estonian |
| fi | Finnish |
| fr | French |
| hu | Hungarian |
| id | Indonesian |
| it | Italian |
| ko | Korean |
| lv | Latvian |
| nb | Norwegian |
| pl | Polish |
| pt | Portuguese |
| pt-BR | Portuguese - Brazil |
| ro | Romanian |
| ru | Russian |
| sk | Slovak |
| sl | Slovenian |
| es | Spanish |
| es-LA | Spanish - Latin America |
| sv | Swedish |
| th | Thai |
| tr | Turkish |
| uk | Ukrainian |
| vi | Vietnamese |
1. Configured Language
The highest priority is given to the language that is specified when the widget is initalized. This can be done when you add the Freshchat widget code. For instance, in the below code the key locale is used to set the language when the widget is initalized. For the sample code snippet please go here.
2. Default Language
The lowest priority is the Default Language which is set in your Freshchat account. If none of the three values below are not available Freshchat will automatically load the widget the default language. This will be the primary language that is specified on your Freshchat Account.
3. Operating System Language
If the browser language is not available, then the next step for fall back is the Operating System Language.
4. Browser Language
If there is no language specified on config, the widget will pick the browser language automatically. If there are multiple languages set on the browser it will take the primary language always.
Code to set Locale on Freshchat
Sample code
1 2 3 4 5 6 7 8 9 10 11 12 | <html> <head> <script src='//fw-cdn.com/1*****7/2*****4.js' chat='true'></script> </head> <body> <script> window.fcWidgetMessengerConfig = { locale: "fr" } </script> </body> </html> |
If you want the Freshchat widget's language to be changed dynamically based on user selection such as language dropdown, the locale has to be set when the dropdown is changed. You will have to use the command window.fcWidget.user.setLocale('en') to specify the language in that case. Please refer to the sample code below for better clarity.
Sample code
1 2 3 4 5 6 7 8 9 10 11 12 13 14 15 16 17 18 19 20 | <html> <head> <script src='//fw-cdn.com/1*****7/2*****4.js' chat='true'></script> </head> <body> <script> window.fcWidgetMessengerConfig = { //Widget aleady initalized without locale } </script> <script> //Consider a dropdown with id #lang-btn to select the language $('#lang-btn').on('change',function() { var selectedLanguage = jQuery(this).val(); //Setting the Widget Locale window.fcWidget.user.setLocale(selectedLanguage); }); </script> </body> </html> |
Tracking Custom Events
Freshchat allows you to track any events performed by your users. It can be anything, ranging from updating their profile picture to adding 5 items to the cart. You can use these events as context while engaging with the user. Events can also be used to set up triggered messages or to segment users for campaigns. Custom Events have an event name (like “Added to cart” or “Downloaded white paper”) and a list of event properties (like email, product name, price, or return date). Use properties to analyze your events via segments, marketing journeys or the activity timeline.
Note: Email address is mandatory for tracking custom events through CRM Tracking Code. Check the sample code below.
FM.trackCustomEvent(eventName, eventProperties)
Sample code
1 2 3 4 5 6 7 8 9 10 | <script> FM.trackCustomEvent("Added to cart", { "email": "david.thompson@sample.com", "price": 100.21, "currency": "USD", "is_mobile_transaction": true, "return date": "2019-12-30" }) </script> |
Messenger Events
Responses for the first 4 commands
| Properties | Type | Description |
|---|---|---|
| success | Boolean | TRUE - Success (200), FALSE - Error (Not 200) |
| status | Var | 1. 200 - Success 2. 400 - Backend Error 3. 401 - Init not called 4. 403 - ExternalId already used. Use clear() user method 5. 404 - Init not called / Restore ID is invalid |
| data | Object | 1. undefined - With 200 in status, user not created yet - Without 200 in status, error 2. { restoreId: <value> } Use to synchronise later |
1. widget:opened - Triggers when the widget opens
Sample code
1 2 3 4 5 6 7 8 9 10 11 | <script> window.fcSettings = { onInit: function() { window.fcWidget.on("widget:opened", function(resp) { console.log('Widget Opened'); //Function to do some task }); } } </script> <script src='//fw-cdn.com/1*****7/2*****4.js' chat='true'></script> |
2. widget:closed - Triggers when the widget close
Sample code
1 2 3 4 5 6 7 8 9 10 11 | <script> window.fcSettings = { onInit: function() { window.fcWidget.on("widget:closed", function(resp) { console.log('Widget Closed'); //Function to do some task }); } } </script> <script src='//fw-cdn.com/1*****7/2*****4.js' chat='true'></script> |
3. widget:loaded - Triggers when the widget loads
Alternatively you could also pass a callback function during Widget initialization, to subscribe to Widget loaded event. Pass the callback as a parameter to window.fcWidgetMessengerConfig = { onLoad: callback_function } for the same.
Sample code
1 2 3 4 5 6 7 8 9 10 11 | <script> window.fcSettings = { onInit: function() { window.fcWidget.on("widget:loaded", function(resp) { console.log('Widget Loaded'); //Function to do some task }); } } </script> <script src='//fw-cdn.com/1*****7/2*****4.js' chat='true'></script> |
4. user:created - Triggers when user is created
Sample code
1 2 3 4 5 6 7 8 9 10 11 | <script> window.fcSettings = { onInit: function() { window.fcWidget.on("user:created", function(resp) { console.log('User has been created'); //Function to do some task }); } } </script> <script src='//fw-cdn.com/1*****7/2*****4.js' chat='true'></script> |
5. unreadCount:notify - To check if there are unread messages
Usage
This event will give you the number of unread messages. Mostly used when the default Freshchat bubble is hidden and a custom button is used.
Sample code
1 2 3 4 5 6 7 8 9 10 | <script> window.fcSettings = { onInit: function() { window.fcWidget.on("unreadCount:notify", function(resp) { console.log(resp); }); } } </script> <script src='//fw-cdn.com/1*****7/2*****4.js' chat='true'></script> |
6. message:sent - Triggers when a message in sent from the Widget
Sample code
1 2 3 4 5 6 7 8 9 10 11 | <script> window.fcSettings = { onInit: function() { window.fcWidget.on("message:sent", function(data) { console.log('A message has been sent from the Widget', data); //Do something on message sent }); } } </script> <script src='//fw-cdn.com/1*****7/2*****4.js' chat='true'></script> |
7. message:received - Triggers when a message in received on the Widget
Sample code
1 2 3 4 5 6 7 8 9 10 11 | <script> window.fcSettings = { onInit: function() { window.fcWidget.on("message:received", function(data) { console.log('A message has been received on the Widget', data); //Do something on message received }); } } </script> <script src='//fw-cdn.com/1*****7/2*****4.js' chat='true'></script> |
8. csat:received - Triggers when a CSAT is received
Sample code
1 2 3 4 5 6 7 8 9 10 11 | <script> window.fcSettings = { onInit: function() { window.fcWidget.on("csat:received", function(data) { console.log('CSAT received', data); // Do something on CSAT recieved }); } } </script> <script src='//fw-cdn.com/1*****7/2*****4.js' chat='true'></script> |
9. csat:updated - Triggers when the recieved CSAT is updated
Sample code
1 2 3 4 5 6 7 8 9 10 11 | <script> window.fcSettings = { onInit: function() { window.fcWidget.on("csat:updated", function(data) { console.log('CSAT updated', data); // Do something on CSAT update }); } } </script> <script src='//fw-cdn.com/1*****7/2*****4.js' chat='true'></script> |
10. widget:destroyed - Triggers after the window.fcWidget.destroy() call is successful
window.fcWidget.destroy() is the method that is used to destroy an already loaded Widget. On successful removal of the Widget from the DOM, this event (widget:destroyed) would be published. Subscribe to this event to do any cleanup after the Widget is fully destroyed and removed.
Sample code
1 2 3 4 5 6 7 8 9 10 11 | <script> window.fcSettings = { onInit: function() { window.fcWidget.on("widget:destroyed", function() { console.log('After widget destroyed'); // Do some clean-up here }); } } </script> <script src='//fw-cdn.com/1*****7/2*****4.js' chat='true'></script> |
11. download:file - Triggers after the user downloaded an asset sent by the Agent
Sample code
1 2 3 4 5 6 7 8 9 10 11 12 | <script> window.fcSettings = { onInit: function() { window.fcWidget.on("download:file", function(response) { if (response.success) { console.log('File URL downloaded by User', response.data.url); } }); } } </script> <script src='//fw-cdn.com/1*****7/2*****4.js' chat='true'></script> |
12. user:cleared - Triggers after the user is cleared
Sample code
1 2 3 4 5 6 7 8 9 10 11 | <script> window.fcSettings = { onInit: function() { window.fcWidget.on("user:cleared", function() { // do some cleanup after user cleared console.log('User Cleared'); }); } } </script> <script src='//fw-cdn.com/1*****7/2*****4.js' chat='true'></script> |
13. dialog:opened - Triggers if a message was received when the widget was closed (minimized) and the message dialog window opened
Sample code
1 2 3 4 5 6 7 8 9 10 11 | <script> window.fcSettings = { onInit: function() { window.fcWidget.on("dialog:opened", function() { // Dialog opened console.log('Message Dialog Opened with message from Agent'); }); } } </script> <script src='//fw-cdn.com/1*****7/2*****4.js' chat='true'></script> |
14. dialog:closed - Triggers if the message dialog was closed
Sample code
1 2 3 4 5 6 7 8 9 10 11 | <script> window.fcSettings = { onInit: function() { window.fcWidget.on("dialog:closed", function() { // Dialog closed console.log('Message Dialog Closed by the User'); }); } } </script> <script src='//fw-cdn.com/1*****7/2*****4.js' chat='true'></script> |
15. conversation:resolved - Triggers when a conversation is resolved
Sample code
1 2 3 4 5 6 7 8 9 10 11 | <script> window.fcSettings = { onInit: function() { window.fcWidget.on("conversation:resolved", function() { console.log('Conversation is resolved', data); // Do something on conversation resolution }); } } </script> <script src='//fw-cdn.com/1*****7/2*****4.js' chat='true'></script> |
Messenger API
1. window.fcWidget.isOpen()
To check whether the Freshchat Widget is open.
Sample code
1 2 3 4 5 6 7 8 9 10 11 12 13 14 15 16 | <script> window.fcSettings = { onInit: function() { //Returns the current window state of the freshchat widget in boolean. //TRUE - Opened / FALSE - Closed jQuery('#myDiv').on('click',function(event, data) { if (window.fcWidget.isOpen() != true) { window.fcWidget.open(); //Or do something else :) } }); } } </script> <script src='//fw-cdn.com/1*****7/2*****4.js' chat='true'></script> </script> |
2. window.fcWidget.open(payload)
Opens the Freshchat Widget with optional parameters including topic id or name.
The replyText parameter can be used to set up custom text in the text area of the widget.
Sample code
1 2 3 4 5 6 7 8 9 10 11 12 13 14 15 16 | <script> window.fcSettings = { onInit: function() { if (window.location.href.indexOf('cart') != -1) { window.fcWidget.open({ name: "Checkout", replyText: "Thank you for the help." }); //Do Something } else { window.fcWidget.open({ name: "Support", replyText: "Thank you for the help" }); //Do Something Else } } } </script> <script src='//fw-cdn.com/1*****7/2*****4.js' chat='true'></script> </script> |
3. window.fcWidget.close()
Closes the Freshchat Widget.
Sample code
1 2 3 4 5 6 7 8 9 10 11 12 13 | <script> window.fcSettings = { onInit: function() { //On click of a button, close the widget. jQuery('.close_btn').on('click',function() { window.fcWidget.close(); //Do something. }); } } </script> <script src='//fw-cdn.com/1*****7/2*****4.js' chat='true'></script> </script> |
4. window.fcWidget.isInitialized()
To check if the Freshchat Widget has already been initialised.
Sample code
1 2 3 4 5 6 7 8 9 10 11 12 13 14 15 16 17 | <script> window.fcSettings = { onInit: function() { //Returns TRUE if the init method is already called else returns FALSE if (window.fcWidget.isInitialized() == true) { console.log('Widget already initialised'); //Do Something } else { console.log('Widget Not Initialised'); //Do Something Else } } } </script> <script src='//fw-cdn.com/1*****7/2*****4.js' chat='true'></script> </script> |
5. window.fcWidget.isLoaded()
To check if the Freshchat widget has completed loading.
Sample code
1 2 3 4 5 6 7 8 9 10 11 12 13 14 15 16 17 | <script> window.fcSettings = { onInit: function() { //Returns TRUE if widget has completed loading else returns FALSE if (window.fcWidget.isLoaded() == true) { console.log('Widget already loaded'); //Do Something } else { console.log('Widget Not Loaded'); //Do Something Else } } } </script> <script src='//fw-cdn.com/1*****7/2*****4.js' chat='true'></script> </script> |
6. window.fcWidget.destroy()
Removes the widget. Widget will have to be re-initalized again to be shown.
Sample code
1 2 3 4 5 6 7 8 9 10 11 12 13 14 15 16 | <script> window.fcSettings = { onInit: function() { //Check if user is logging out. if (window.location.href.indexOf('logout') != -1) { window.fcWidget.destroy(); //Do Something } else { //Do Something Else } } } </script> <script src='//fw-cdn.com/1*****7/2*****4.js' chat='true'></script> </script> |
7. window.fcWidget.hide()
Hides the widget if it is visible.
Sample code
1 2 3 4 5 6 7 8 9 | <script> window.fcSettings = { onInit: function() { window.fcWidget.hide(); } } </script> <script src='//fw-cdn.com/1*****7/2*****4.js' chat='true'></script> </script> |
8. window.fcWidget.show()
Shows the widget if it is hidden.
Sample code
1 2 3 4 5 6 7 8 9 | <script> window.fcSettings = { onInit: function() { window.fcWidget.show(); } } </script> <script src='//fw-cdn.com/1*****7/2*****4.js' chat='true'></script> </script> |
9. window.fcWidget.setExternalId()
Set the External ID dynamically. Check the 'Restoring a User' section
Sample code
1 2 3 4 5 6 7 8 9 | <script> window.fcSettings = { onInit: function() { window.fcWidget.setExternalId('externalId'); } } </script> <script src='//fw-cdn.com/1*****7/2*****4.js' chat='true'></script> </script> |
10. window.fcWidget.setConfig(payload)
The init payload can be set dynamically using this API if the Widget is already inited using window.fcWidget.init()
Sample code
1 2 3 4 5 6 7 8 9 | <script> window.fcSettings = { onInit: function() { window.fcWidget.setConfig(payload); } } </script> <script src='//fw-cdn.com/1*****7/2*****4.js' chat='true'></script> </script> |
11. window.fcWidget.trackPage(url, title)
This API can be used to track the different page visits done by the User. Call this API with the url and title
Sample code
1 2 3 4 5 6 7 8 9 | <script> window.fcSettings = { onInit: function() { window.fcWidget.trackPage(url, title); } } </script> <script src='//fw-cdn.com/1*****7/2*****4.js' chat='true'></script> </script> |
User API
1. window.fcWidget.user.get() - Get User Promise
Response
| Properties | Type | Description |
|---|---|---|
| success | Boolean | TRUE - Success (200), FALSE - Error (Not 200) |
| status | Var | 1. 200 - Success 2. 401 - User not created |
Sample code
1 2 3 4 5 6 7 8 9 10 11 12 13 | <script> window.fcSettings = { onInit: function() { //After Widget Open/Init or loaded, getting User. window.fcWidget.user.get().then(function(result) { console.log(result); var userInfo = result.data; //Do Something }); } } </script> <script src='//fw-cdn.com/1*****7/2*****4.js' chat='true'></script> |
2. window.fcWidget.user.create(payload, callback) - Create User if it doesn't exist
Response
| Properties | Type | Description |
|---|---|---|
| success | Boolean | TRUE - Success (200), FALSE - Error (Not 200) |
| status | Var | 1. 200 - Success 2. 401 - User not created 3. 403 - User exists. Use clear() user method 4. 404 - Init not called |
Sample code
1 2 3 4 5 6 7 8 9 10 11 12 13 14 15 16 17 18 19 | <script> window.fcSettings = { onInit: function() { window.fcWidget.user.create({ firstName: 'John', lastName: 'Doe', email: 'name@company.com', meta: { userproperty1: 'value', userproperty2: 'value', userproperty3: 'value' } }, function(data) { console.log('User created', data) }) } } </script> <script src='//fw-cdn.com/1*****7/2*****4.js' chat='true'></script> |
3. window.fcWidget.user.update(payload) - Update User Promise
Response
| Properties | Type | Description |
|---|---|---|
| success | Boolean | TRUE - Success (200), FALSE - Error (Not 200) |
| status | Var | 1. 200 - Success 2. 401 - User not created 3. 400 - Backend error |
Sample code
1 2 3 4 5 6 7 8 9 10 11 12 13 14 15 16 17 18 19 | <script> window.fcSettings = { onInit: function() { window.fcWidget.user.update({ firstName: 'John', lastName: 'Doe', email: 'name@company.com', meta: { userproperty1: 'value', userproperty2: 'value', userproperty3: 'value' } }).then(function(response) { console.log(response); } } } </script> <script src='//fw-cdn.com/1*****7/2*****4.js' chat='true'></script> |
4. window.fcWidget.user.clear() - Clear User Promise
Response
| Properties | Type | Description |
|---|---|---|
| success | Boolean | TRUE - Success (200), FALSE - Error (Not 200) |
| status | Var | 1. 200 - Success 2. 401 - User not created 3. 400 - Backend error 4. 404 - Init not called |
Sample code
1 2 3 4 5 6 7 8 9 10 11 12 | <script> window.fcSettings = { onInit: function() { window.fcWidget.user.clear().then(function() { console.log('User cleared'); }, function() { console.log("User Not cleared"); }); } } </script> <script src='//fw-cdn.com/1*****7/2*****4.js' chat='true'></script> |
5. window.fcWidget.user.isExists() - User exists Promise
Response
| Properties | Type | Description |
|---|---|---|
| success | Boolean | TRUE - Success (200), FALSE - Error (Not 200) |
| status | Var | 1. 200 - Success getting data 2. 401 - User 3. 400 - Backend error 4. 404 - Init not called |
| data | Boolean | true or false depening on whether a user is created on Freshchat end |
Sample code
1 2 3 4 5 6 7 8 9 10 11 12 | <script> window.fcSettings = { onInit: function() { window.fcWidget.user.isExists().then(function(data) { console.log('User data', data); }, function() { console.log("Error fetching user); }); } } </script> <script src='//fw-cdn.com/1*****7/2*****4.js' chat='true'></script> |
Domain Whitelisting
Enable Freshchat only in certain Domains
If you would like to restrict showing the Freshchat Widget only on specific domains, please reach out to support@freshchat.com with details of your account and the list of domains to whitelist.
JWT Authentication
Enabling user authentication using JSON Web Token
Freshchat uses JSON Web Token (JWT) to allow only authenticated users to initiate a conversation with you through the Freshchat messenger. Freshchat sends a callback (along with the user’s authentication status) to let you know about any event with respect to the messenger and user’s authentication status.
Once the user gets authenticated on your system and tries to initiate a conversation, your system communicates the encrypted key to Freshchat to allow or restore conversations. This way, the authenticated user can engage in a secure conversation until the end of a session. This will also prevent any third party from impersonating your users.
As a first step towards enabling JWT Authentication for users, please contact support@freshchat.com to convert your freshchat account to a JWT enabled account
Overview of JWT user authentication in Freshchat
Once you enable user authentication for a particular user, an encrypted key is generated from your end and passed on to Freshchat. Subsequently, whenever the user logs into your system and initiates a conversation on Freshchat, Freshchat receives an encrypted SSH-keygen command to decrypt the authentication information, and thereby allow authenticated users to continue the conversation.
What happens during JWT user authentication
1. A user tries to initiate a chat session by clicking on the chat widget.
2. Freshchat requests a signed JWT token containing user data from your API (encrypted with the public key).
3. Freshchat then initializes the chat by passing along the JWT token to the FreshChat API
4. FreshChat API receives the token, parses the user details from the JWT payload and then grants the user a chat session.
Enabling JWT User Authentication
Let us look at how to enable JWT Authentication for Web and Mobile usecases:
Web Application
Freshchat lets you decide what kind of users (logged-in/logged-out) can be allowed to initiate a chat with you. The information required by Freshchat for logged-in users is different from logged-out users. Let’s look at both the processes separately.
Logged-in users
When a logged-in user initiates chat, Freshchat will require the ReferenceID and JWT token from your end.
Freshchat checks if the ReferenceID is present for a user. Based on this, the JWT token generated by you will be shared with the Freshchat messenger through init using a placeholder.
The JWT token will be decrypted to authenticate the user and restore their conversations.
If authentication fails, Freshchat will continue to re-authenticate the user (this re-authentication depends on the time set by you and can be limited from your end by customizing the code and adding a timer or a loop limiter to the code).
Each time the page is refreshed after re-authentication fails, init will be called automatically and Freshchat will try to re-authenticate the user(again, the number of times can be limited by Customer).
Logged-out users
These are unidentified users for whom a ReferenceID will not be available. So, based on the code, Freshchat will be calling init, while simultaneously calling authenticateUser(data).
This, in turn, will get the universally unique identifier (UUID) from Freshchat messenger, using window.fcWidget.user.getUUID(), which will be signed in your backend.
The signed UUID will be used by window.fcWidget.authenticate(signedUUID); to authenticate the user.
Once the user is authenticated, the conversation screen will load.
If the user is not authenticated, re-authentication will be attempted each time a new JWT is generated.
Mobile Application
When a user initiates chat, Freshchat.getFreshchatUserId() is called and the UUID gets returned.
The UUID is then sent to your backend.
Your application backend should generate JWT with UUID and the ReferenceID.
Your mobile App gets the token and checks Freshchat.getUserIdTokenStatus().
If the status of the token ID is set, then Freshchat authenticates the user and restores the conversation. If not, it calls Freshchat.setUserWithIdToken(Token).
A token that does not have a Reference ID & UUID will be rejected. If a user with a given Reference ID is found, the user is updated with details from the token and conversations get restored on the SDK screen. If no user is found with the Reference ID, the user will be created when they send in a message.
Technical Implementation
This section is for the team in the company responsible for the companys JWT authentication system. It provides details about the Freshchat JWT User authentication implementation.
JWT Algorithm
Specify RS256 as the JWT algorithm in the header of your JWT payload
JWT Attributes
Send attributes to Freshchat as a base64-encoded hash (Ruby) or dictionary (Python). Example using Ruby:
Freshchat requires a reference-id to uniquely identify the user from your system. Beyond the required attributes listed below, you may optionally send additional user profile data. This data is synced between your user management system and Freshchat.
Freshchat_uuid is an ID generated by the Freshchat SDK/WebWidget, to be invoked by the integrating website/mobile app and to be included in the generation of the JWT for the user.
- iat
- Reference_id
- freshchat_uuid
- first_name
- last_name
- phone_number
Generating SSH key
Key generation command on Linux and Mac OSX
We use the ssh-keygen command to generate an RSA public key private key pair with 2048 bits as key size and admin email id as the comment.
The ssh-keygen command is part of the OpenSSH suite available form https://www.openssh.com. Download and install OpenSSH for your respective OS if you dont have it installed already
Parameters to be sent in JWT Token:
Logged-in Users
reference_id is provided by the customer and is used to restore the conversation. Only freshchat_identifier and signature are mandatory
Logged-out Users
Sample code
1 2 3 4 5 6 7 8 9 10 11 12 13 14 15 16 17 18 19 20 21 22 23 24 25 26 27 28 29 30 31 32 33 34 35 36 37 38 39 40 41 42 43 44 45 46 47 48 49 50 51 52 53 54 55 56 57 58 59 60 61 62 63 64 65 66 67 68 69 70 71 72 73 74 75 76 77 78 79 80 81 82 83 84 85 86 87 88 89 90 91 92 93 94 | <html> <body> <script> window.fcSettings = { onInit: function(){ function authenticateUser(userData) { let authenticateCB = (uuid) => { // Signed UUID Hardcoded. Call Customer backend and generate the signed uuid from uuid let signedUUID = "eyJhbGciOiJSUzI1NiIsInR5cCI6IkpXVCJ9.eyJzdWIiOiIxMjM0NTY3ODkwIiwibmFtZSI6IkpvaG4gRG9lIiwiYWRtaW4iOnRydWUsImlhdCI6MTUxNjIzOTAyMn0.TCYt5XsITJX1CxPCT8yAV-TVkIEq_PbChOMqsLfRoPsnsgw5WEuts01mq-pQy7UJiN5mgRxD-WUcX16dUEMGlv50aqzpqh4Qktb3rk-BuQy72IFLOqV0G_zS245-kronKb78cPN25DGlcTwLtjPAYuNzVBAh4vGH**********"; window.fcWidget.authenticate(signedUUID); }; if (userData && userData.freshchat_uuid) { authenticateCB(userData.freshchat_uuid); } else { // Generate UUID and create new user window.fcWidget.user.getUUID().then((resp) => { let uuid = resp && resp.data && resp.data.uuid; if (uuid) { authenticateCB(uuid); } }); } } window.fcWidget.on("frame:statechange", function(data) { if (data.success === false && data.data.frameState === "not_authenticated") { authenticateUser(data); } }); window.fcWidget.on("user:statechange", function(data) { if (data.success) { let userData = data.data; // authenticate user success if (userData) { if (userData.userState === "authenticated") { console.log("User Authenticated"); } if (userData.userState === "created") { console.log("User Created"); } if (userData.userState === "loaded") { console.log("User Loaded"); } if (userData.userState === "identified") { console.log("User Identified"); } if (userData.userState === "restored") { console.log("User Restored"); } } } else { let userData = data.data; if (userData) { if (userData.userState === "not_loaded" || userData.userState === "unloaded" || userData.userState === "not_created" || userData.userState === "not_authenticated") { authenticateUser(userData); } } } }); } } var userReferenceId; // Call Customer backend and get the user reference id // If user exists in Customer database if (userReferenceId) { // Call Customer backend and get the signature for userReferenceId window.fcWidgetMessengerConfig = { jwtAuthToken: "XYZ.ABC.DEF" // Placeholder for signature. Use the generated one from backend which includes reference_id & user properties } # Append the CRM Tracking Code Dynamically var script = document.createElement('script'); script.src = '//fw-cdn.com/1*****7/2*****4.js'; // Replace this placeholder string from your account. Go to Admin Settings > Chat Widget Customization > Web (Embed Code) script.setAttribute('chat', 'true'); document.body.appendChild(script); } else { # Append the CRM Tracking Code Dynamically var script = document.createElement('script'); script.src = '//fw-cdn.com/1*****7/2*****4.js'; // Replace this placeholder string from your account. Go to Admin Settings > Chat Widget Customization > Web (Embed Code) script.setAttribute('chat', 'true'); document.body.appendChild(script); } </script> </body> </html> |
Custom JS functions
JS Functions in Conversation widget
You can now use custom JS functions to trigger an external action in your bot flows. These widget actions need to be configured in the bot builder and be part of your regular bot flows.
Example: Let's say your business is location-based, so you want to display the nearest store to your customers or you want to check if you deliver to their location, you can get the location based on their browser data to personalize the customer experience
Known limitations:
Returning value from asynchronous function is not supported.
eg: Trying to return value from a promise will return an empty object.
Custom functions can not be bot specific in Freshchat
Since the widget is on account level, we cannot define custom functions for a specific bot. If you have multiple bots with custom functions defined for each bot, you need to define all the functions in the widget script. Also, each bot should have a unique function name otherwise other bot will use the same JS function.
Sample code
1 2 3 4 5 6 7 8 9 10 11 12 13 | <script src='//fm-staging-us-app-cdnjs.s3.amazonaws.com/crm/1400115213/****2.js' chat='true' /> <script> window.fcWidgetMessengerConfig = { jsFunctions: { getEmail(params) { return "i am message"; }, sendEmail(params) { return "i am " + params.email; } } }; </script> |