Overview
Freshchat now lets you embed a widget in any site - the Web Messenger. The Web Messenger lets you engage with and manage queries from your website visitors - both anonymous and logged in users. It will appear as a widget on the bottom right corner of your web page. Every message that comes in from the Web Messenger will be treated as a separate conversation in the Freshchat inbox.
Setup
Get widget code:
- Log in to your Freshchat account as Admin
- Go to Settings
- Choose Web Messenger
- You will be directed to the Web Messenger settings page under the Getting Started tab.
- To chat with your website visitors, you will have to embed the widget on your website
- Copy the JavaScript code snippet before the </body> tag on every page to initialize the Web Messenger widget on your website
Multiple Sites
Using the same Freshchat account on multiple sites
Sample code
1 2 3 4 5 6 7 8 9 10 | <!-- Head --> <script src="https://wchat.freshchat.com/js/widget.js"></script> <!-- Head --> <script> window.fcWidget.init({ token: "WEB_CHAT_TOKEN", host: "https://wchat.freshchat.com", siteId: "UNIQUE_SITE_ID" }); </script> |
Anonymous User
FRESHCHAT WEB MESSENGER FOR LOGGED OUT / ANONYMOUS USERS:
Sample code
1 2 3 4 5 6 7 8 9 | <!-- Head --> <script src="https://wchat.freshchat.com/js/widget.js"></script> <!-- Head --> <script> window.fcWidget.init({ token: "WEB_CHAT_TOKEN", host: "https://wchat.freshchat.com" }); </script> |
Logged in User
FRESHCHAT WEB MESSENGER FOR LOGGED IN USERS:
Note: The example user data has to be replaced with real data that helps in getting actual user information on all of your web pages.
Sample code
1 2 3 4 5 6 7 8 9 10 11 12 13 14 15 | <!-- Head --> <script src="https://wchat.freshchat.com/js/widget.js"></script> <!-- Head --> <script> window.fcWidget.init({ token: "WEB_CHAT_TOKEN", host: "https://wchat.freshchat.com", externalId: "john.doe1987", // user’s id unique to your system firstName: "John", // user’s first name lastName: "Doe", // user’s last name email: "john.doe@gmail.com", // user’s email address phone: "8668323090", // phone number without country code phoneCountryCode: "+1" // phone’s country code }); </script> |
Restoring a User
You can restore user conversations for logged in users, every time they initiate a conversation from a different browser or device. To do so, for every user, an unique external ID and restore ID has to be defined.
Two attributes needed to restore a user conversation,
- External ID - The external ID has to be unique to each logged in user. This information should be passed to Freshchat from your side. For example, user email ID can be an external ID.
- Restore ID - This will be created by Freshchat when a logged in user (from the customer’s website) initiates a conversation on Freshchat messenger for the first time. Restore ID is also unique to each created user. This ID will be passed to your website on the user creation callback function. You have to store this ID in your database, once it is passed by Freshchat. The next time the website user pings using the Freshchat messenger from a different browser or mobile app, this restore ID, along with the external ID must be passed from your side to Freshchat for the user conversation to be restored. Otherwise every conversation initiated by the user on a new / fresh browser session will create a new user and the conversation history will be lost.
Steps:
1. Paste the entire script from below on your website.
Note: Restore ID won’t be available when a website user logs in for the first time. It gets created only after a user initiates a conversation on the Freshchat messenger for the first time.
2. Define external ID. This step is mandatory.
Note: External ID should be unique for each user. Example: Email ID of each user can be defined as their external ID.
3. init() and fcWidget.user.get() start running when a user logs in for the first time on your website.
4. When a logged in user sends a message on Freshchat messenger for the first time, the user gets created in Freshchat, with information from fcWidget.user.setProperties() and call back function for user creation runs.
5. Parallely, restore ID is created in Freshchat for that user and will be available on fcWidget.on(‘user created’) event.
6. In if (data.restoreId) condition, add your code to save the restore ID from Freshchat to your database.
7. When a user starts a conversation from a different browser or device next time, restore ID should be fetched from your database and sent to Freshchat, to restore user conversation. To do this, you have to add code which fetches the restore ID from your database before init().
8. Finally, pass this restore ID to Freshchat in init().
Sample code
1 2 3 4 5 6 7 8 9 10 11 12 13 14 15 16 17 18 19 20 21 22 23 24 25 26 27 28 29 30 31 32 33 34 35 | <script src="https://wchat.freshchat.com/js/widget.js" async></script> <script> var restoreId = RESTOREID //Which need to be fetched from your DB window.fcWidget.init({ token: "WEB_CHAT_TOKEN", host: "https://wchat.freshchat.com", externalId: '1234567', restoreId: restoreId ? restoreId : null }); window.fcWidget.user.get(function(resp) { var status = resp && resp.status, data = resp && resp.data; if (status !== 200) { window.fcWidget.user.setProperties({ firstName: "John", // user's first name lastName: "Doe", // user's last name email: "john.doe@gmail.com", // user's email address phone: "8668323090", // phone number without country code phoneCountryCode: "+1", // phone's country code plan: "Estate", // user's meta property 1 status: "Active", // user's meta property 2 "Last Payment": "12th August" // user's meta property 3 }); window.fcWidget.on('user:created', function(resp) { var status = resp && resp.status, data = resp && resp.data; if (status === 200) { if (data.restoreId) { // Update restoreId in your database } } }); } }); </script> |
Setting User Properties
window.fcWidget.user.setProperties()
Use this command to set user properties on Freshchat for users.
Response
| Properties | Type | Description |
|---|---|---|
| success | Boolean | TRUE - Success (200), FALSE - Error (Not 200) |
| status | Var | 1. 200 - Success 2. 401 - User not created 3. 400 - Backend error |
Sample code
1 2 3 4 5 6 7 8 9 10 11 12 | <script> window.fcWidget.user.setProperties({ firstName: <fname>, lastName: <lname>, email: <email>, phone: <phone>, phoneCountry: <country_code>, "plan": "Estate", "status": "Active", "Last Payment": "12th August" }); </script> |
Setting User Events
Events
Freshchat allows you to track any events performed by your users. It can be anything, ranging from updating their profile picture to adding 5 items to the cart. You can use these events as context while engaging with the user. Events can also be used to set up triggered messages or to segment users for campaigns.
window.fcWidget.track(eventName, payload)
Sample code
1 2 3 4 5 6 7 8 9 10 | <script> //After Page and Widget is Loaded. //Check if widget is loaded using the isLoaded Condition //Event name add_to_cart can also be set to your preference. window.fcWidget.track('add_to_cart', { //Key and value can be anything relatable to your web app. cartValue: 5000, lastItemCategory: 'electronics' }); </script> |
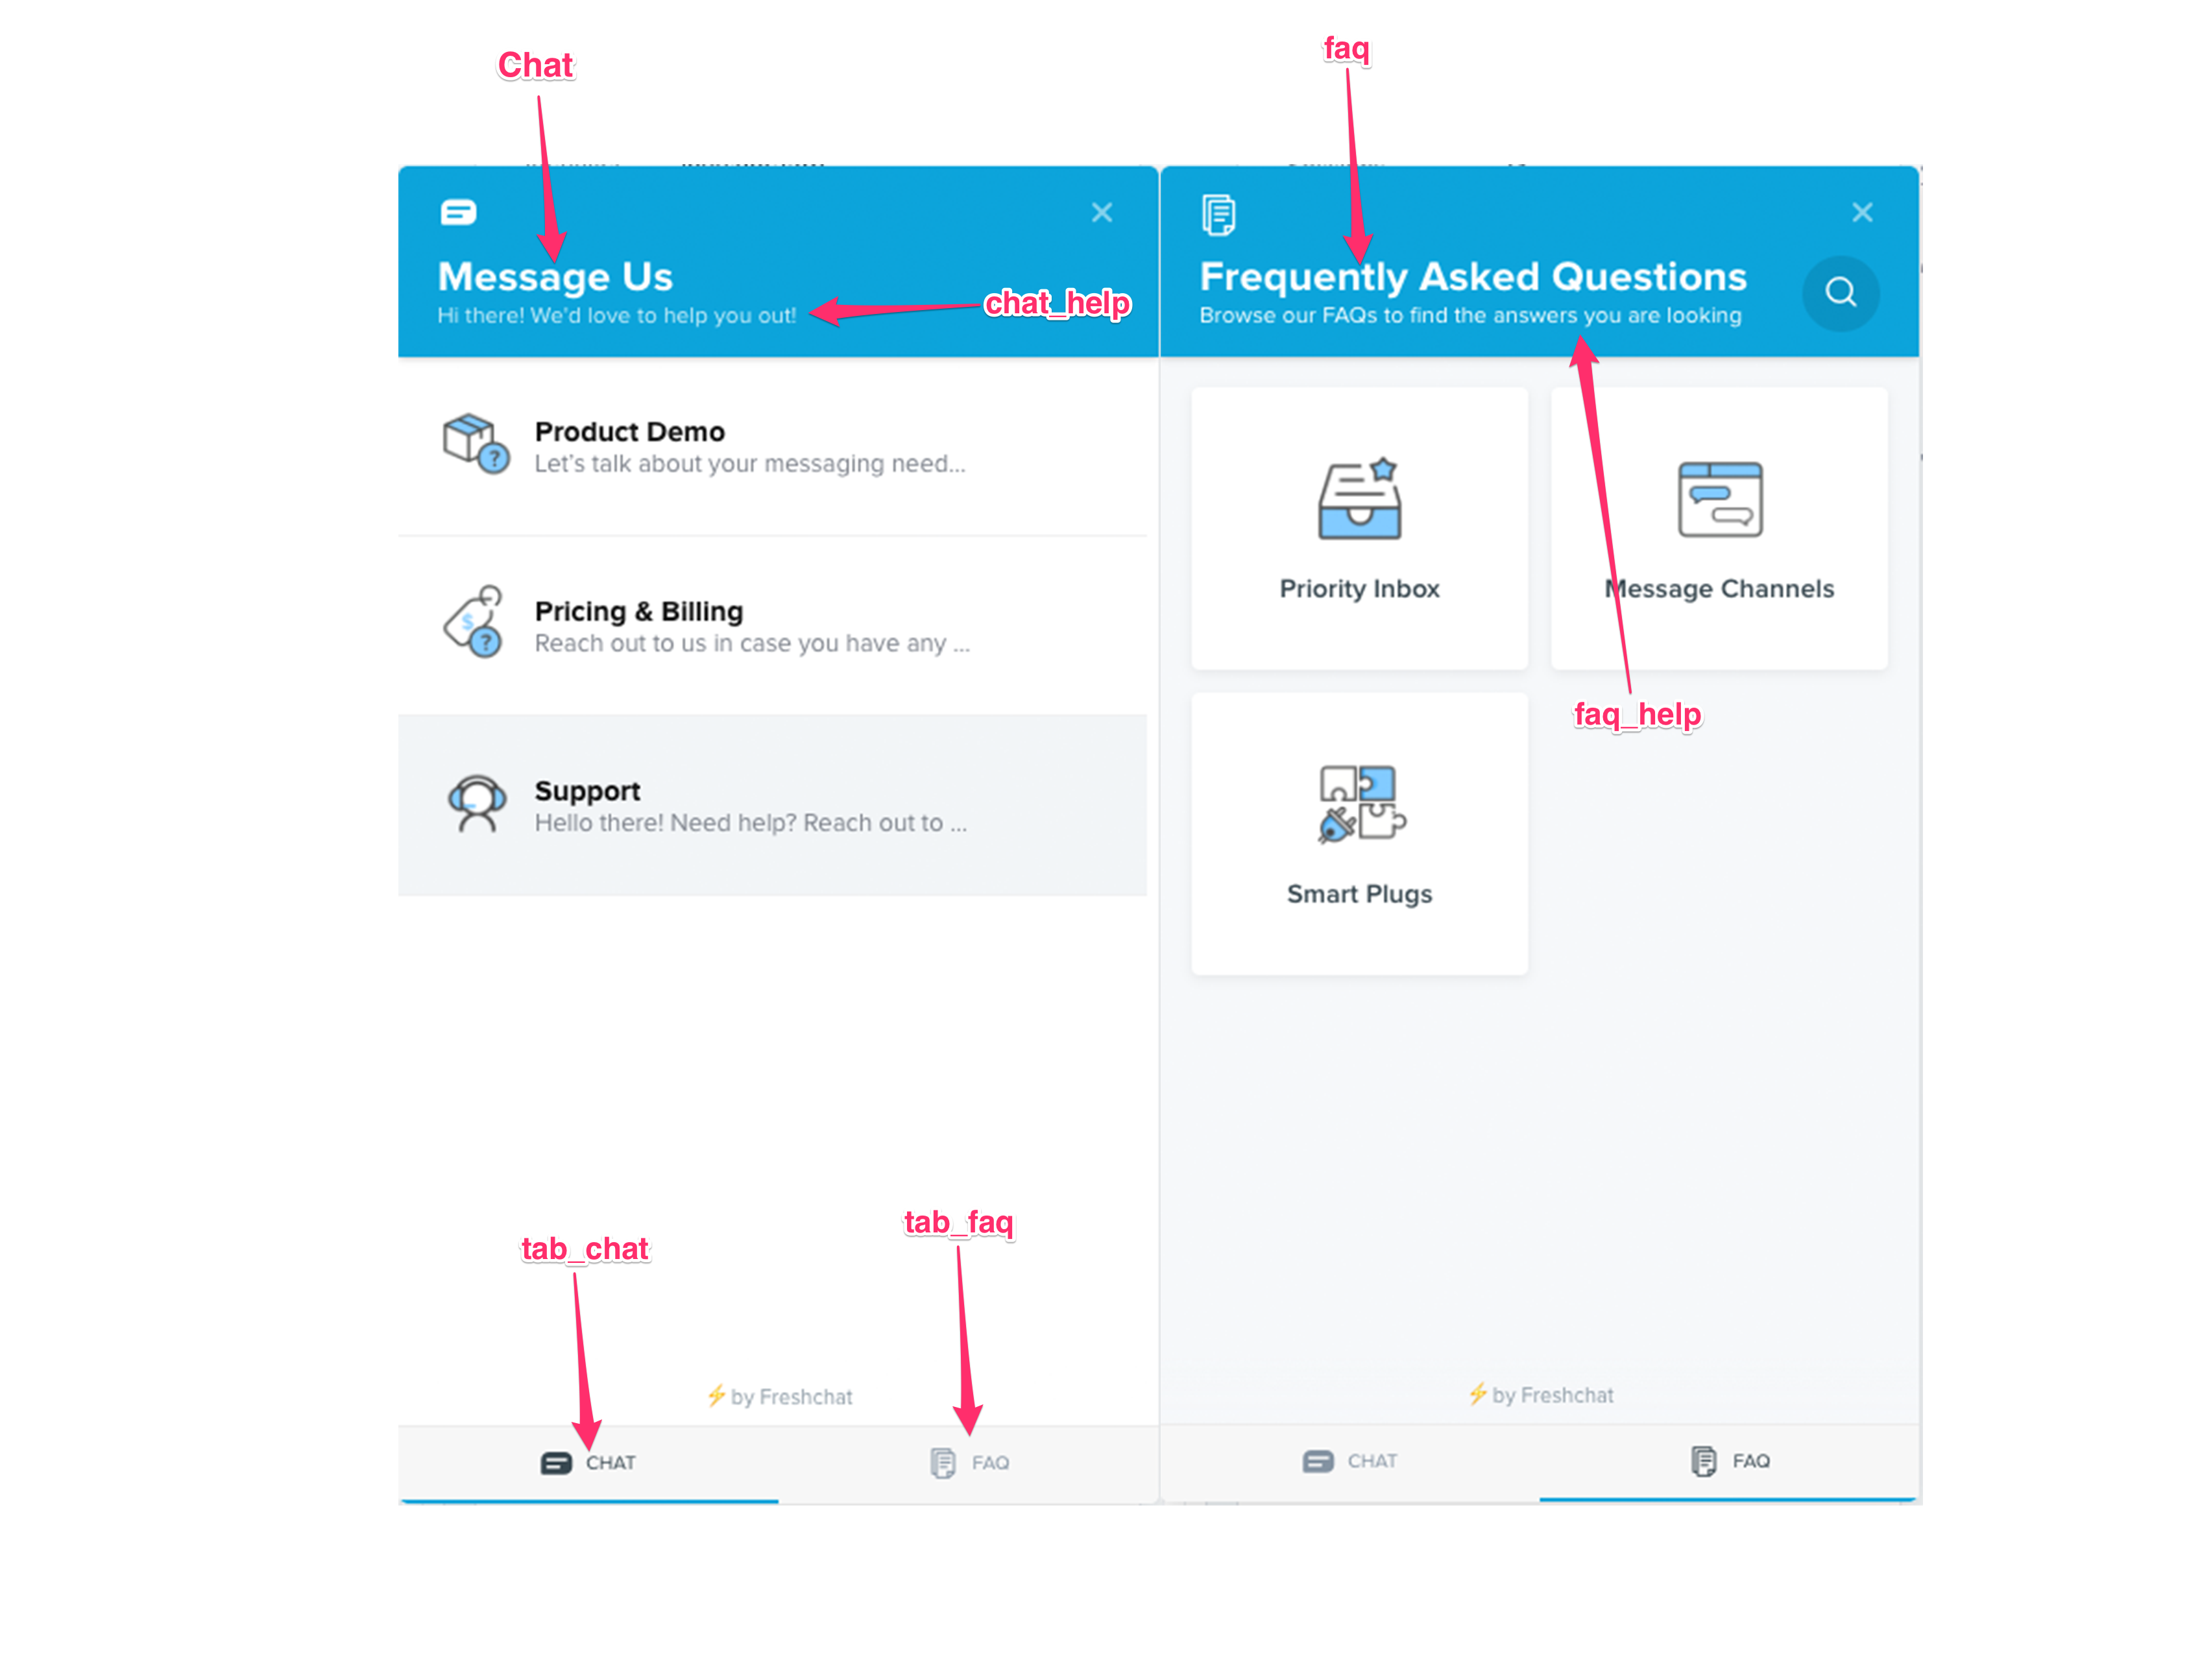
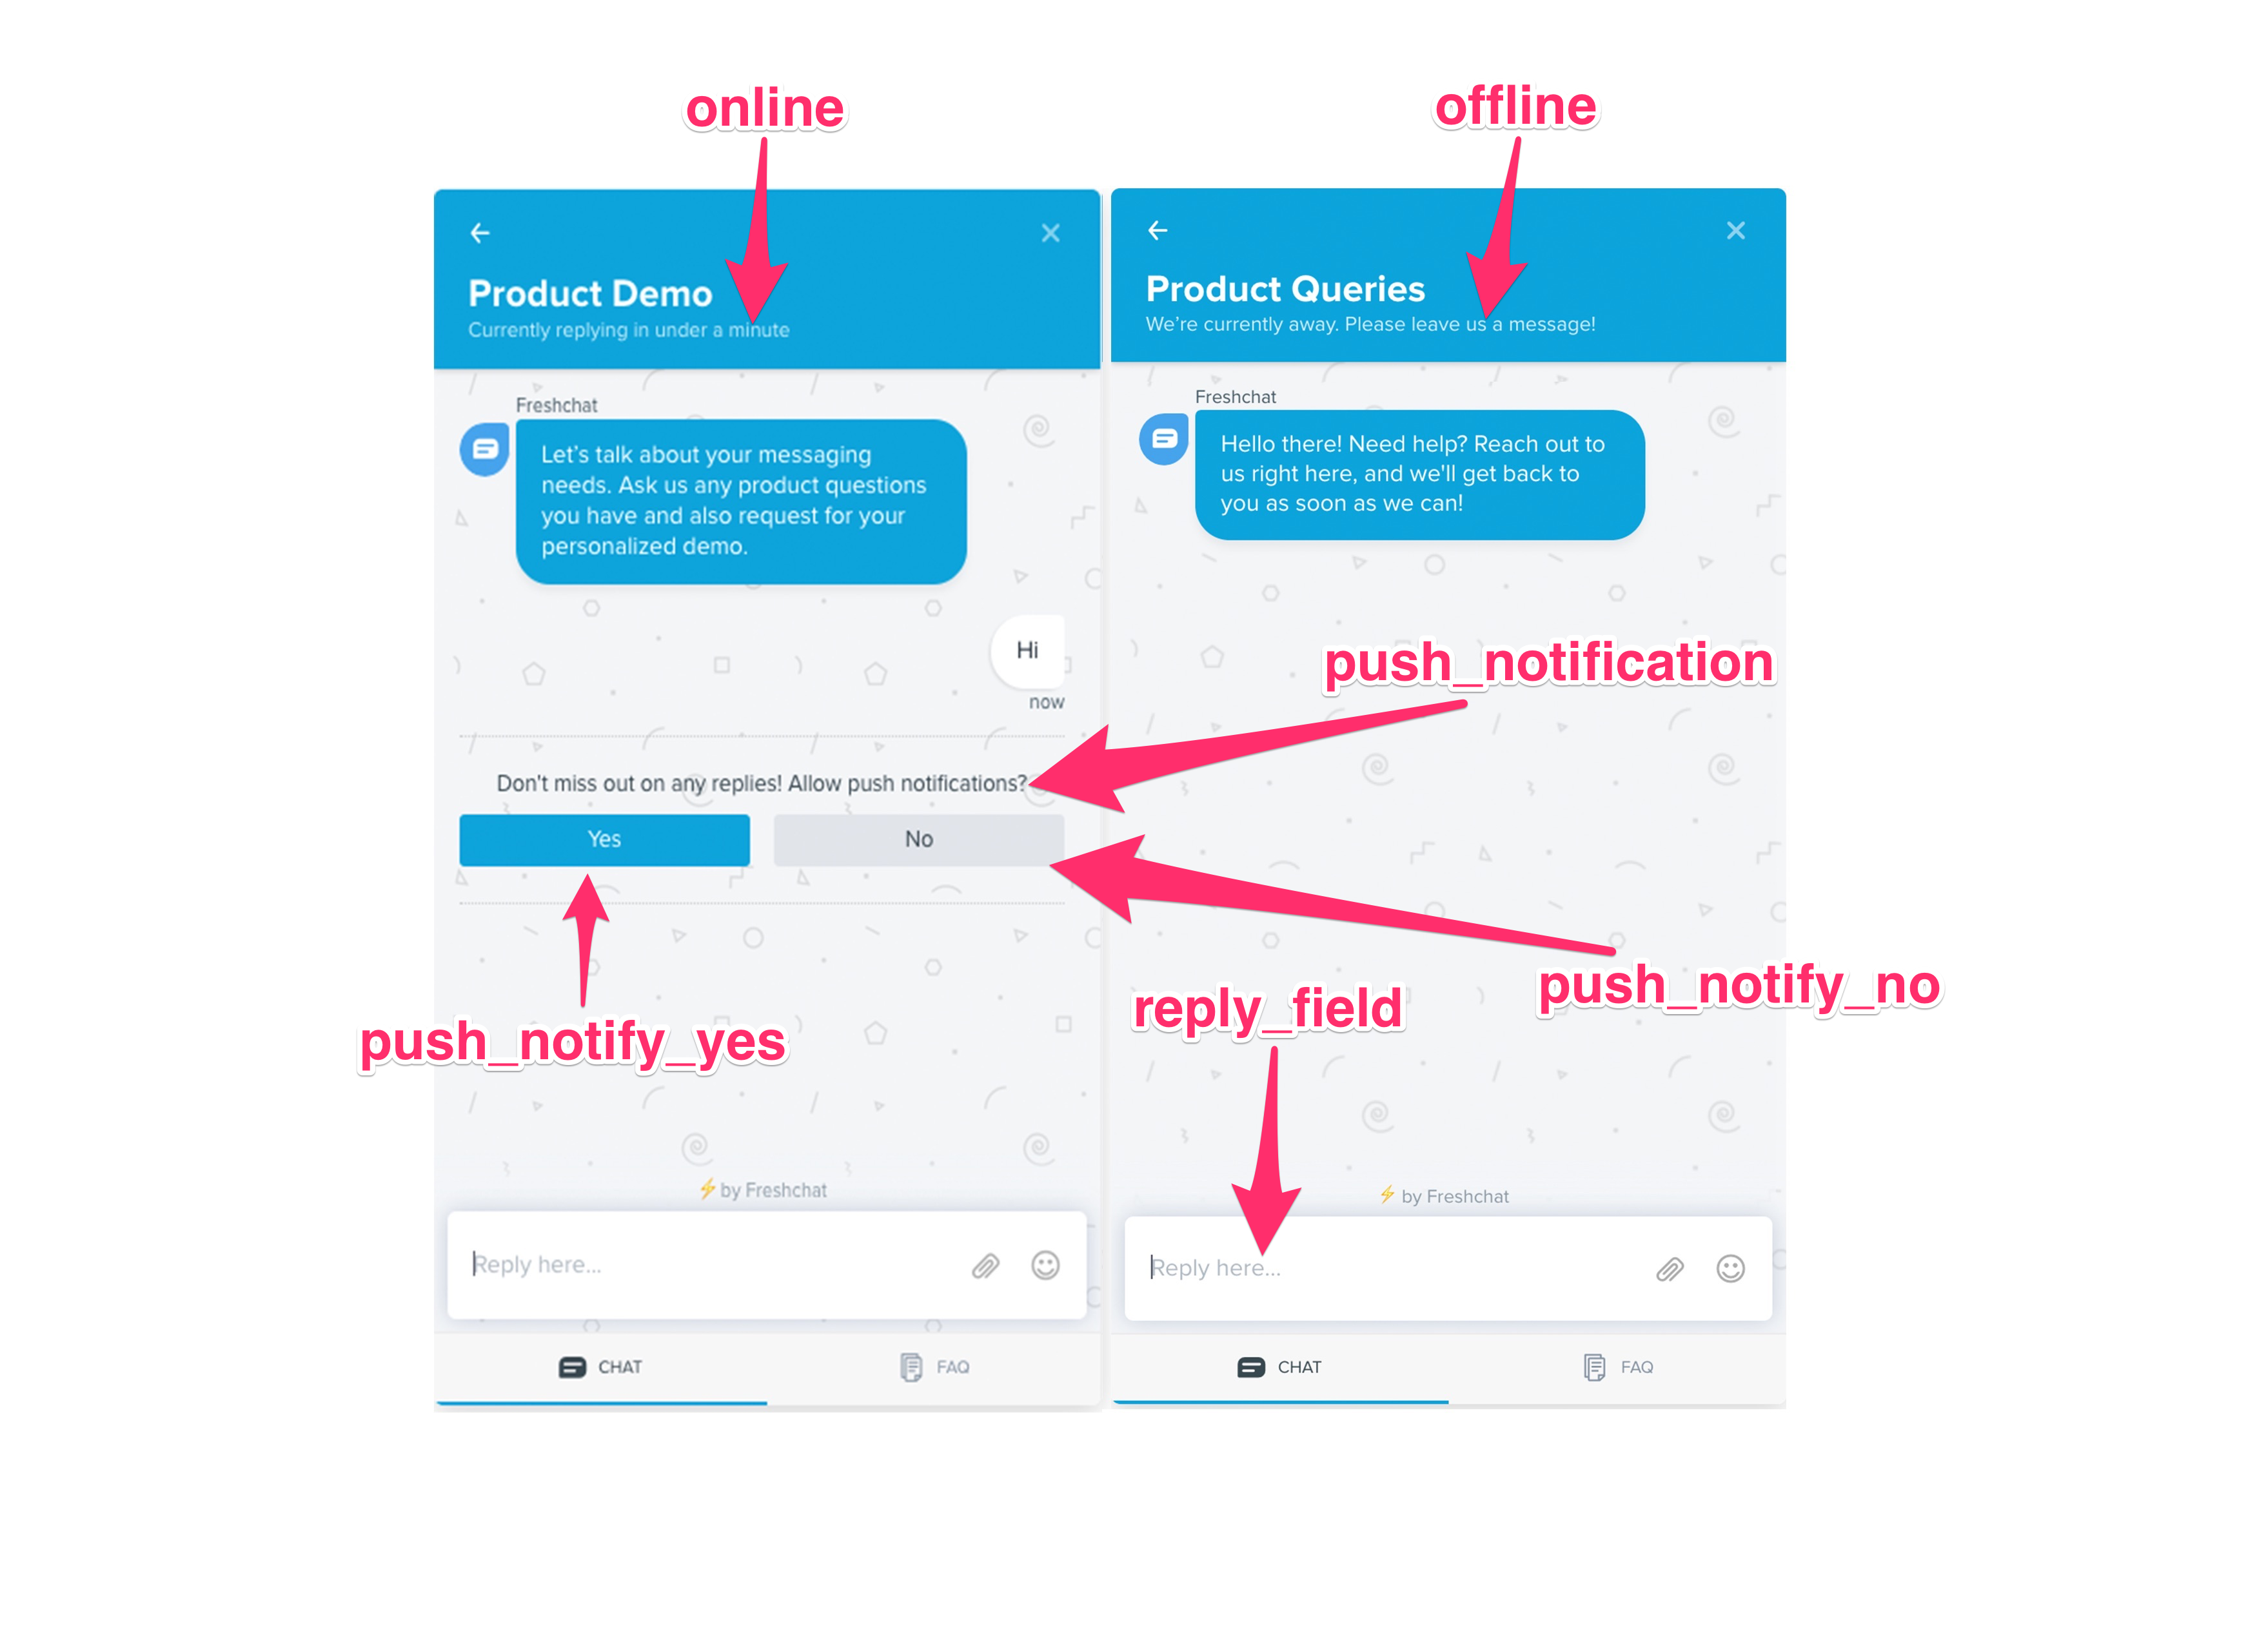
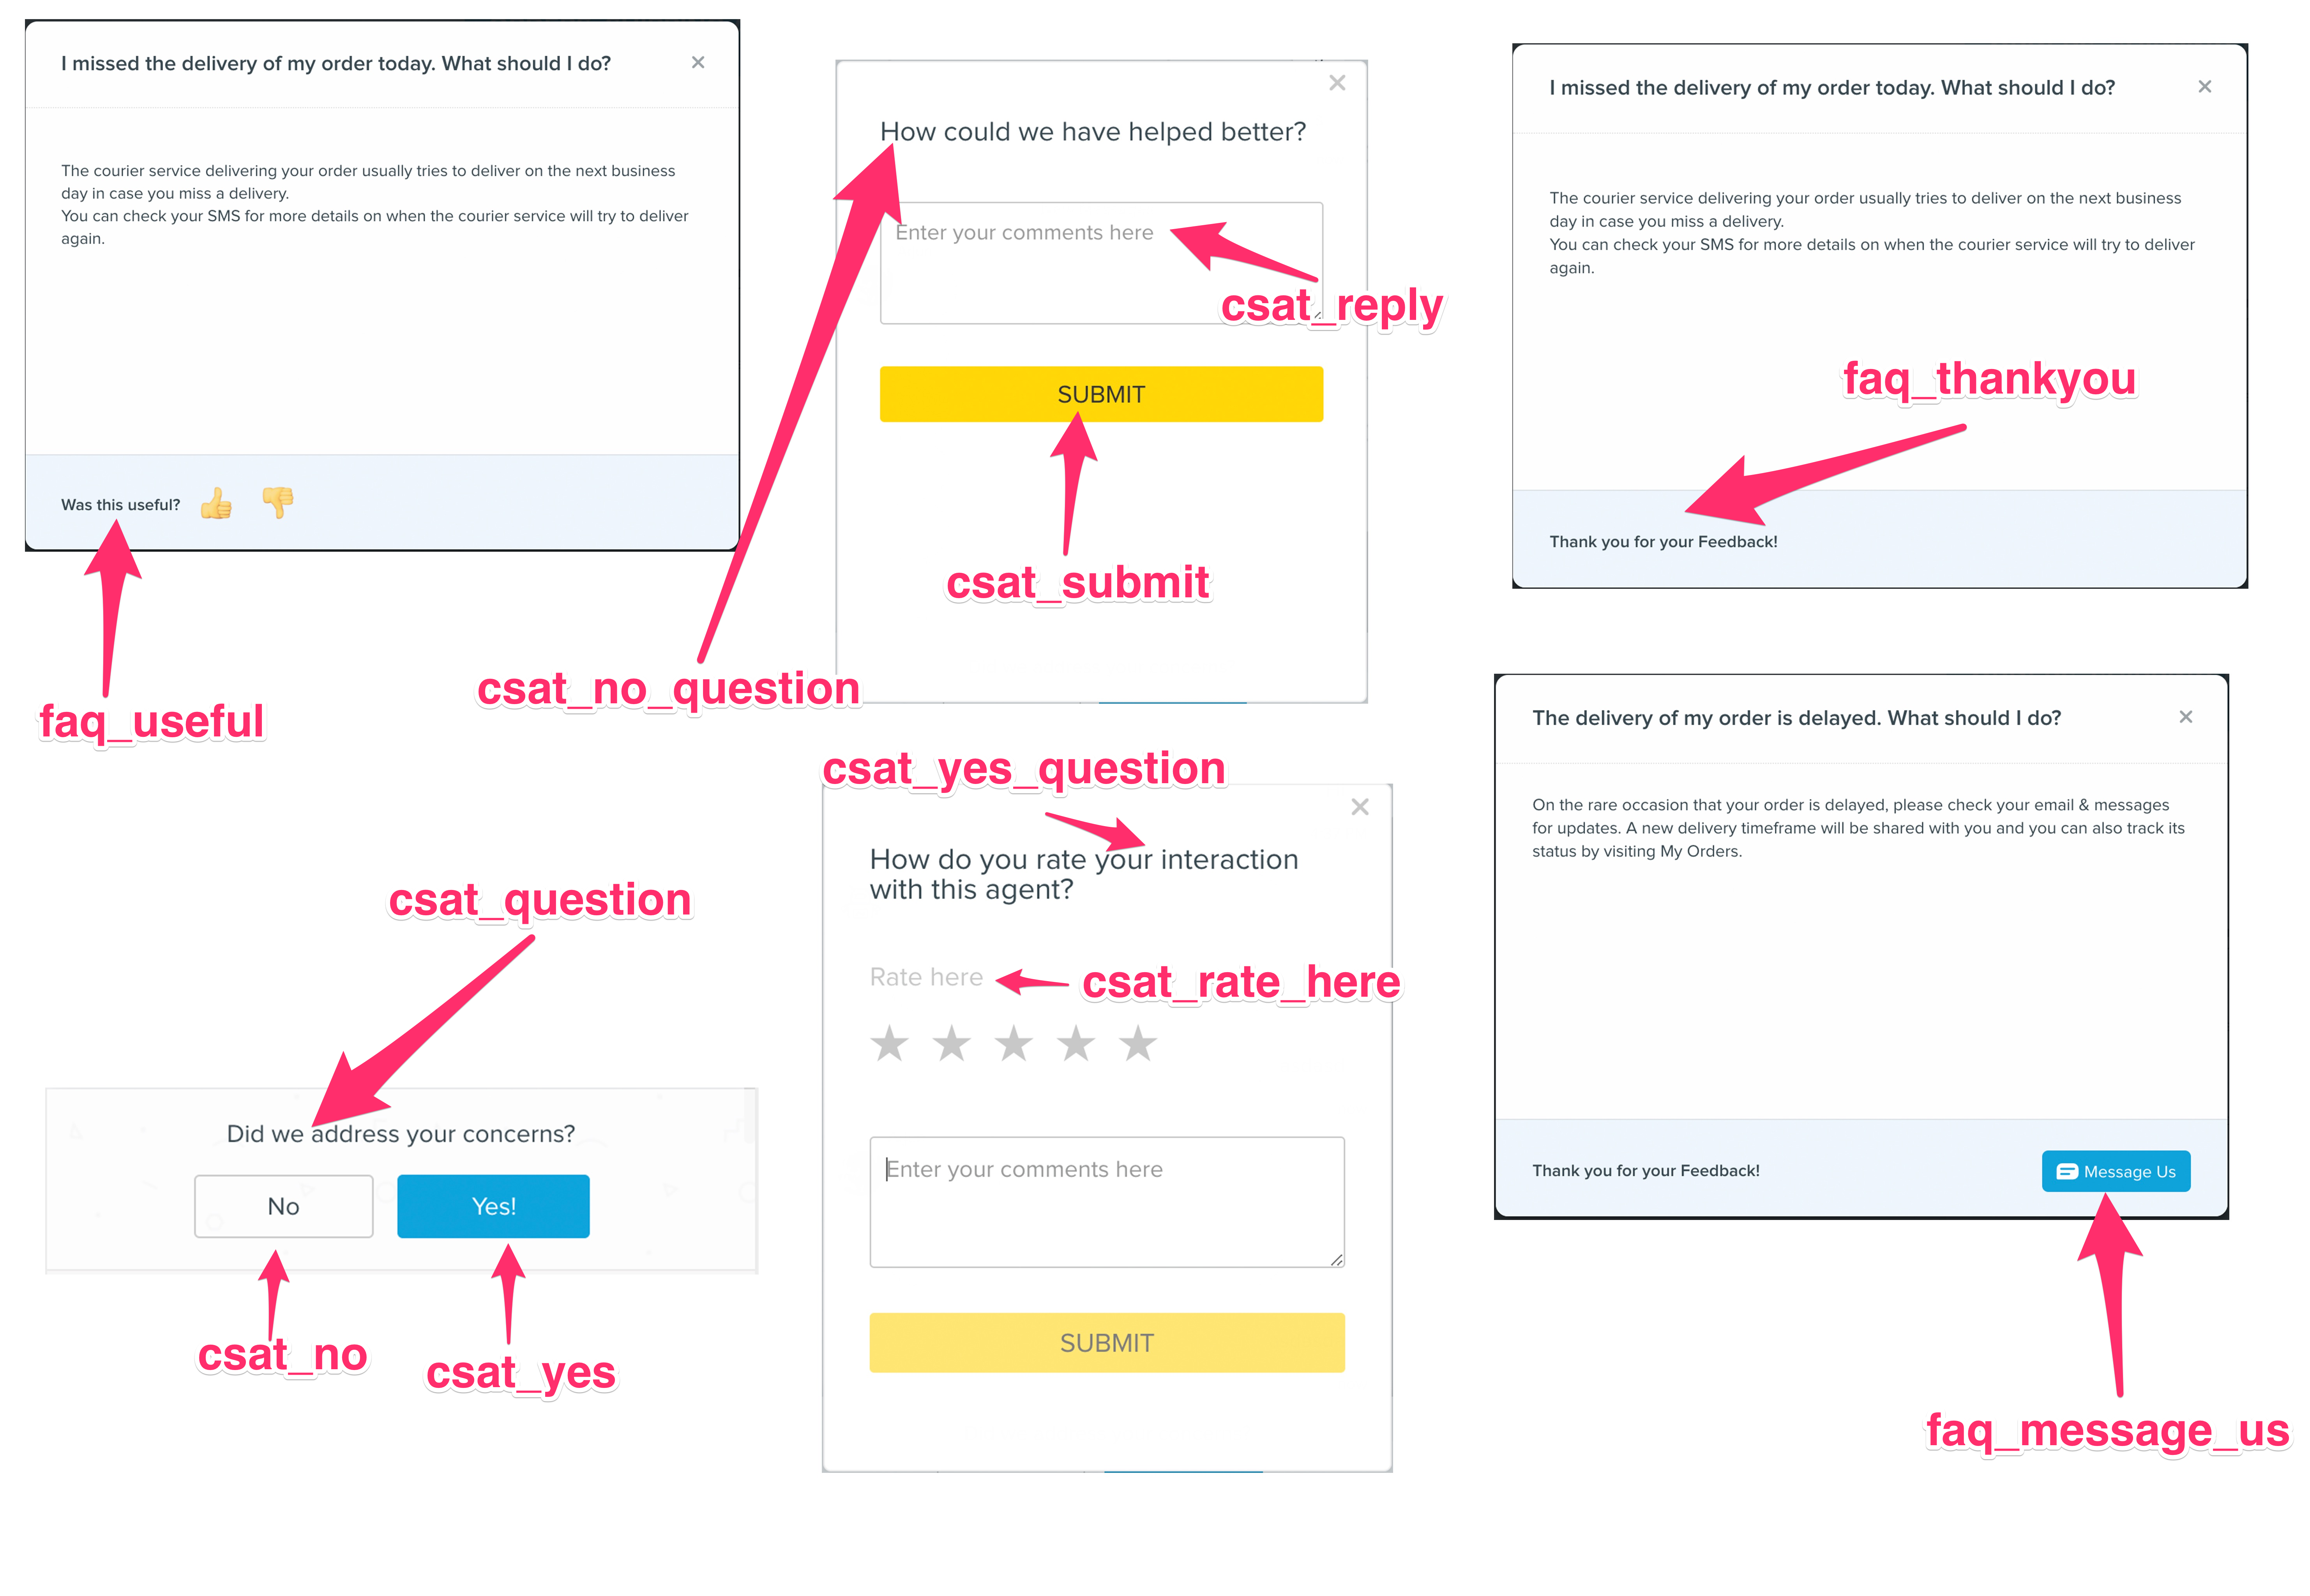
Widget Customisation
Widget customisation allows you to set up your Freshchat web widget with customisations such as custom strings or color or chat backgrounds.
Screenshots
Below are a few screenshots of a widget where the values/strings that can be customised are highlighted.
Sample code with all available customisations
Note: Please note that the older version of the code had {{time}} which will also work properly.
Sample code for Freshchat to open automatically into the FAQ screen
Sample code to hide agent details and disable event tracking
Font Customisation
Freshchat's web widget now supports the ability to use a custom font. Just provide the font name and font URL within the headerProperty object in the widget config.
If it is a hosted font such as Google Fonts or Adobe Typekit, the sample code will look like this.
If you'd like to use a commonly available font such as Arial or Times New Roman, you may provide that for fontName. In that case, fontUrl is not needed.
Note: If the widget is unable to load the custom font, it would default to the local system font.
Channel Customisation
CUSTOMIZING WEB WIDGET CHANNELS
Set Tags in widget init
If the tags are set when the init is set, relevant channels will appear when the widget loads.
Sample code
1 2 3 4 5 6 7 8 9 10 11 | <!-- Head --> <script src="https://wchat.freshchat.com/js/widget.js"></script> <!-- Head --> <script> window.fcWidget.init({ token: "WEB_CHAT_TOKEN", host: "WEB_CHAT_URL", tags: ["public", "paid"], externalId: <externalId> }); </script> |
Set Tags during page transition:
The tags can also be set later for specific web pages using Set Tags (only the latest selection will be updated for the channel list). For example, if a user is on the 'Payments' page, these tags will show only payment related channels on the Web Messenger. If he's switching to the 'Deliveries' page, Set Tags help show channels relating to deliveries during transition. Once Set Tags are called, the channel list will immediately be updated.
Sample code
1 2 3 4 5 6 7 8 9 10 11 12 13 14 | <!-- Head --> <script src="https://wchat.freshchat.com/js/widget.js"></script> <!-- Head --> <script> window.fcWidget.init({ token: "WEB_CHAT_TOKEN", host: "WEB_CHAT_URL", externalId: "john.doe1987", // user's id unique to your system restoreId: "RESTORE_ID", // restore id obtained }); </script> <script> window.fcWidget.setTags(tags); // For ex: ["public", "paid"] </script> |
Multi LanguageNEW
Multi Language Support
Supported Languages
| Language Code | Language |
|---|---|
| ar | Arabic Language (RTL) |
| en | English |
| ca | Catalan |
| zh-HANS | Chinese (Simplified) |
| zh-HANT | Chinese (Traditional) |
| cs | Czech |
| da | Danish |
| nl | Dutch |
| de | German |
| et | Estonian |
| fi | Finnish |
| fr | French |
| hu | Hungarian |
| id | Indonesian |
| it | Italian |
| ko | Korean |
| lv | Latvian |
| nb | Norwegian |
| pl | Polish |
| pt | Portuguese |
| pt-BR | Portuguese - Brazil |
| ro | Romanian |
| ru | Russian |
| sk | Slovak |
| sl | Slovenian |
| es | Spanish |
| es-LA | Spanish - Latin America |
| sv | Swedish |
| th | Thai |
| tr | Turkish |
| uk | Ukrainian |
| vi | Vietnamese |
1. Configured Language
The highest priority is given to the language that is specified when the widget is initalized. This can be done when you add the Freshchat widget code. For instance, in the below code the key locale is used to set the language when the widget is initalized. For the sample code snippet please go here.
2. Default Language
The lowest priority is the Default Language which is set in your Freshchat account. If none of the three values below are not available Freshchat will automatically load the widget the default language. This will be the primary language that is specified on your Freshchat Account.
3. Operating System Language
If the browser language is not available, then the next step for fall back is the Operating System Language.
4. Browser Language
If there is no language specified on config, the widget will pick the browser language automatically. If there are multiple languages set on the browser it will take the primary language always.
Code to set Locale on Freshchat
Sample code
1 2 3 4 5 6 7 8 9 10 11 12 13 14 | <html> <head> <script src="https://wchat.freshchat.com/js/widget.js"></script> </head> <body> <script> window.fcWidget.init({ token: "8d3a4a04-5562-4f59-8f66-f84a269897a1", host: "https://wchat.freshchat.com", locale: "fr" }); </script> </body> </html> |
If you want the Freshchat widget's language to be changed dynamically based on user selection such as language dropdown, the locale has to be set when the dropdown is changed. You will have to use the command window.fcWidget.user.setLocale('en') to specify the language in that case. Please refer to the sample code below for better clarity.
Sample code
1 2 3 4 5 6 7 8 9 10 11 12 13 14 15 16 17 18 19 20 21 22 | <html> <head> <script src="https://wchat.freshchat.com/js/widget.js"></script> </head> <body> <script> window.fcWidget.init({ token: "8d3a4a04-5562-4f59-8f66-f84a269897a1", host: "https://wchat.freshchat.com", //Widget aleady initalized without locale }); </script> <script> //Consider a dropdown with id #lang-btn to select the language $('#lang-btn').on('change',function() { var selectedLanguage = jQuery(this).val(); //Setting the Widget Locale window.fcWidget.user.setLocale(selectedLanguage); }); </script> </body> </html> |
FAQ Customisation
CUSTOMIZING WEB WIDGET FAQs
Tags can be added to FAQ Categories or FAQ Article while creating or adding them. FAQ Tags allow you to filter and display specific FAQs or Categories on web pages.
- For example, a specific set of FAQ categories/articles regarding pricing and billing can be displayed on the pricing page of your website.
- Or a specific set of FAQs can be displayed for Paid Subscribers with additional information on the premium features.
How category and article tags work?
There are two types of FAQ Tags, which can be set to filter FAQs or Categories.
- Category tags ( filterType:'category' ) - Category Level Tags can be used to filter FAQ Categories.
- Article tags ( filterType:'article' ) - Article Level Tags works on two levels. This means if the given tag is associated with any category all the articles in that category will be shown. Then the Article Tags will look for articles with the associated tags under all FAQ Categories.
Set FAQ Tags on widget init
If the FAQ tags are set on initialisation of the Freshchat widget, relevant FAQ categories/articles will be loaded when the widget is opened.
Sample code
1 2 3 4 5 6 7 8 9 10 11 12 13 14 15 16 17 | <!-- Head --> <script src="https://wchat.freshchat.com/js/widget.js"></script> <!-- Head --> <script> window.fcWidget.init({ token: "WEB_CHAT_TOKEN", host: "https://wchat.freshchat.com", // Setting FAQ Tags in the object below. faqTags : { // Array of Tags tags : ['paidusers'], //For articles, the below value should be article. //For article category, the below value should be category. filterType:'category' //Or filterType: 'article' }, }); </script> |
Set FAQ Tags during page transition:
The tags can also be set later for specific web pages using setFaqTags (only the latest selection will be updated for the channel list). For example, if a user is on the 'Payments' page, you can set FAQ Tags to display payment related FAQs. If a user switches to the 'Deliveries' page, this funciton will help show FAQs relating to deliveries during transition. Once setFaqTags are called, the FAQ list will immediately be updated.
Sample code
1 2 3 4 5 6 7 8 9 | <script> window.fcWidget.setFaqTags({ // For ex: ["public", "paid"] tags : ['hello'], //For articles, the below value should be article. //For article category, the below value should be category. filterType:'article' //Or filterType: 'category' }); </script> |
Messenger Events
Responses for the first 4 commands
| Properties | Type | Description |
|---|---|---|
| success | Boolean | TRUE - Success (200), FALSE - Error (Not 200) |
| status | Var | 1. 200 - Success 2. 400 - Backend Error 3. 401 - Init not called 4. 403 - ExternalId already used. Use clear() user method 5. 404 - Init not called / Restore ID is invalid |
| data | Object | 1. undefined - With 200 in status, user not created yet - Without 200 in status, error 2. { restoreId: <value> } Use to synchronise later |
1. widget:opened - Triggers when the widget opens
Sample code
1 2 3 4 5 6 | <script> window.fcWidget.on("widget:opened", function(resp) { console.log('Widget Opened'); //Function to do some task }); </script> |
2. widget:closed - Triggers when the widget close
Sample code
1 2 3 4 5 6 | <script> window.fcWidget.on("widget:closed", function(resp) { console.log('Widget Closed'); //Function to do some task }); </script> |
3. widget:loaded - Triggers when the widget loads
Sample code
1 2 3 4 5 6 | <script> window.fcWidget.on("widget:loaded", function(resp) { console.log('Widget Loaded'); //Function to do some task }); </script> |
4. user:created - Triggers when user is created
Sample code
1 2 3 4 5 6 | <script> window.fcWidget.on("user:created", function(resp) { console.log('User has been created'); //Function to do some task }); </script> |
5. unreadCount:notify - To check if there are unread messages
Usage
This event will give you the number of unread messages. Mostly used when the default Freshchat bubble is hidden and a custom button is used.
Sample code
1 2 3 4 5 | <script> window.fcWidget.on("unreadCount:notify", function(resp) { console.log(resp); }); </script> |
6. window.fcWidget.user.get() - Get User Promise
Response
| Properties | Type | Description |
|---|---|---|
| success | Boolean | TRUE - Success (200), FALSE - Error (Not 200) |
| status | Var | 1. 200 - Success 2. 401 - User not created |
Sample code
1 2 3 4 5 6 7 8 | <script> //After Widget Open/Init or loaded, getting User. window.fcWidget.user.get().then(function(result) { console.log(result); var userInfo = result.data; //Do Something }); </script> |
7. window.fcWidget.user.create(payload) - Create User Promise
Response
| Properties | Type | Description |
|---|---|---|
| success | Boolean | TRUE - Success (200), FALSE - Error (Not 200) |
| status | Var | 1. 200 - Success 2. 401 - User not created 3. 403 - User exists. Use clear() user method 4. 404 - Init not called |
Sample code
1 2 3 4 5 6 7 | <script> window.fcWidget.user.create().then(function() { console.log('User Created'); }, function() { console.log("User Not Created"); }); </script> |
8. window.fcWidget.user.update(payload) - Update User Promise
Response
| Properties | Type | Description |
|---|---|---|
| success | Boolean | TRUE - Success (200), FALSE - Error (Not 200) |
| status | Var | 1. 200 - Success 2. 401 - User not created 3. 400 - Backend error |
Sample code
1 2 3 4 5 6 7 8 9 10 11 12 13 14 | <script> window.fcWidget.user.update({ firstName: 'John', lastName: 'Doe', email: 'name@company.com', meta: { userproperty1: 'value', userproperty2: 'value', userproperty3: 'value' } }).then(function(response) { console.log(response); } </script> |
9. window.fcWidget.user.clear() - Clear User Promise
Response
| Properties | Type | Description |
|---|---|---|
| success | Boolean | TRUE - Success (200), FALSE - Error (Not 200) |
| status | Var | 1. 200 - Success 2. 401 - User not created 3. 400 - Backend error 4. 404 - Init not called |
Sample code
1 2 3 4 5 6 7 | <script> window.fcWidget.user.clear().then(function() { console.log('User cleared'); }, function() { console.log("User Not cleared"); }); </script> |
Messenger API
1. window.fcWidget.isOpen()
To check whether the Freshchat Widget is open.
Sample code
1 2 3 4 5 6 7 8 9 10 | <script> //Returns the current window state of the freshchat widget in boolean. //TRUE - Opened / FALSE - Closed jQuery('#myDiv').on('click',function(event, data) { if (window.fcWidget.isOpen() != true) { window.fcWidget.open(); //Or do something else :) } }); </script> |
2. window.fcWidget.open(payload)
Opens the Freshchat Widget with optional parameters including channel id or name.
The replyText parameter can be used to set up custom text in the text area of the widget.
Sample code
1 2 3 4 5 6 7 8 9 10 | <script> if (window.location.href.indexOf('cart') != -1) { window.fcWidget.open({ name: "Checkout", replyText: "Thank you for the help." }); //Do Something } else { window.fcWidget.open({ name: "Support", replyText: "Thank you for the help" }); //Do Something Else } </script> |
3. window.fcWidget.close()
Closes the Freshchat Widget.
Sample code
1 2 3 4 5 6 7 | <script> //On click of a button, close the widget. jQuery('.close_btn').on('click',function() { window.fcWidget.close(); //Do something. }); </script> |
4. window.fcWidget.isInitialized()
To check if the Freshchat Widget has already been initialised.
Sample code
1 2 3 4 5 6 7 8 9 10 11 | <script> //Returns TRUE if the init method is already called else returns FALSE if (window.fcWidget.isInitialized() == true) { console.log('Widget already initialised'); //Do Something } else { console.log('Widget Not Initialised'); //Do Something Else } </script> |
5. window.fcWidget.isLoaded()
To check if the Freshchat widget has completed loading.
Sample code
1 2 3 4 5 6 7 8 9 10 11 | <script> //Returns TRUE if widget has completed loading else returns FALSE if (window.fcWidget.isLoaded() == true) { console.log('Widget already loaded'); //Do Something } else { console.log('Widget Not Loaded'); //Do Something Else } </script> |
6. window.fcWidget.destroy()
Removes the widget. Widget will have to be re-initalized again to be shown.
Sample code
1 2 3 4 5 6 7 8 9 10 | <script> //Check if user is logging out. if (window.location.href.indexOf('logout') != -1) { window.fcWidget.destroy(); //Do Something } else { //Do Something Else } </script> |