Getting Started
Prerequisites
SDK Requirements
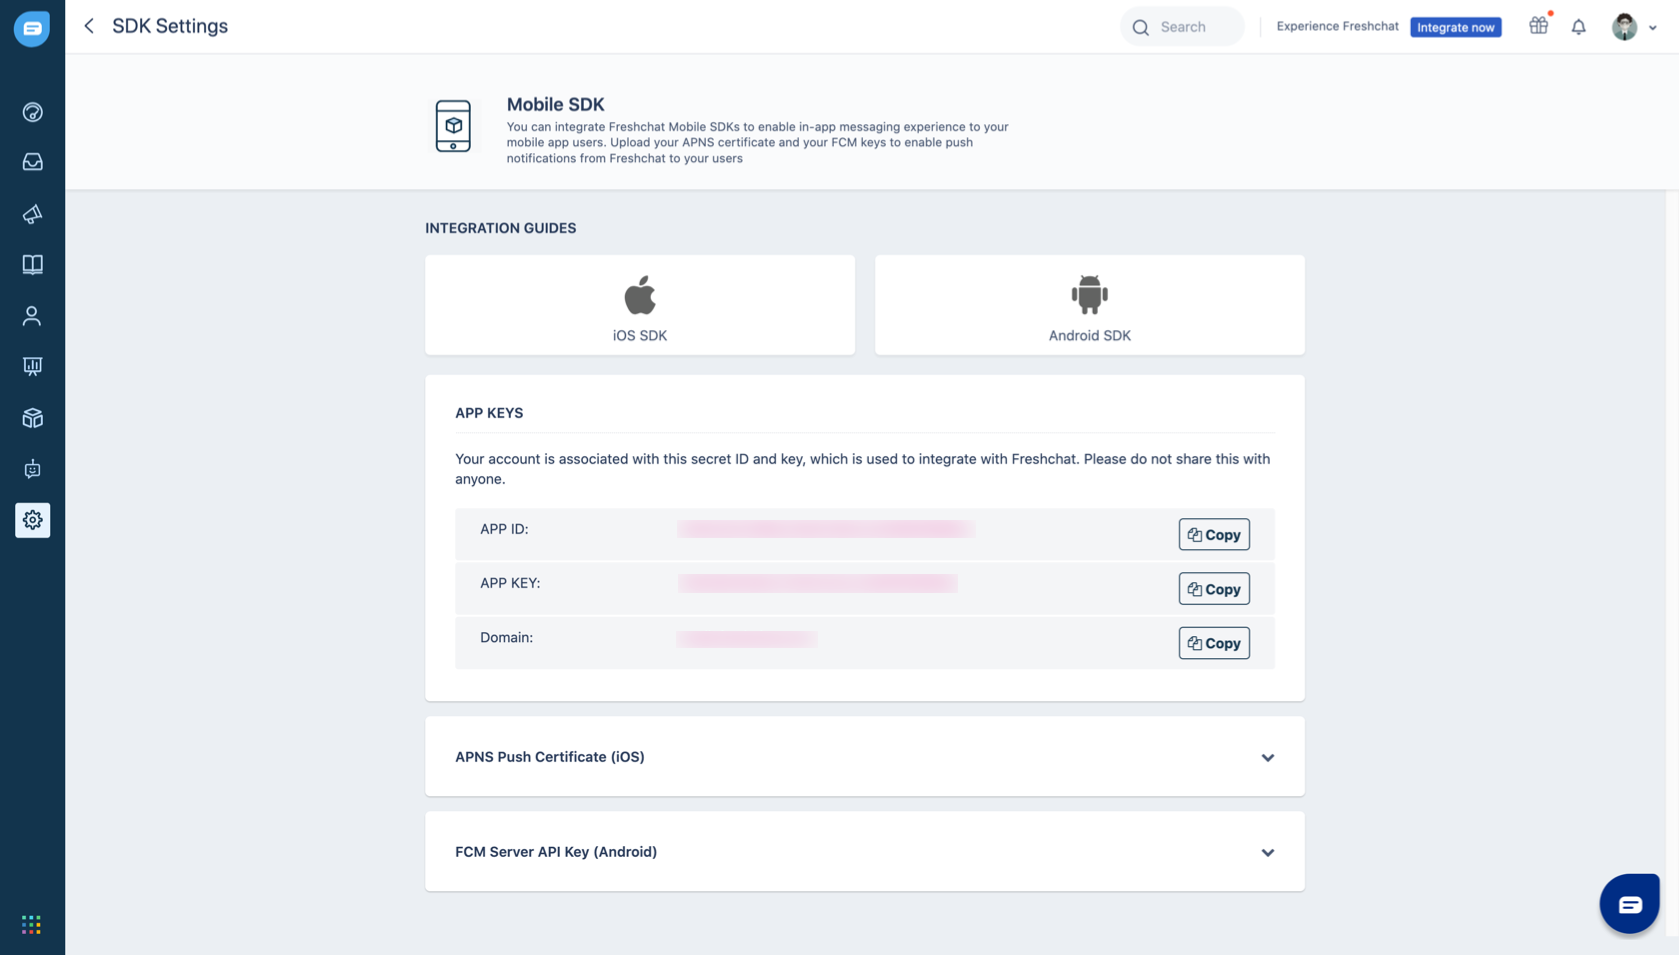
1. Login to your account as Account Owner/Admin.
2. Go to Admin > Mobile SDK. You can see your app id, app key, and domain here.
Platform Requirements
- Freshchat Android SDK clients require devices running Android 4.1(API level 16) or higher
- Freshchat Android SDK supports apps running Android version 7.0 with appcompat-v7 r24.2 or later
- Freshchat iOS SDK contains a slice for arm64 architecture.
- Freshchat iOS SDK supports apps running iOS version 11.0 and above.
 No Prerequisites Needed!!!
No Prerequisites Needed!!!
Proguard Configuration
Freshchat Android SDK is configured to support proguard. If Proguard is enabled on your app, no manual configuration is required as it automatically picks up the configuration required for the SDK.
Permissions
Freshchat Android SDK is built with support for the Run Time/Dynamic Permissions Model introduced in Marshmallow as long as the app is built with targetSdk as Marshmallow or later.
Add SDK
Add Freshdesk Android SDK to your project.
1. Add the maven URL to the root build.gradle (project/build.gradle). Ensure that you open the build.gradle file for the app module.
project/build.gradle1 2 3 4 5 | allprojects { repositories { maven { url "https://jitpack.io" } } } |
2. Add the following dependency to your app module's build.gradle file (project/app/build.gradle):
project/app/build.gradle1 2 3 4 5 6 7 8 | apply plugin: 'com.android.application' android { // ... } dependencies { // ... implementation 'com.github.freshworks:freshchat-android:{{latest-version}}' } |
Replace {{latest-version}} with the latest version of the SDK from here.
Example: implementation 'com.github.freshworks:freshchat-android:4.2.0
3. If the app targets Android 7.0+ and Image attachment is enabled, configure the FileProvider by adding it to AndroidManifest.xml.
AndroidManifest.xml1 2 3 4 5 6 7 8 9 | <provider android:name="androidx.core.content.FileProvider" android:authorities="com.example.demoapp.provider" android:exported="false" android:grantUriPermissions="true"> <meta-data android:name="android.support.FILE_PROVIDER_PATHS" android:resource="@xml/freshchat_file_provider_paths" /> </provider> |
1 | <string name="freshchat_file_provider_authority">com.example.demoapp.provider</string> |
4. Select File > Sync Project to save the file and integrate the SDK in the project.
Cocoapod Approach:
Add Freshchat iOS SDK to your project.
1. Add FreshchatSDK pod file to your project and update podfile.d
1 2 3 4 5 | # Uncomment this line to define a global platform for your project platform :ios, '11.0' target 'Your project target' do pod 'FreshchatSDK' # If particular version required, need to add pod 'FreshchatSDK' , ‘x.x.x’ End |
Add the following code snippet to your project:
1 | Import "FreshchatSDK.h" in your AppDelegate.m file |
1 | Import "FreshchatSDK.h" in your bridging header file. |
Or
Swift Package Manager Approach:
To add package dependencies, please navigate to the 'Project --> Package dependencies' section.
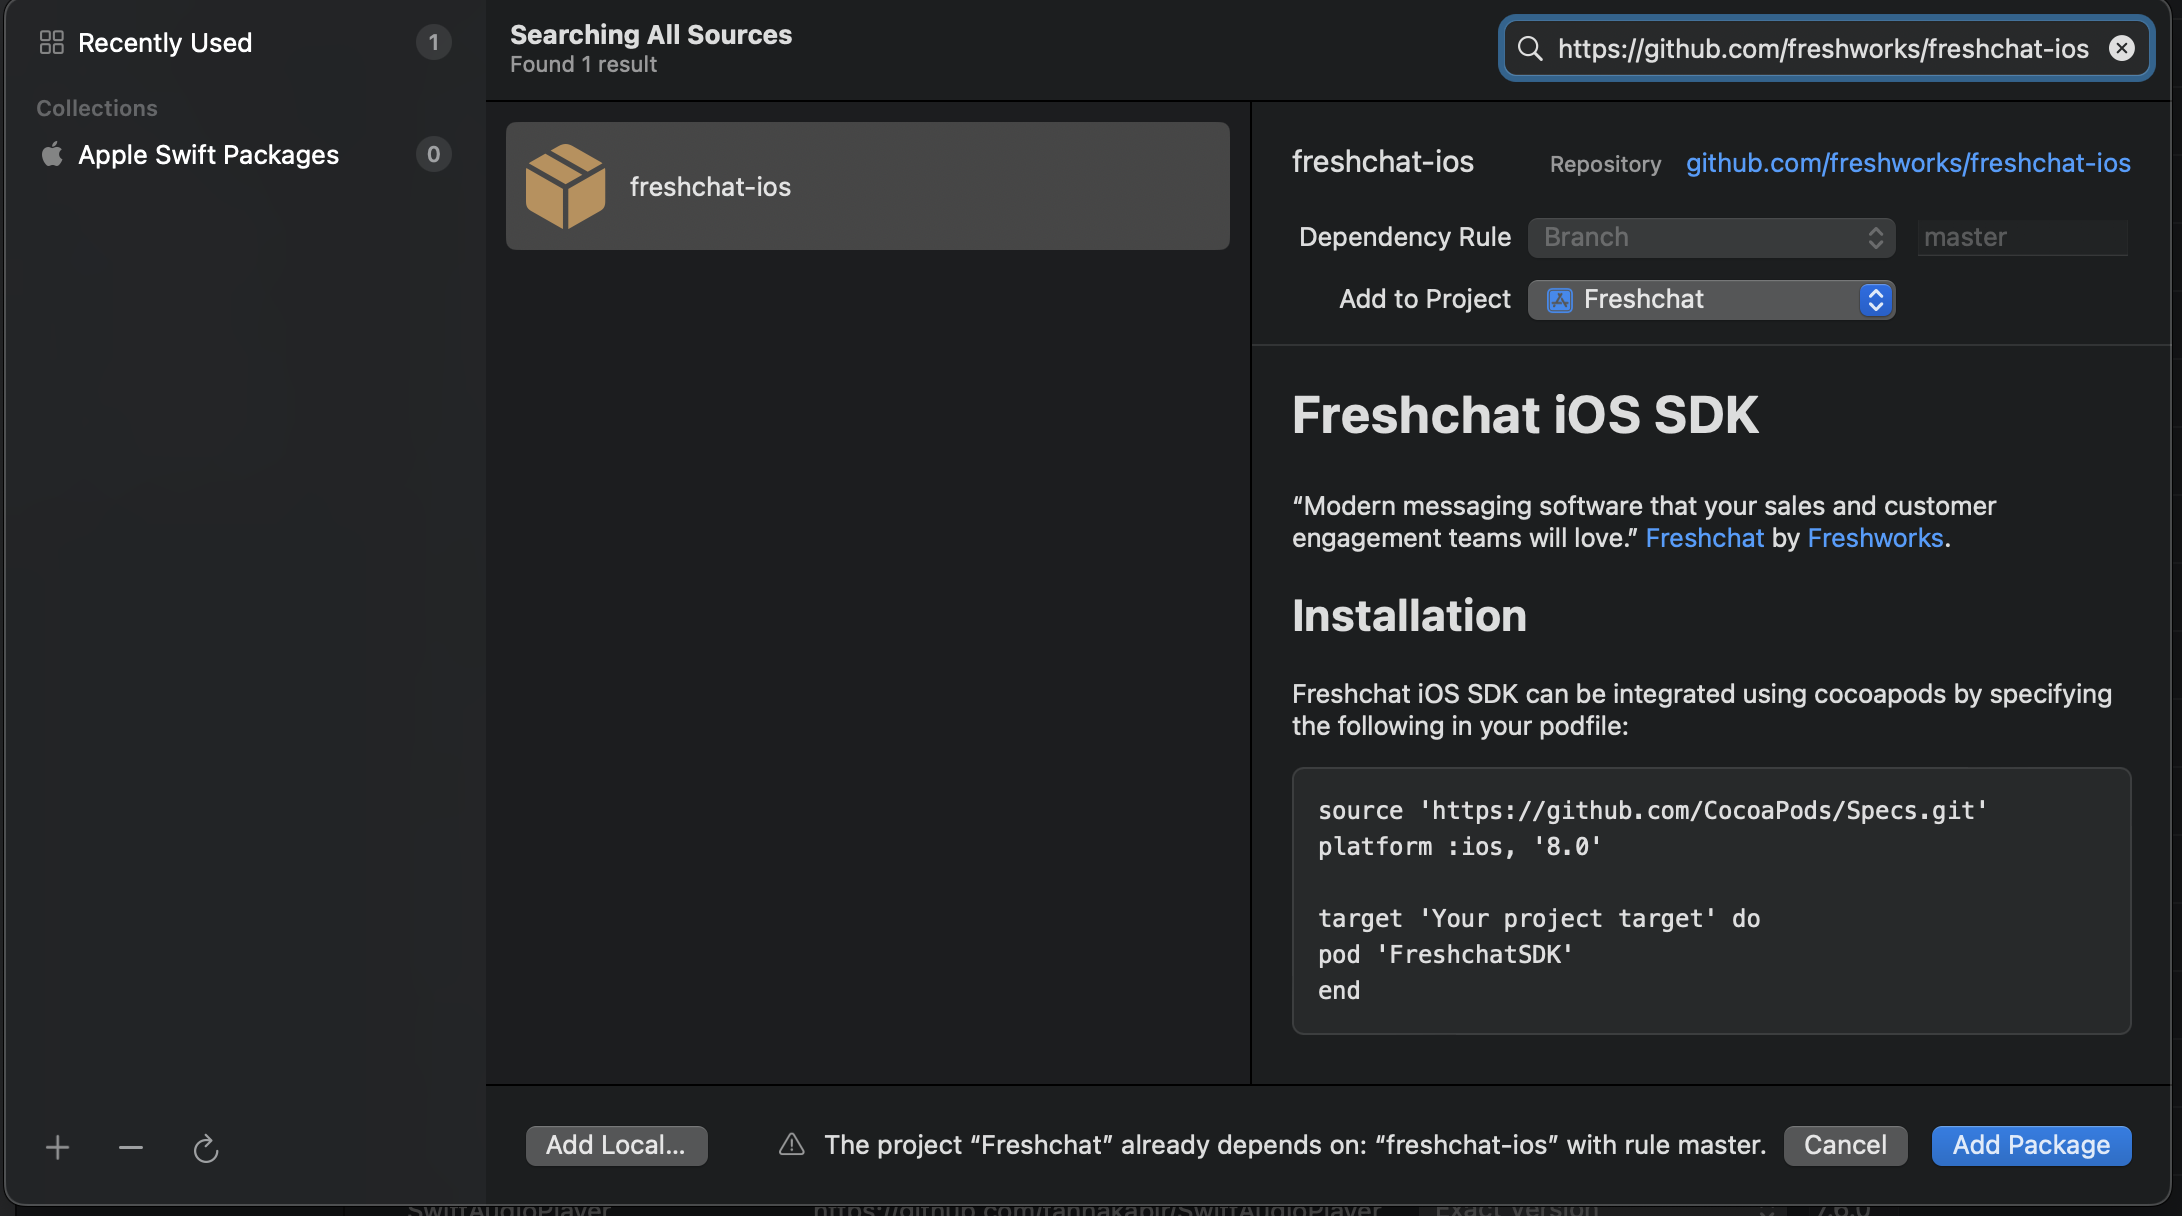
Add 'https://github.com/freshworks/freshchat-ios' as a Swift Package Repository in Xcode, and then proceed to add FreshchatSDK as a Swift Package to your project.
Integrate React Native Freshchat SDK:
1 | npm i react-native-freshchat-sdk |
Add Freshchat Android SDK to your project.
1. Add the maven URL to the root build.gradle (project/build.gradle). Ensure that you open the build.gradle file for the app module.
project/build.gradle1 2 3 4 5 | allprojects { repositories { maven { url "https://jitpack.io" } } } |
Replace {{latest-version}} with the latest version of the SDK from here.
Example: implementation 'com.github.freshworks:freshchat-android:4.2.0
2. If the app targets Android 7.0+ and Image attachment is enabled, configure the FileProvider by adding it to AndroidManifest.xml.
AndroidManifest.xml1 2 3 4 5 6 7 8 9 | <provider android:name="androidx.core.content.FileProvider" android:authorities="com.example.demoapp.provider" android:exported="false" android:grantUriPermissions="true"> <meta-data android:name="android.support.FILE_PROVIDER_PATHS" android:resource="@xml/freshchat_file_provider_paths" /> </provider> |
1 | <string name="freshchat_file_provider_authority">com.example.demoapp.provider</string> |
3. Select File > Sync Project to save the file and integrate the SDK in the project.
Freshchat plugin name is ‘freshchat_sdk’.
In your flutter project’s pubspec.yaml file, under dependencies add
1 | freshchat_sdk: "{{latest-version}}" |
When the app targets Android 7.0+ and Image attachment is enabled, FileProvider needs to be configured.
Include the provider in the AndroidManifest.xml as below.
1 2 3 4 5 6 7 8 9 | <provider android:name="androidx.core.content.FileProvider" android:authorities="com.example.demoapp.provider" android:exported="false" android:grantUriPermissions="true"> <meta-data android:name="android.support.FILE_PROVIDER_PATHS" android:resource="@xml/freshchat_file_provider_paths" /> </provider> |
1 2 | <string name="freshchat_file_provider_authority">com.example.demoapp.provider </string> |
Run the below command to autolink the SDK
1 2 | cd ios pod install |
Initialize SDK
Invoke Freshchat.init() with your app id, app key, and domain before invoking any other features of Freshchat SDK. We recommend you to invoke init() from your app's launcher/support activity's onCreate() function. Freshchat SDK checks for the presence of its components during init() and warns about missing components.
Replace the YOUR-APP-ID, YOUR-APP-KEY, and YOUR-DOMAIN in the following code snippet with the actual app ID, app key, and Domain.
1 2 3 | FreshchatConfig config = new FreshchatConfig("YOUR-APP-ID","YOUR-APP-KEY"); freshchatConfig.setDomain("YOUR-DOMAIN"); Freshchat.getInstance(getApplicationContext()).init(config); |
1 2 3 | val freshchatConfig = FreshchatConfig("YOUR-APP-ID", "YOUR-APP-KEY") freshchatConfig.domain = "YOUR-DOMAIN” Freshchat.getInstance(applicationContext)?.init(freshchatConfig) |
1 2 3 4 5 6 7 8 | - (BOOL)application:(UIApplication *)application didFinishLaunchingWithOptions:(NSDictionary *)launchOptions { //Initialize Freshchat FreshchatConfig *config = [[FreshchatConfig alloc]initWithAppID:@"YOUR-APP-ID" andAppKey:@"YOUR-APP-KEY"]; config.domain = @"YOUR-DOMAIN; [[Freshchat sharedInstance]initWithConfig:config]; return YES; } |
1 2 3 4 5 6 | func application(_ application: UIApplication, didFinishLaunchingWithOptions launchOptions: [UIApplicationLaunchOptionsKey: Any]?) -> Bool { let freshchatConfig:FreshchatConfig = FreshchatConfig.init(appID: "YOUR-APP-ID", andAppKey: "YOUR-APP-KEY") config.domain = "YOUR-DOMAIN" Freshchat.sharedInstance().initWith(freshchatConfig) return true } |
1 2 3 4 | import { Freshchat, FreshchatConfig } from 'react-native-freshchat-sdk'; var freshchatConfig = new FreshchatConfig(APP_ID, APP_KEY); freshchatConfig.domain = "YOUR-DOMAIN"; Freshchat.init(freshchatConfig); |
1 | Freshchat.init(YOUR-APP-ID, YOUR-APP-KEY, YOUR-DOMAIN); |
Note: In shared preferences (Android)/keychains in iOS), account-sensitive information is stored. Any changes or deletions you make in the folder may cause the SDK to malfunction. For example, channels and FAQs will not load and instead, a continuous loading indicator will display.
Configuring the SDK
Enable or disable features like camera capture before initialization.
1 2 3 4 5 6 7 8 9 10 | FreshchatConfig config = new FreshchatConfig("YOUR-APP-ID","YOUR-APP-KEY"); config.setDomain("YOUR-DOMAIN"); config.setCameraCaptureEnabled(true); config.setGallerySelectionEnabled(true); config.setResponseExpectationEnabled(true); config.setTeamMemberInfoVisible(true); config.setUserEventsTrackingEnabled(true); config.setFileSelectionEnabled(true); config.setUserEventsTrackingEnabled(true); Freshchat.getInstance(getApplicationContext()).init(config); |
1 2 3 4 5 6 7 8 9 | val freshchatConfig = FreshchatConfig("YOUR-APP-ID", "YOUR-APP-KEY") freshchatConfig.domain = "YOUR-DOMAIN” freshchatConfig.cameraCaptureEnabled = true freshchatConfig.gallerySelectionEnabled = true freshchatConfig.responseExpectationEnabled = true freshchatConfig.teamMemberInfoVisible = true freshchatConfig.userEventsTrackingEnabled = true freshchatConfig.fileSelectionEnabled = true Freshchat.getInstance(applicationContext)?.init(freshchatConfig) |
1 2 3 4 5 6 7 8 9 10 11 12 13 14 15 16 17 18 19 20 21 | - (BOOL)application:(UIApplication *)application didFinishLaunchingWithOptions:(NSDictionary *)launchOptions { /* Initialize Freshchat*/ FreshchatConfig *config = [[FreshchatConfig alloc]initWithAppID:@"YOUR-APP-ID" andAppKey:@"YOUR-APP-KEY"]; config.domain = @"YOUR-DOMAIN”; config.gallerySelectionEnabled = YES; // set NO to disable picture selection for messaging via gallery config.cameraCaptureEnabled = YES; // set NO to disable picture selection for messaging via camera config.teamMemberInfoVisible = YES; // set to NO to turn off showing team member avatar. To customize the avatar shown, use the theme file config.showNotificationBanner = YES; // set to NO if you don't want to show the in-app notification banner upon receiving a new message while the app is open config.responseExpectationVisible = YES; //set NO to hide it if you want to hide the response expectation for the Topic config.eventsUploadEnabled = YES; //set NO to disable application events with Freshchat. config.fileAttachmentEnabled = YES; //set NO to disable File attachment with Freshchat. [[Freshchat sharedInstance] initWithConfig:config]; return YES; } |
1 2 3 4 5 6 7 8 9 10 11 12 13 14 15 16 17 18 19 20 | func application(_ application: UIApplication, didFinishLaunchingWithOptions launchOptions: [UIApplicationLaunchOptionsKey: Any]?) -> Bool { let freshchatConfig:FreshchatConfig = FreshchatConfig.init(appID: "YOUR-APP-ID", andAppKey: "YOUR-APP-KEY") config.domain = "YOUR-DOMAIN" freshchatConfig.gallerySelectionEnabled = true; // set false to disable picture selection for messaging via gallery freshchatConfig.cameraCaptureEnabled = true; // set false to disable picture selection for messaging via camera freshchatConfig.teamMemberInfoVisible = true; // set to false to turn off showing a team member avatar. To customize the avatar shown, use the theme file freshchatConfig.showNotificationBanner = true; // set to false if you don't want to show the in-app notification banner upon receiving a new message while the app is open freshchatConfig.responseExpectations = true; //set to false if you want to hide the response expectations for the Topics freshchatConfig.fileAttachmentEnabled = true; //set to false to disable the file attachment with freshchat. freshchatConfig.eventsUploadEnabled = true; //set to false to disable upload events with freshchat. Freshchat.sharedInstance().initWith(freshchatConfig) return true } |
1 2 3 4 5 6 7 8 9 10 11 12 13 | // add in index.js var freshchatConfig = new FreshchatConfig(APP_ID, APP_KEY); freshchatConfig.domain = "YOUR-DOMAIN"; freshchatConfig.teamMemberInfoVisible = true; freshchatConfig.cameraCaptureEnabled = true; freshchatConfig.gallerySelectionEnabled = true; freshchatConfig.responseExpectationEnabled = true; freshchatConfig.showNotificationBanner = true; //iOS only freshchatConfig.notificationSoundEnabled = true; //iOS only freshchatConfig.themeName = "CustomTheme.plist"; //iOS only freshchatConfig.stringsBundle = "FCCustomLocalizable"; //iOS only Freshchat.init(freshchatConfig); |
1 2 3 4 5 6 7 | Freshchat.init(YOUR-APP-ID, YOUR-APP-KEY,YOUR-DOMAIN, teamMemberInfoVisible:true, cameraCaptureEnabled:true, gallerySelectionEnabled:true, responseExpectationEnabled:true, showNotificationBanner:true, notificationSoundEnabled:true); |
Permissions(IOS specific)
Starting with iOS 10, Apple requires developers to declare access to privacy-sensitive controls ahead of time.
To comply with this new privacy requirement, developers must add the required keys to the Info.plist,
"NSPhotoLibraryUsageDescription" and "NSCameraUsageDescription"
Moreover, we will also log a warning message on the XCode console if you have missed adding the required keys.
Warning!
Failing this iOS 10 will exit the app by crashing when a user tries to access the controls of the microphone, camera, or photo library.
For more information, click here.
Note: In shared preferences (Android)/keychains in iOS), account-sensitive information is stored. Any changes or deletions you make in the folder may cause the SDK to malfunction. For example, channels and FAQs will not and instead, a continuous loading indicator will display.
Manage User Information
Managing user information with JWT authentication
Freshdesk Messaging uses JSON Web Token (JWT) to allow only authenticated users to initiate a conversation through the Freshdesk Messaging messenger. It sends a callback (along with the user’s authentication status) to let you know about any event with respect to the messenger and user’s authentication status. Once the user is authenticated on your system and tries to initiate a conversation, your system communicates the encrypted key to Freshdesk Messaging to allow or restore conversations. This way, the authenticated user can engage in a secure conversation until the end of a session. This also prevents any third party from impersonating your users.
You can manage both logged-in and anonymous users. The following table provides the Freshdesk Messaging specific properties in JWT token.
| Attribute | Description |
|---|---|
| freshchat_uuid |
Freshchat UUID is the UUID provided by Freshdesk Messaging SDK. This value can be obtained using the below API every time before generating a JWT Token. Android:Freshchat.getInstance(getContext()).getFreshchatUserId(); iOS:[[Freshchat sharedInstance] getFreshchatUserId]; |
| reference_id |
Reference Id is the uniquely identifiable information of the user in your system. Eg. userId, email, etc With reference_id, you can restore the user's conversation history across multiple sessions and platforms. |
Managing a restorable JWT user
You can restore user conversations for logged-in users, every time they initiate a conversation from a different browser or device. Restorable user JWT Token should contain reference_id and freshchat_uuid.
Creating a Secure JWT Token:
To enhance the security of your application, you can generate a JWT (JSON Web Token) by following these steps. Replace "ENCRYPTED JWT TOKEN" with the actual JWT token once it's generated.
1. Prepare Your JSON Payload:
Begin by constructing the JSON data that you want to include in your JWT token. Make sure it contains the necessary information you wish to secure.
2. Generate the JWT Token:
Use a JWT library or tool to create the JWT token. Ensure that you sign it with a secure key or secret for added security.
3. Replace "ENCRYPTED JWT TOKEN":
In your application code, replace the placeholder "ENCRYPTED JWT TOKEN" with the actual JWT token you've just generated.
Restoring a restorable User
To create or restore a restorable user, restore the user API.
Sample JWT payload:
                "freshchat_uuid": "6bc903d6-12ba-11eb-adc1-0242ac120002",

                "reference_id": "sample_user"
}
1 2 | // Convert the JSON data above into a JWT token and substitute it in place of 'ENCRYPTED JWT TOKEN'. Freshchat.getInstance(getContext()).restoreUser("ENCRYPTED JWT TOKEN"); |
1 2 | // Convert the JSON data above into a JWT token and substitute it in place of 'ENCRYPTED JWT TOKEN'. Freshchat.getInstance(applicationContext)?.restoreUser(“ENCRYPTED JWT TOKEN”) |
1 2 | // Convert the JSON data above into a JWT token and substitute it in place of 'ENCRYPTED JWT TOKEN'. [[Freshchat sharedInstance] restoreUserWithIdToken: “ENCRYPTED JWT TOKEN”]; |
1 2 | // Convert the JSON data above into a JWT token and substitute it in place of 'ENCRYPTED JWT TOKEN'. Freshchat.sharedInstance().restoreUser(withIdToken: “ENCRYPTED JWT TOKEN”) |
1 2 3 4 5 6 | // Convert the JSON data above into a JWT token and substitute it in place of 'ENCRYPTED JWT TOKEN'. const restoreUserWithIdToken = () => { Freshchat.restoreUserWithIdToken("ENCRYPTED JWT TOKEN", (error) => { console.log(error); }); }; |
1 2 | // Convert the JSON data above into a JWT token and substitute it in place of 'ENCRYPTED JWT TOKEN'. Freshchat.restoreUserWithIdToken("ENCRYPTED JWT TOKEN") |
Updating user properties of a restorable user
To update user properties of a restorable user, use setUser API:
Sample JWT payload:
                    "first_name": "Duraivel",

                    "last_name" : "P",

                    "custom_prop1": "value1",

                    "freshchat_uuid": "6bc903d6-12ba-11eb-adc1-0242ac120002",

                    "reference_id": "refId123456"
}
1 2 | // Convert the JSON data above into a JWT token and substitute it in place of 'ENCRYPTED JWT TOKEN'. Freshchat.getInstance(getContext()).setUser("ENCRYPTED JWT TOKEN"); |
1 2 | // Convert the JSON data above into a JWT token and substitute it in place of 'ENCRYPTED JWT TOKEN'. Freshchat.getInstance(applicationContext)?.setUser(“ENCRYPTED JWT TOKEN”) |
1 2 | // Convert the JSON data above into a JWT token and substitute it in place of 'ENCRYPTED JWT TOKEN'. [[Freshchat sharedInstance] setUserWithIdToken: “ENCRYPTED JWT TOKEN”]; |
1 2 | // Convert the JSON data above into a JWT token and substitute it in place of 'ENCRYPTED JWT TOKEN'. Freshchat.sharedInstance().setUserWithIdToken("ENCRYPTED JWT TOKEN") |
1 2 3 4 5 6 | // Convert the JSON data above into a JWT token and substitute it in place of 'ENCRYPTED JWT TOKEN'. const updateUserWithIdToken = () => { Freshchat.setUserWithIdToken("ENCRYPTED JWT TOKEN", (error) => { console.log(error); }); }; |
1 | Freshchat.setUserWithIdToken("ENCRYPTED JWT TOKEN") |
Managing an anonymous JWT user
Anonymous users are temporary users. They are mostly created to have chat sessions before login. Note that the conversations of anonymous users cannot be restored. Also, Anonymous user JWT Token should contain freshchat_uuid.
Creating an anonymous User
To create an anonymous user, use setUser API.
"freshchat_uuid": "6bc903d6-12ba-11eb-adc1-0242ac120002",
}
1 2 | // Convert the JSON data above into a JWT token and substitute it in place of 'ENCRYPTED JWT TOKEN'. Freshchat.getInstance(getContext()).setUser("ENCRYPTED JWT TOKEN"); |
1 2 | // Convert the JSON data above into a JWT token and substitute it in place of 'ENCRYPTED JWT TOKEN'. Freshchat.getInstance(applicationContext)?.setUser(“ENCRYPTED JWT TOKEN”) |
1 2 | // Convert the JSON data above into a JWT token and substitute it in place of 'ENCRYPTED JWT TOKEN'. [[Freshchat sharedInstance] setUserWithIdToken: “ENCRYPTED JWT TOKEN”]; |
1 2 | // Convert the JSON data above into a JWT token and substitute it in place of 'ENCRYPTED JWT TOKEN'. Freshchat.sharedInstance().setUserWithIdToken("ENCRYPTED JWT TOKEN") |
1 2 3 4 5 6 | // Convert the JSON data above into a JWT token and substitute it in place of 'ENCRYPTED JWT TOKEN'. const restoreUserWithIdToken = () => { Freshchat.setUserWithIdToken("ENCRYPTED JWT TOKEN", (error) => { console.log(error); }); }; |
1 2 | // Convert the JSON data above into a JWT token and substitute it in place of 'ENCRYPTED JWT TOKEN'. Freshchat.setUserWithIdToken("ENCRYPTED JWT TOKEN") |
Updating user properties of an anonymous user
To update the user properties of an anonymous user, use setUser API.
Sample JWT payload:
                    "first_name": "Duraivel",

                    "last_name" : "P",

                    "custom_prop1": "value1",

                    "freshchat_uuid": "6bc903d6-12ba-11eb-adc1-0242ac120002",
}
1 2 | // Convert the JSON data above into a JWT token and substitute it in place of 'ENCRYPTED JWT TOKEN'. Freshchat.getInstance(getContext()).setUser("ENCRYPTED JWT TOKEN"); |
1 2 | // Convert the JSON data above into a JWT token and substitute it in place of 'ENCRYPTED JWT TOKEN'. Freshchat.getInstance(applicationContext)?.setUser(“ENCRYPTED JWT TOKEN”) |
1 2 | // Convert the JSON data above into a JWT token and substitute it in place of 'ENCRYPTED JWT TOKEN'. [[Freshchat sharedInstance] setUserWithIdToken: “ENCRYPTED JWT TOKEN”]; |
1 2 | // Convert the JSON data above into a JWT token and substitute it in place of 'ENCRYPTED JWT TOKEN'. Freshchat.sharedInstance().setUserWithIdToken("ENCRYPTED JWT TOKEN") |
1 2 3 4 5 6 | // Convert the JSON data above into a JWT token and substitute it in place of 'ENCRYPTED JWT TOKEN'. const updateUserWithIdToken = () => { Freshchat.setUserWithIdToken("ENCRYPTED JWT TOKEN", (error) => { console.log(error); }); }; |
1 2 | // Convert the JSON data above into a JWT token and substitute it in place of 'ENCRYPTED JWT TOKEN'. Freshchat.setUserWithIdToken("ENCRYPTED JWT TOKEN") |
Managing JWT users with expiry
JWT token has an unlimited lifetime by default. If you want to add expiry to JWT token, add exp property to your JWT token. Note that exp value should be in seconds.
Sample exp key & value
"exp" : 1603191000
JWT Token Statuses and their SDK behavior
JWT Token status helps you identify the current status of the token provided to SDK. It can be one of the following:
| Status | Description | SDK Behaviour |
|---|---|---|
| TOKEN_NOT_SET | This will be the initial status of the token before any token is set. | The sser will not see chat/FAQ content. SDK will wait for 30 seconds for the app to provide a valid token.
If not provided, the user will be pushed out of the SDK screen. |
| TOKEN_NOT_PROCESSED | This will be the status when the token is provided to SDK and SDK is processing it. | The users will not be shown chat / FAQ content. SDK waist for 30 seconds for token to be valid.
If not, the user will be pushed out of SDK screen. |
| TOKEN_VALID | When provided token is valid. | The user will be able to use SDK. |
| TOKEN_INVALID | When token is invalid. | The user will not be able to open SDK screens. If the user is accessing an SDK screen, they will be pushed out. |
| TOKEN_EXPIRED | When token has expired. |
The user will not see chat / FAQ content. SDK will wait for 30 seconds for the app to provide valid token.
If user is in the middle of a valid session, chat / FAQ content will be shown. SDK will wait for 30 seconds for the app to provide new valid token. If not provided, user will be pushed out of SDK screen |
Use the following code to get current JWT token status:
1 | Freshchat.getInstance(getContext()).getUserIdTokenStatus(); |
1 | Freshchat.getInstance(applicationContext)?.userIdTokenStatus |
1 | [[Freshchat sharedInstance] getUserIdTokenStatus]; |
1 | Freshchat.sharedInstance().getUserIdTokenStatus() |
1 | Freshchat.getUserIdTokenStatus() |
1 | Freshchat.getUserIdTokenStatus |
Listening to JWT Token status changes
You can listen to token status changes by listening to Freshchat.FRESHCHAT_EVENTS
Registering receiver1 2 3 4 | // We recommend you to register in onCreate and unregister in onTerminate of your application class. IntentFilter freshchatEventsIntentFilter = new IntentFilter(Freshchat.FRESHCHAT_EVENTS); LocalBroadcastManager.getInstance(getApplicationContext()).registerReceiver(freshchatEventsReceiver, freshchatEventsIntentFilter); |
1 2 3 4 | // We recommend you to register in onCreate and unregister in onTerminate of your application class. val freshchatEventsIntentFilter = IntentFilter(Freshchat.FRESHCHAT_EVENTS) LocalBroadcastManager.getInstance(applicationContext).registerReceiver(freshchatEventsReceiver, freshchatEventsIntentFilter) |
1 2 | [[NSNotificationCenter defaultCenter] addObserver:self selector:@selector(userActionEvent:) name:FRESHCHAT_EVENTS object:nil]; |
1 2 | NotificationCenter.default.addObserver(self, selector: #selector(userActionEvent(_:)), name: Notification.Name("FRESHCHAT_EVENTS"), object: nil) |
1 2 3 4 | Freshchat.addEventListener( Freshchat.FRESHCHAT_EVENTS, eventHandler ); |
1 | var freshchatEventStream = Freshchat.onFreshchatEvents; |
1 2 3 4 5 6 7 8 9 10 | BroadcastReceiver freshchatEventsReceiver = new BroadcastReceiver() { @Override public void onReceive(Context context, Intent intent) { Event event = Freshchat.getEventFromBundle(intent.getExtras()); if (event.getEventName() == Event.EventName.FCEventIdTokenStatusChange) { Log.e("FreshchatTest", "Token status - " + Freshchat.getInstance(getApplicationContext()).getUserIdTokenStatus()); } } }; |
1 2 3 4 5 6 7 8 | var freshchatEventsReceiver: BroadcastReceiver = object : BroadcastReceiver() { override fun onReceive(context: Context, intent: Intent) { val event: Event? = intent.extras?.let { Freshchat.getEventFromBundle(it) } if (event?.eventName == Event.EventName.FCEventIdTokenStatusChange) { // Do action on token change } } } |
1 2 3 4 5 6 | - (void) userActionEvent:(NSNotification *)notif { FreshchatEvent *fcEvent = notif.userInfo[@"event"]; if(fcEvent.name == FCEventIdTokenStatusChange) { NSString *tokenStatus = [[Freshchat sharedInstance] getUserIdTokenStatus]; } } |
1 2 3 4 5 6 7 | @objc func userActionEvent(_ notification: Notification) { if let fcEvent = notification.userInfo?["event"] as? FreshchatEvent { if fcEvent.name == FCEventIdTokenStatusChange { let tokenStatus = Freshchat.sharedInstance().getUserIdTokenStatus() } } } |
1 2 3 4 5 6 7 8 9 | const eventHandler = (actionData) => { console.log("eventHandler triggered"); var action = actionData.user_action; Freshchat.getUserIdTokenStatus((stateData) => { var state = stateData.user_id_token_status; console.log('eventHandler: action - ', action); console.log('eventHandler: state - ', state); }); }; |
1 2 3 | fchatEventStreamSubscription = freshchatEventStream.listen((event) { print("Freshchat Event: $event"); }); |
1 | LocalBroadcastManager.getInstance(getApplicationContext()).unregisterReceiver(freshchatEventsReceiver); |
1 | LocalBroadcastManager.getInstance(applicationContext).unregisterReceiver(freshchatEventsReceiver) |
1 | [[NSNotificationCenter defaultCenter] removeObserver:self name:FRESHCHAT_EVENTS object:nil]; |
1 | NotificationCenter.default.removeObserver(self, name: NSNotification.Name("FRESHCHAT_EVENTS"), object: nil) |
1 | Freshchat.removeEventListeners(Freshchat.FRESHCHAT_EVENTS); |
1 | No specific action required for unregistering. |
Managing user information without JWT authentication
Pass user information
You can send basic user information at any point to give you more context on the user when your support agents message back and forth with them.
1 2 3 4 5 6 7 8 9 | // Get the user object for the current installation FreshchatUser freshchatUser = Freshchat.getInstance(getApplicationContext()).getUser(); freshchatUser.setFirstName("John"); freshchatUser.setLastName("Doe"); freshchatUser.setEmail("john.doe.1982@mail.com"); freshchatUser.setPhone("+91", "9790987495"); // Call setUser so that the user information is synced with Freshchat's servers Freshchat.getInstance(getApplicationContext()).setUser(freshchatUser); |
1 2 3 4 5 6 7 8 9 | // Get the user object for the current installation val freshchatUser: FreshchatUser? = Freshchat.getInstance(applicationContext)?.user freshchatUser?.firstName = “John” freshchatUser?.lastName = “Doe” freshchatUser?.email = “john.doe.1982@mail.com” freshchatUser?.setPhone("+91", "9790987495") // Call setUser so that the user information is synced with Freshchat's servers Freshchat.getInstance(context).setUser(freshchatUser) |
1 2 3 4 5 6 7 8 9 10 11 12 | // Create a user object FreshchatUser *user = [FreshchatUser sharedInstance]; // To set an identifiable first name for the user user.firstName = @"John"; // To set an identifiable last name for the user user.lastName = @"Doe"; //To set user's email id user.email = @"john.doe.1982@mail.com"; //To set user's phone number user.phoneCountryCode=@"00"; user.phoneNumber = @"9999999999"; [[Freshchat sharedInstance] setUser:user]; |
1 2 3 4 5 6 7 8 9 10 11 12 | // Create a user object let user = FreshchatUser.sharedInstance(); // To set an identifiable first name for the user user.firstName = "John" // To set an identifiable last name for the user user.lastName = "Doe" //To set user's email id user.email = "john.doe.1982@mail.com" //To set user's phone number user.phoneCountryCode="00" user.phoneNumber = "9999999999" Freshchat.sharedInstance().setUser(user) |
1 2 3 4 5 6 7 8 9 10 11 12 13 14 15 | const setUser = () => { var freshchatUser = new FreshchatUser(); freshchatUser.firstName = "John"; freshchatUser.lastName = "Doe"; freshchatUser.email = "johndoe@dead.man"; freshchatUser.phoneCountryCode = "+91"; freshchatUser.phone = "1234234123"; console.log(freshchatUser); Freshchat.setUser(freshchatUser, (error) => { console.log(error); }); }; |
1 2 3 4 5 6 7 | import 'package:freshchat_sdk/freshchat_user.dart'; FreshchatUser freshchatUser; freshchatUser.setFirstName("John"); freshchatUser.setLastName("Doe"); freshchatUser.setEmail("johndoe@dead.man"); freshchatUser.setPhone("+91","1234234123"); Freshchat.setUser(freshchatUser); |
Update user properties
You can capture and send additional metadata about the user in the app, all of which also becomes a way to segment your users to later push messages to them.
1 2 3 4 5 6 7 8 9 10 11 | /* Set any custom metadata to give agents more context, and for segmentation for marketing or pro-active messaging */ Map<String, String> userMeta = new HashMap<String, String>(); userMeta.put("userLoginType", "Facebook"); userMeta.put("city", "SpringField"); userMeta.put("age", "22"); userMeta.put("userType", "premium"); userMeta.put("numTransactions", "5"); userMeta.put("usedWishlistFeature", "yes"); //Call setUserProperties to sync the user properties with Freshchat's servers Freshchat.getInstance(getApplicationContext()).setUserProperties(userMeta); |
1 2 3 4 5 6 7 8 | val userMeta: MutableMap<String, String> = HashMap() userMeta["userLoginType"] = "Facebook" userMeta["city"] = "SpringField" userMeta["age”] = "22" userMeta["userType"] = "premium" userMeta["numTransactions"] = "5" userMeta.["usedWishlistFeature"] = "yes" Freshchat.getInstance(context).setUserProperties(userMeta) |
1 2 3 4 5 6 7 8 9 | //You can set custom user properties for a particular user [[Freshchat sharedInstance] setUserPropertyforKey:@"customerType" withValue:@"Premium"]; //You can set user demographic information [[Freshchat sharedInstance] setUserPropertyforKey:@"city" withValue:@"San Bruno"]; //You can segment based on where the user is in their journey of using your app [[Freshchat sharedInstance] setUserPropertyforKey:@"loggedIn" withValue:@"true"]; //You can capture a state of the user that includes what the user has done in your app [[Freshchat sharedInstance] setUserPropertyforKey:@"transactionCount" withValue:@"3"]; |
1 2 3 4 5 6 7 8 | //You can set custom user properties for a particular user Freshchat.sharedInstance().setUserPropertyforKey("customerType", withValue: "Premium") //You can set user demographic information Freshchat.sharedInstance().setUserPropertyforKey("city", withValue: "San Bruno") //You can segment based on where the user is in their journey of using your app Freshchat.sharedInstance().setUserPropertyforKey("loggedIn", withValue: "true") //You can capture a state of the user that includes what the user has done in your app Freshchat.sharedInstance().setUserPropertyforKey("transactionCount", withValue: "3") |
1 2 3 4 5 6 7 8 9 | const setUserProperties = () => { var userPropertiesJson = { "user_type": "Paid", "plan": "Gold" }; Freshchat.setUserProperties(userPropertiesJson, (error) => { console.log(error); }) }; |
1 2 3 4 5 6 | var userPropertiesJson = { "user_type": "Paid", "plan": "Gold" } Freshchat.setUserProperties(userPropertiesJson); |
Sync user information across devices
For retaining the chat messages across devices/sessions/platforms, the mobile app needs to pass the same unique identifiers for the users. This allows users to seamlessly pick up the conversation from any supported platforms - Android, iOS, and Web.
To sync user information, you need the following parameters/attributes.
| Parameter | Description |
|---|---|
| externalId |
A unique identifier for the user from your system like a user id or email id. Note: Once set, you cannot change this. |
| restoreId |
This is generated by Freshdesk Messaging for the current user. The app stores and presents the combination of external id and restore id to the Freshdesk Messaging SDK to continue the conversations across sessions on the same device or across devices and platforms. |
Saving the conversations
1.To set the external id (if not set already):1 | Freshchat.getInstance(getApplicationContext()).identifyUser(externalId, null); |
1 | Freshchat.getInstance(context).identifyUser(externalId, null) |
1 | [[Freshchat sharedInstance] identifyUserWithExternalID:@"externalId" restoreID:nil]; |
1 | Freshchat.sharedInstance().identifyUser(withExternalID: "externalId", restoreID: nil) |
1 | Freshchat.identifyUser("externalId", null); |
1 | Freshchat.identifyUser(externalId:"EXTERNAL_ID"); |
Restore Id generation is an asynchronous process. So, you need to register a broadcast receiver to get notifications when it is generated. You can register at onCreate and unregistered at onTerminate of your application class.
Note: Restore ID will be generated only after the user starts a conversation. So, make sure this is not invoked on the app before any user reaches for help.
a. Register for broadcast receiver1 2 | IntentFilter intentFilter = new IntentFilter(Freshchat.FRESHCHAT_USER_RESTORE_ID_GENERATED); LocalBroadcastManager.getInstance(getApplicationContext()).registerReceiver(broadcastReceiver, intentFilter); |
1 2 | val intentFilterRestoreID = IntentFilter(Freshchat.FRESHCHAT_USER_RESTORE_ID_GENERATED) LocalBroadcastManager.getInstance(applicationContext).registerReceiver(restoreIdReceiver, intentFilterRestoreID) |
1 | [[NSNotificationCenter defaultCenter] addObserver:self selector:@selector(userRestoreIdReceived:) name:FRESHCHAT_USER_RESTORE_ID_GENERATED object :nil]; |
1 | NotificationCenter.default.addObserver(self, selector: #selector(userRestoreIdReceived), name: NSNotification.Name(rawValue: FRESHCHAT_USER_RESTORE_ID_GENERATED), object: nil) |
1 2 3 4 | Freshchat.addEventListener( Freshchat.EVENT_USER_RESTORE_ID_GENERATED, userRestoreIdGeneratedHandler ); |
1 | var restoreStream = Freshchat.onRestoreIdGenerated; |
1 2 3 4 5 6 | BroadcastReceiver broadcastReceiver = new BroadcastReceiver() { @Override public void onReceive(Context context, Intent intent) { String restoreId = Freshchat.getInstance(getApplicationContext()).getUser().getRestoreId(); } }; |
1 2 3 4 5 6 7 | var restoreIdReceiver: BroadcastReceiver = object : BroadcastReceiver() { override fun onReceive(context: Context, intent: Intent) { // TODO: Save this restoreId to app's backend for restoring across platforms and session val restoreId = Freshchat.getInstance(applicationContext).user.restoreId Toast.makeText(context, "Restore id: $restoreId", Toast.LENGTH_SHORT).show() } } |
1 2 3 4 | - (void) userRestoreIdReceived:(NSNotification *) notification { NSLog(@"Your restore id is - %@",[FreshchatUser sharedInstance].restoreID); NSLog(@"Your query external id is - %@",[FreshchatUser sharedInstance].externalID); } |
1 2 3 4 | func userRestoreIdReceived() { print("Your restore id is - " FreshchatUser.sharedInstance().restoreID) print("Your query external id is - " FreshchatUser.sharedInstance().externalID) } |
1 2 3 4 5 6 7 8 9 | const userRestoreIdGeneratedHandler = () => { console.log("onRestoreIdUpdated triggered"); Freshchat.getUser((user) => { var restoreId = user.restoreId; var externalId = user.externalId; console.log("externalId: " + externalId); console.log("restoreId: " + restoreId); }) }; |
1 2 3 4 5 6 | var restoreStreamSubscription = restoreStream.listen((event) { FreshchatUser user = Freshchat.getUser(); var restoreId = user.getRestoreId(); var externalId = user.getExternalId(); }); |
1 | LocalBroadcastManager.getInstance(getApplicationContext()).unregisterReceiver(broadcastReceiver); |
1 | LocalBroadcastManager.getInstance(applicationContext).unregisterReceiver(restoreIdReceiver) |
1 | [[NSNotificationCenter defaultCenter] removeObserver:self name:FRESHCHAT_USER_RESTORE_ID_GENERATED object:nil]; |
1 | NotificationCenter.default.removeObserver(FRESHCHAT_USER_RESTORE_ID_GENERATED) |
1 2 3 | const unregisterFromRestoreIdUpdatedEvent = () => { Freshchat.removeEventListeners(Freshchat.EVENT_USER_RESTORE_ID_GENERATED); }; |
1 | No specific unregister action required. |
Note:Make sure to save the restoreID on your server to retrieve conversations later.
Now all the conversations are mapped to the exteralid and restoreid.
Retrieving conversations
You can use the app to retrieve saved conversations in the following scenarios:
- When the user uninstalls/reinstalls the app
- When the user logs out and logs into the same app
- When the user switches across devices, OS, or, platforms
1 | Freshchat.getInstance(getApplicationContext()).identifyUser(externalId, restoreId); |
1 | Freshchat.getInstance(context).identifyUser(externalId, restoreId) |
1 | [[Freshchat sharedInstance] identifyUserWithExternalID:@"externalId" restoreID: @"restoreId"]; |
1 | Freshchat.sharedInstance().identifyUser(withExternalID: "externalId", restoreID: "restoreId") |
1 2 3 4 5 | const identifyUser = () => { Freshchat.identifyUser("externalId", "restoreId", (error) => { console.log(error); }); }; |
1 | Freshchat.identifyUser(externalId:"EXTERNAL_ID",restoreId:"RESTORE_ID"); |
Notes:
1. Restore Id for a user is typically generated only when the user has sent a message.
2. Notifications are supported in only one mobile device at any point in time and is currently the last restored device or device with the last updated push token.
Reset user data
Reset user data at logout or when appropriate based on user action in the app by invoking the resetUser API.
Note: Ensure that you call this function whenever your users log out. Otherwise, conversations will be visible to the newly logged-in user too.1 | Freshchat.resetUser(getApplicationContext()); |
1 | Freshchat.resetUser(context) |
1 2 3 | [[Freshchat sharedInstance] resetUserWithCompletion:^ { //Completion block code here }]; |
1 2 3 | Freshchat.sharedInstance().resetUser(completion: { () in //Completion code }) |
1 | Freshchat.resetUser() |
1 | Freshchat.resetUser(); |
Log user events in timeline
Tracking user events provides more insight and context about the user(s) in your application. Events like user actions, failure/error cases can be tracked using this API. Tracked events are listed under Events Timeline on the agent side. (Available from version 3.1.0)
1 2 3 4 5 6 7 8 9 10 | String eventName = "Visited Order Details page"; // Create a map and set required properties like below HashMap<String, Object> properties = new HashMap<>(); properties.put("Order Id", 3223232332); properties.put("Order Date", "24 Jan 2020"); properties.put("Order Status ", "In-Transit"); // Call trackEvent by passing eventName and a map of properties Freshchat.trackEvent(getContext(), eventName, properties); |
1 2 3 4 5 6 | val eventName:String = “Visited Order Details page” val properties: MutableMap<String, Any> = HashMap() properties["Order Id"] = 3223232332 properties["Order Date"] = "24 Jan 2020" properties["Order Status”] = "In-Transit" Freshchat.trackEvent(context, eventName, properties) |
1 | [[Freshchat sharedInstance] trackEvent:"Event_Name" withProperties:PropertiesDictionary]; |
1 | Freshchat.sharedInstance()?.trackEvent("Event_Name", withProperties: PropertiesDictionary) |
1 2 3 4 5 6 7 8 9 | const trackEvent = () => { var properties = { "prop1": "value1", "prop2": 12, "prop3": 12.34 }; Freshchat.trackEvent("TestEvent", properties); }; |
1 2 3 4 5 6 | var eventName = "Visited Order Details page"; var eventProperties = {"Order Id": 3223232332, "Order Date": "24 Jan 2020", "Order Status ": "In-Transit"}; Freshchat.trackEvent(eventName, properties: eventProperties); |
Notes:
1. Freshdesk Messaging allows only 121 unique events per account.
2. Event name accepts string value (max 32 chars).
3. Property key name should be of string type (max 32 chars).
4. Property value can be of any primitive object type (max 256 chars).
5. Freshdesk Messaging allows you to send a maximum of 20 properties per event.
Handle push notifications
Integrating Freshchat push notification in your application helps users receive your support messages quicker.
Server Side Integration
Connecting Freshchat with Firebase Cloud Messaging (FCM)
Prerequisites
Before you proceed, make sure that you do the following:
- Implement FCM in your app
- Device runs Play Services
- Save FCM Server Key in Freshchat web portal
Saving FCM server key in Freshchat web portal
Get your Application's Firebase FCM server key and save it in the Freshchat web app under Admin > Mobile SDK > FCM Server key.
Client Side Integration
Sending the device registration token to Freshchat SDK
Note: Before proceeding, ensure to push registration token to Freshchat SDK
1 2 | String token = FirebaseInstanceId.getInstance().getToken(); Freshchat.getInstance(this).setPushRegistrationToken(token); |
1 | Freshchat.getInstance(this).setPushRegistrationToken(token) |
Handling messages
When you implement FirebaseMessagingService, pass the RemoteMessage object to Freshchat if it is a Freshchat notification.
1 2 3 4 5 6 7 8 | public void onMessageReceived(RemoteMessage remoteMessage) { if (Freshchat.isFreshchatNotification(remoteMessage)) { Freshchat.handleFcmMessage(context, remoteMessage); } else { // Handle notifications with data payload for your app } } |
1 2 3 4 5 6 7 | override fun onMessageReceived(remoteMessage: RemoteMessage){ if (Freshchat.isFreshchatNotification(remoteMessage)) { Freshchat.handleFcmMessage(this, remoteMessage) } else { //Handle notifications for app } } |
To troubleshoot any issues with push notifications, check Fixing broken Android push notifications.
Customizing Notifications
You can customize the notifications that the app can receive for agent replies to chat. These notifications contain details like icons, agent messages, app names, etc. Freshchat SDK supports customizing the following for notifications.
1. Notification Icon (Small Icon and Large Icon): App icon is used as the default for the small icon if not set explicitly.
2. Notification Sound: Enable or disable notification tone. By default it is disabled.
3. Notification Priority: Priority for notifications in below Android 8.0 devices. Default is NotificationCompat.PRIORITY_DEFAULT.
4. Notification Importance: Importance for notifications in Android 8.0+ devices. Default is NotificationManagerCompat.IMPORTANCE_DEFAULT.
This can be modified to show Heads up Notifications.
5. Activity to launch on up navigation from the messages screen launched from notification.
The messages screen will have no activity to navigate to the backstack when it is launched from notification. Specify the activity class name to be launched.
6. For specifying the accent color of the circle behind the small icon in a notification.
7. On Oreo and later versions of Android, you can customize the notification channel name used to deliver notifications by overriding the string as below.
1 2 3 4 5 6 7 | FreshchatNotificationConfig notificationConfig = new FreshchatNotificationConfig() .setNotificationSoundEnabled(true) .setSmallIcon(R.drawable.ic_notif_small_icon) .setLargeIcon(R.drawable.ic_notif_large_icon) .launchActivityOnFinish(MainActivity.class.getName()) .setPriority(NotificationCompat.PRIORITY_HIGH); Freshchat.getInstance(getApplicationContext()).setNotificationConfig(notificationConfig); |
1 2 3 4 5 6 | val notificationConfig = FreshchatNotificationConfig() .setNotificationSoundEnabled(true) .setSmallIcon(R.drawable.ic_notif_small_icon) .setLargeIcon(R.drawable.ic_notif_large_icon) .launchActivityOnFinish(MainActivity::class.qualifiedName) .setNotificationSound(soundUri) .setImportance(NotificationManagerCompat.IMPORTANCE_MAX) Freshchat.getInstance(context)?.setNotificationConfig(notificationConfig) |
Android Oreo Support
Freshchat SDK supports Notification channels out of the box in Oreo or later. It automatically creates a notification channel for conversation messages.
Note: If you haven't integrated FCM, follow the instructions here and continue from 3.
Server Side Integration
Connecting Freshchat with Apple Push Notification Service(APNS)
Freshchat supports .p12 and .P8 certificates for sending push notifications for user messages or campaigns.
Note:
-
For instructions on creating a .P8 certificate and performing the subsequent upload, refer the following video.
-
To gain knowledge on creating a .P12 certificate, please refer to the documentation by click here.
Additionally, you can access a video tutorial on the same topic by following the video. -
To seamlessly integrate push notification into your Xcode project, follow the instructions provided in the following tutorial.
-
If you are interested in learning how to migrate from a .P12 certificate to a .P8 certificate, refer the video for detailed guidance.
Saving APNS key in Freshchat web portal
Get your Application's APNS key and save it in the Freshchat web app under Admin > Mobile SDK > APNS Push Certificate.
Client Side Integration
Configuration for notification setup in app delegate file.
Requesting Permission for notification from user.
1 2 3 4 5 6 | UNUserNotificationCenter *notifcenter = [UNUserNotificationCenter currentNotificationCenter]; notifcenter.delegate = self; [notifcenter requestAuthorizationWithOptions:(UNAuthorizationOptionBadge | UNAuthorizationOptionAlert |UNAuthorizationOptionSound) completionHandler:^(BOOL granted, NSError * _Nullable error) { NSLog(@"Succes %d", granted); }]; [[UIApplication sharedApplication] registerForRemoteNotifications]; |
1 2 3 | UNUserNotificationCenter.current().delegate = self UNUserNotificationCenter.current().requestAuthorization(options:[.badge, .alert, .sound]){ (granted, error) in } UIApplication.shared.registerForRemoteNotifications() |
Sending the device registration token to Freshchat
To enable it, add setPushRegistrationToken API into your app delegate\'s didRegisterForRemoteNotificationsWithDeviceToken method as follow.
1 | [[Freshchat sharedInstance] setPushRegistrationToken:deviceToken]; |
1 | Freshchat.sharedInstance().setPushRegistrationToken(deviceToken) |
Handling messages
To handle push notification messages in active or background state add the following method in didReceiveRemoteNotification delegate method respectively.
1 2 3 | if ([[Freshchat sharedInstance]isFreshchatNotification:info]) { [[Freshchat sharedInstance]handleRemoteNotification:info andAppstate:app.applicationState]; } |
1 2 3 | if Freshchat.sharedInstance().isFreshchatNotification(userInfo) { Freshchat.sharedInstance().handleRemoteNotification(userInfo, andAppstate: application.applicationState) } |
Note: isFreshchatNotification returns a BOOL. If remote notification was not sent by Freshchat, it returns NO and you can insert code to handle other notifications based on this check.
UNUserNotification Framework
This is the new method of configuring push notifications From iOS 10.1. Older approaches will work but they are deprecated. If you are using UserNotifications.framework for handling notifications, make sure you are handling Freshchat notifications in willPresent & didReceive methods as shown below.
1 2 3 4 5 6 7 8 9 10 11 12 13 14 15 16 17 18 19 20 21 22 | /* For devices running on ios 10 and above */ // willPresent - (void)userNotificationCenter:(UNUserNotificationCenter *)center willPresentNotification:(UNNotification *)notification withCompletionHandler:(void (^) UNNotificationPresentationOptions options))completionHandler { if ([[Freshchat sharedInstance]isFreshchatNotification:notification.request.content.userInfo]) { [[Freshchat sharedInstance]handleRemoteNotification:notification.request.content.userInfo andAppstate:[[UIApplication sharedApplication] applicationState]]; completionHandler( UNAuthorizationOptionSound ); // To Display Alert banner in app foreground state -> completionHandler( UNAuthorizationOptionAlert | UNAuthorizationOptionSound ) } else { completionHandler( UNAuthorizationOptionAlert | UNAuthorizationOptionSound | UNAuthorizationOptionBadge ); } } // didReceive - (void)userNotificationCenter:(UNUserNotificationCenter *)center didReceiveNotificationResponse:(UNNotificationResponse *)response withCompletionHandler:(void (^)(void))completionHandler { if ([[Freshchat sharedInstance]isFreshchatNotification:response.notification.request.content.userInfo]) { [[Freshchat sharedInstance]handleRemoteNotification:response.notification.request.content.userInfo andAppstate:[[UIApplication sharedApplication] applicationState]]; completionHandler( UNAuthorizationOptionSound ); } else { completionHandler( UNAuthorizationOptionAlert | UNAuthorizationOptionSound | UNAuthorizationOptionBadge ); } } |
1 2 3 4 5 6 7 8 9 10 11 12 13 14 15 16 | // willPresent func userNotificationCenter(_ center: UNUserNotificationCenter, willPresent notification: UNNotification, withCompletionHandler completionHandler: @escaping (UNNotificationPresentationOptions) -> Void) { if Freshchat.sharedInstance().isFreshchatNotification(notification.request.content.userInfo) { Freshchat.sharedInstance().handleRemoteNotification(notification.request.content.userInfo, andAppstate: UIApplication.shared.applicationState) } completionHandler([ .sound]) // To Display Alert banner in app foreground state -> completionHandler([ .sound, .alert]) } // didReceive func userNotificationCenter(_ center: UNUserNotificationCenter, didReceive response: UNNotificationResponse, withCompletionHandler completionHandler: @escaping () -> Void) { if Freshchat.sharedInstance().isFreshchatNotification(notification.request.content.userInfo) { Freshchat.sharedInstance().handleRemoteNotification(notification.request.content.userInfo, andAppstate: UIApplication.shared.applicationState) } completionHandler([.alert, .badge, .sound]) } |
Server Side Integration
1. In Firebase Console Under your project go to the cloud messaging tab and you will see your Server Key, copy that. If you do not have a Firebase account for your application. You can also refer to the Firebase setup documentation here:
2. Save this FCM server key in Freshchat web portal under Admin -> Mobile SDK
3. To integrate our service on the server side for ReactNative Android, please navigate to the 'Android' tab in the top-level menu and follow the instructions provided under 'Server Side Integration.' This will guide you through the integration process for React Native Android.
Client Side Integration:
Please follow the below steps to integrate push notifications in your mobile app. Below steps are under the assumption that your app is handing other push notifications.
Steps:
1. Saving push token: Each application will have a push token. Freshchat needs this token to send push notifications to users. You can use below snippet to send token to Freshchat SDK.
1 2 3 4 5 6 7 8 | token = nil if (Platform.isAndroid) { token = fcmToken } else { token = apnsToken } Freshchat.setPushRegistrationToken(token); |
1 2 3 4 5 6 7 8 9 10 | Freshchat.isFreshchatNotification(notification, (freshchatNotification) => { if (freshchatNotification) { Freshchat.handlePushNotification(notification); } else { // handle your app notification } }) |
Customizing Notifications:(Android only)
1 2 3 4 5 6 7 8 9 10 11 | // Add the below code in index.js var freshchatNotificationConfig = new FreshchatNotificationConfig(); freshchatNotificationConfig.priority = FreshchatNotificationConfig.NotificationPriority.PRIORITY_HIGH; freshchatNotificationConfig.notificationSoundEnabled = true; freshchatNotificationConfig.largeIcon = "notif"; // Drawable name freshchatNotificationConfig.smallIcon = "notif"; // Drawable name Freshchat.setNotificationConfig(freshchatNotificationConfig); Freshchat.setPushRegistrationToken(device.pushToken); |
Push Notification checklists:
1. Make sure you have added correct FCM key of your application in Freshchat portal
2. Don’t check the emulator, which doesn't have google play service enabled. Check in the real device.
3. Confirm you are passing on device token to the Freshchat using the following method,
1 2 3 4 5 6 7 8 | token = nil if (Platform.isAndroid) { token = fcmToken } else { token = apnsToken } Freshchat.setPushRegistrationToken(token); |
5. Refer the codes here for plugin implementation, confirm you have implemented all the recommendations.
If the problem persists, try the following URL, https://<
Server Side Integration
To integrate our service on the server side for ReactNative iOS, please navigate to the 'IOS' tab in the top-level menu and follow the instructions provided under 'Server Side Integration.' This will guide you through the integration process for React Native iOS.
Client Side Integration
To integrate our service on the client side for ReactNative iOS, please navigate to the 'iOS' tab in the top-level menu and follow the instructions provided under 'Client Side Integration.' This will guide you through the integration process for React Native iOS
Push Notification Checklist:1. Make sure you have uploaded the correct push certificate in the Freschat portal.
2. When utilizing a P12 certificate, it's crucial to verify whether you're operating in the development or production environment. Ensure that you upload the appropriate certificate to the Freschat portal accordingly.
3. Don’t check in the iOS simulator, since it did not have push notification capability. Check the real device.
4. Push notification capability should be enabled in your Xcode project.
5. Make sure you give permission to push notification for your application. If not go to Admin -> under your application, enable push notification.
6. Make sure apns device token is set on Freshchat using the following method "Freshchat.setPushRegistrationToken(token)"
7. Under the Appdelegate class make sure you have either UNUserNotificationCenter delegate methods or [UIApplicationDelegate application:didReceiveRemoteNotification:fetchCompletionHandler:] is implemented. And if the UNUserNotificationCenter framework is being used, make sure a delegate has been set for that.
8. Add respective react bridging codes on the push notification delegate methods.
9. Refer the codes here for plugin implementation, confirm you have implemented all the recommendations.
10. If you have a Notification extension in your app, make sure it's not blocking the notification.
Server Side Integration
1. In Firebase Console Under your project go to cloud messaging tab and you will see your Server Key, copy that.
If you do not have a Firebase account for your application.
Refer here
2. Save this FCM server key in Freshchat web portal under Admin -> Mobile SDK.
3. To integrate our service on the server side for Flutter Android, please navigate to the 'Android' tab
in the top-level menu and follow the instructions provided under 'Server Side Integration.'
This will guide you through the integration process for Flutter Android.
Client Side Integration
Please follow the below steps to integrate push notifications in your Android version of the mobile app.
The below steps are suggested under the assumption that your app is handling other push notifications.
Steps:
1. Saving push token: Each application will have a firebase push token.
Freshchat needs this token to send push notifications to users. You can use the below snippet to send firebase token to Freshchat SDK.
1 2 3 4 | if(Platform.isAndroid) { Freshchat.setPushRegistrationToken(token); } |
2. Passing received push notification payload to Freshchat SDK:
1 2 3 4 5 6 7 8 9 | FirebaseMessaging firebaseMessaging = FirebaseMessaging(); firebaseMessaging.configure(onMessage: (Map<String,dynamic> message)async { if(await Freshchat.isFreshchatNotification(message['data'])) { Freshchat.handlePushNotification(message['data']); } } onBackgroundMessage: myBackgroundMessageHandler);); |
Follow this documentation to set up background FCM notification support for your flutter app. Register the Freshchat SDK plugin inside the registerWith method by adding this line inside it.
1 2 3 4 5 6 7 | import com.freshchat.consumer.sdk.flutter.FreshchatSdkPlugin; public void registerWith(PluginRegistry registry) { FirebaseMessagingPlugin.registerWith(registry.registrarFor("io.flutter.plugins.firebasemessaging.FirebaseMessagingPlugin")); FreshchatSdkPlugin.register(registry) } |
1 2 3 4 5 6 7 | Future<dynamic> myBackgroundMessageHandler(Map<String,dynamic> message) async { if(await Freshchat.isFreshchatNotification(message['data'])) { Freshchat.handlePushNotification(message['data']); }} |
Add the below code in your dart file
1 2 3 4 5 6 | Freshchat.setNotificationConfig( priority: Priority.PRIORITY_HIGH, importance: Importance.IMPORTANCE_DEFAULT, notificationSoundEnabled:true, largeIcon:"notif"// Drawable name, smallIcon:"notif"// Drawablename); |
We have identified some potential areas where the problem happens.
So we consolidated those into checklists, check if you have done everything.
1. Make sure you have added correct FCM key of your application in Freshchat portal
2. Don’t check in Android emulators as they usually don't have the Google Play Service enabled. It's better to run tests and check using an actual Android device.
3. Confirm you are passing on device token to the Freshchat using the following method,
1 | Freshchat.setPushRegistrationToken(fcmToken); |
5. Refer to the codes here for plugin implementation, confirm you have implemented all the recommendations.
If the problem persists, try the following URL,
https://<
Server Side Integration
To integrate our service on the Server side for Flutter iOS, please navigate to the 'iOS' tab in the top-level menu and follow the instructions provided under 'Client Side Integration.' This will guide you through the integration process for Flutter iOS
Client Side Integration
Configuration for notification setup in app delegate file.
Requesting Permission for notification from user.
1 2 3 4 5 | UNUserNotificationCenter *notifcenter = [UNUserNotificationCenter currentNotificationCenter]; [notifcenter requestAuthorizationWithOptions:(UNAuthorizationOptionBadge | UNAuthorizationOptionAlert |UNAuthorizationOptionSound) completionHandler:^(BOOL granted, NSError * _Nullable error) { NSLog(@“Succes %d”, granted); }]; [[UIApplication sharedApplication] registerForRemoteNotifications]; |
1 2 3 | UNUserNotificationCenter.current().delegate = self UNUserNotificationCenter.current().requestAuthorization(options:[.badge, .alert, .sound]){ (granted, error) in } UIApplication.shared.registerForRemoteNotifications() |
Sending the device registration token to Freshchat
To enable it, add setPushRegistrationToke API into your app delegate\'s didRegisterForRemoteNotificationsWithDeviceToken method as follow.
1 2 | FreshchatSdkPlugin* freshchatSdkPlugin = [[FreshchatSdkPlugin alloc] init]; [freshchatSdkPlugin setPushRegistrationToken:deviceToken]; |
1 2 | let freshchatSdkPlugin = FreshchatSdkPlugin() freshchatSdkPlugin.setPushRegistrationToken(deviceToken) |
Handling messages
To handle push notification messages in active or background state add the following method in didReceiveRemoteNotification delegate method respectively.
1 2 3 4 | FreshchatSdkPlugin* freshchatSdkPlugin = [[FreshchatSdkPlugin alloc] init]; if ([freshchatSdkPlugin isFreshchatNotification:info]) { [freshchatSdkPlugin handleRemoteNotification:info andAppstate:app.applicationState]; } |
1 2 3 4 | let freshchatSdkPlugin = FreshchatSdkPlugin() if freshchatSdkPlugin.isFreshchatNotification(userInfo) { freshchatSdkPlugin.handleRemoteNotification(userInfo, andAppstate: application.applicationState) } |
Note: isFreshchatNotification returns a BOOL. If remote notification was not sent by Freshchat, it returns NO and you can insert code to handle other notifications based on this check.
UNUserNotification Framework
This is the new method of configuring push notifications From iOS 10.1. Older approaches will work but they are deprecated. If you are using UserNotifications.framework for handling notifications, make sure you are handling Freshchat notifications in willPresent & didReceive methods as shown below.
1 2 3 4 5 6 7 8 9 10 11 12 13 14 15 16 17 18 19 20 21 22 23 24 | /* For devices running on ios 10 and above */ FreshchatSdkPlugin* freshchatSdkPlugin = [[FreshchatSdkPlugin alloc] init]; // willPresent - (void)userNotificationCenter:(UNUserNotificationCenter *)center willPresentNotification:(UNNotification *)notification withCompletionHandler:(void (^) UNNotificationPresentationOptions options))completionHandler { if ([freshchatSdkPlugin isFreshchatNotification:notification.request.content.userInfo]) { [freshchatSdkPlugin handleRemoteNotification:notification.request.content.userInfo andAppstate:[[UIApplication sharedApplication] applicationState]]; completionHandler( UNAuthorizationOptionSound ); // To Display Alert banner in app foreground state -> completionHandler( UNAuthorizationOptionAlert | UNAuthorizationOptionSound ) } else { completionHandler( UNAuthorizationOptionAlert | UNAuthorizationOptionSound | UNAuthorizationOptionBadge ); } } // didReceive - (void)userNotificationCenter:(UNUserNotificationCenter *)center didReceiveNotificationResponse:(UNNotificationResponse *)response withCompletionHandler:(void (^)(void))completionHandler { if ([freshchatSdkPlugin isFreshchatNotification:response.notification.request.content.userInfo]) { [freshchatSdkPlugin handleRemoteNotification:response.notification.request.content.userInfo andAppstate:[[UIApplication sharedApplication] applicationState]]; completionHandler( UNAuthorizationOptionSound ); } else { completionHandler( UNAuthorizationOptionAlert | UNAuthorizationOptionSound | UNAuthorizationOptionBadge ); } } |
1 2 3 4 5 6 7 8 9 10 11 12 13 14 15 16 17 18 | let freshchatSdkPlugin = FreshchatSdkPlugin() // willPresent func userNotificationCenter(_ center: UNUserNotificationCenter, willPresent notification: UNNotification, withCompletionHandler completionHandler: @escaping (UNNotificationPresentationOptions) -> Void) { if freshchatSdkPlugin.isFreshchatNotification(notification.request.content.userInfo) { freshchatSdkPlugin.handleRemoteNotification(notification.request.content.userInfo, andAppstate: UIApplication.shared.applicationState) } completionHandler([ .sound]) // To Display Alert banner in app foreground state -> completionHandler([ .sound, .alert]) } // didReceive func userNotificationCenter(_ center: UNUserNotificationCenter, didReceive response: UNNotificationResponse, withCompletionHandler completionHandler: @escaping () -> Void) { if freshchatSdkPlugin.isFreshchatNotification(notification.request.content.userInfo) { freshchatSdkPlugin.handleRemoteNotification(notification.request.content.userInfo, andAppstate: UIApplication.shared.applicationState) } completionHandler([.alert, .badge, .sound]) } |
Freshchat SDK is capable of getting push notifications for all user conversations.
Push Notification Checklist:
We have identified some potential areas where the problem happens. So we consolidated those into checklists, check if you have done everything.
1. Make sure you have uploaded the correct push certificate in the Freshchat portal.
2. Make sure that you are checking in the development or production environment and upload the respective certificate in the Freshchat portal.
3. Don’t check in the iOS simulator, since it does not have push notification capability. Run tests and check by using an actual iOS device.
4. Push notification capability should be enabled in your Xcode project.
5. Make sure to give permissions to push notifications for your application. Navigate to Admin > your application > enable push notification.
6. Add respective flutter bridging codes on the push notification delegate methods.
7. Refer to the codes here for plugin implementation, confirm you have implemented all the recommendations in AppDelegate.
8. If you have a Notification extension in your app, make sure it's not blocking the notification.
If the problem persists, try the following URL, https://<
Display FAQs
Invoking FAQs
In response to specific UI events like a menu selection or button click event, you can invoke the showFAQs() API to launch the FAQ screen. By default, the FAQ categories are displayed as a grid with a “Contact Us” button at the bottom. For customizing this, check the Customizing FAQ Flow.
1 2 3 4 5 6 | myFAQButton.setOnClickListener(new OnClickListener() { @Override public void onClick(View view) { Freshchat.showFAQs(getApplicationContext()); } }); |
1 2 3 | faqButton.setOnClickListener { Freshchat.showFAQs(context) } |
1 2 3 | - (IBAction)showFeedbackOverlay:(id)sender { [[Freshchat sharedInstance] showFAQs:self]; } |
1 2 3 | func presentFAQ(sender: Any) { Freshchat.sharedInstance().showFAQs(self) } |
1 | Freshchat.showFAQs(); |
1 | Freshchat.showFAQs(); |
Customizing FAQ Flow
You can customize the FAQ flow using the FaqOptions instance in showFAQs() API. The FAQs are typically the solution articles categories you build in the Knowledge Base.
Example: To launch the FAQ from the click of a button in your app screen, use the following:1 2 3 4 5 6 7 8 9 10 11 12 13 | myFAQButton.setOnClickListener(new OnClickListener() { @Override public void onClick(View view) { FaqOptions faqOptions = new FaqOptions() .showFaqCategoriesAsGrid(true) //To display the FAQ categories as list, set the value as false. .showContactUsOnAppBar(true) // To hide Contact us from the app bar, set the value as true. .showContactUsOnFaqScreens(false) //To show Contact us on FAQ screen, set the value as true. .showContactUsOnFaqNotHelpful(false); //To show Contact us on FAQ feedback, set the value as true Freshchat.showFAQs(MainActivity.this, faqOptions); } }); |
1 2 3 4 5 6 7 | val faqOptions = FaqOptions() faqOptions.showFaqCategoriesAsGrid(true) //To display the FAQ categories as list, set the value as false. faqOptions.showContactUsOnAppBar(true) // To hide Contact us from the app bar, set the value as true. faqOptions.showContactUsOnFaqScreens(false) //To show Contact us on the FAQ screen, set the value as true. faqOptions.showContactUsOnFaqNotHelpful(false) //To show Contact us on FAQ feedback, set the value as true Freshchat.showFAQs(context, faqOptions) |
1 2 3 4 5 6 | FAQOptions *options = [FAQOptions new]; options.showFaqCategoriesAsGrid = YES; // Show FAQ in grid formal, NO to list view options.showContactUsOnFaqScreens = YES; // Show chat option from FAQ section options.showContactUsOnFaqNotHelpful = YES; // Show contact us in article detail when user select Not Helpful options.showContactUsOnAppBar = YES; // Show chat option over navigation bar in FAQ category view or article list view [[Freshchat sharedInstance]showFAQs:self withOptions:options]; |
1 2 3 4 5 6 | let options = FAQOptions.init() options.showFaqCategoriesAsGrid = true // Show FAQ in grid formal, false to list view options.showContactUsOnFaqScreens = true // Show chat option from FAQ section options.showContactUsOnFaqNotHelpful = true // Show contact us in article detail when user select Not Helpful options.showContactUsOnAppBar = true // Show chat option over navigation bar in FAQ category view or article list view Freshchat.sharedInstance().showFAQs(self, with: options) |
1 2 3 4 5 6 7 8 9 10 | import { FaqOptions } from 'react-native-freshchat-sdk'; var faqOptions = new FaqOptions(); faqOptions.tags = ["payment_failure"]; faqOptions.filteredViewTitle = "Payments"; faqOptions.filterType = FaqOptions.FilterType.ARTICLE; faqOptions.showFaqCategoriesAsGrid = true; faqOptions.showContactUsOnFaqScreens = true; faqOptions.showContactUsOnFaqNotHelpful = true; faqOptions.contactusFilterTags = ["payments"]; Freshchat.showFAQs(faqOptions); |
1 2 3 4 5 6 7 | Freshchat.showFAQs(faqTitle:"Payments", faqTags:["payment_failure"], faqFilterType:FaqFilterType.Article, showFaqCategoriesAsGrid:true, showContactUsOnFaqScreens:true, showContactUsOnFaqNotHelpful:true, contactUsTags:["payments"]); |
Filtering FAQ categories by tags
To filter and display only FAQ categories tagged with a specific term, use the filterByTags API with Filter Type as a category in the FAQ Options instance in showFAQs() API.
Example: To display FAQ Categories related to specific user type, tag the categories with the term "premium".1 2 3 4 5 6 7 | List<String> tags = new ArrayList<>(); tags.add("premium"); FaqOptions faqOptions = new FaqOptions() .filterByTags(tags, "FAQs", FaqOptions.FilterType.CATEGORY);//tags, filtered screen title, type Freshchat.showFAQs(MainActivity.this, faqOptions); |
1 2 3 4 5 | val tagsList: MutableList<String> = ArrayList() tagsList.add("premium") val faqOptions = FaqOptions() faqOptions.filterByTags(tagsList, “FAQ”, FaqOptions.FilterType.CATEGORY) Freshchat.showFAQs(context, faqOptions) |
1 2 3 | FAQOptions *options = [FAQOptions new]; [options filterByTags:@[ @"payment", @"billing" ] withTitle:@"Filtered_View_Title" andType: CATEGORY]; [[Freshchat sharedInstance]showFAQs:self withOptions:options]; |
1 2 3 4 | let options = FAQOptions.init() let tags: [String] = ["payment", "billing"] options.filter(byTags: tags, withTitle:"Filtered_View_Title", andType :CATEGORY) Freshchat.sharedInstance().showFAQs(self, with: options) |
1 2 3 4 5 6 | import { FaqOptions } from 'react-native-freshchat-sdk'; var faqOptions = new FaqOptions(); faqOptions.tags = ["premium"]; faqOptions.filteredViewTitle = "Tags"; faqOptions.filterType = FaqOptions.FilterType.CATEGORY; Freshchat.showFAQs(faqOptions); |
1 | Freshchat.showFAQs(faqTags:["premium"],faqFilterType: FaqFilterType.Category ); |
Filtering FAQ articles by tags
To filter and display FAQ articles tagged with a specific term, use the filterByTags API with Filter Type as Article in FAQOptions instance in showFAQs() API.
Note: FAQs also inherit the tags from the parent FAQ Category.
1 2 3 4 5 6 7 | List<String> tags = new ArrayList<>(); tags.add("payment_failure"); FaqOptions faqOptions = new FaqOptions() .filterByTags(tags, "payment_failure", FaqOptions.FilterType.ARTICLE);//tags, filtered screen title, type Freshchat.showFAQs(MainActivity.this, faqOptions); |
1 2 3 4 5 | val tagsList: MutableList<String> = ArrayList() tagsList.add("payment_failure") val faqOptions = FaqOptions() faqOptions.filterByTags(tagsList, “Payment Failure”, FaqOptions.FilterType.ARTICLE) Freshchat.showFAQs(context, faqOptions) |
1 2 3 | FAQOptions *options = [FAQOptions new]; [options filterByTags:@[ @"payment", @"billing" ] withTitle:@"Filtered_View_Title" andType: ARTICLE]; [[Freshchat sharedInstance]showFAQs:self withOptions:options]; |
1 2 3 4 | let options = FAQOptions.init() let tags: [String] = ["payment", "billing"] options.filter(byTags: tags, withTitle:"Filtered_View_Title", andType :ARTICLE) Freshchat.sharedInstance().showFAQs(self, with: options) |
1 2 3 4 5 6 | import { FaqOptions } from 'react-native-freshchat-sdk'; var faqOptions = new FaqOptions(); faqOptions.tags = ["premium"]; faqOptions.filteredViewTitle = "Tags"; faqOptions.filterType = FaqOptions.FilterType.ARTICLE; Freshchat.showFAQs(faqOptions); |
1 | Freshchat.showFAQs(faqTags:["payment_failure"],faqFilterType: FaqFilterType.Article); |
Filter topics in FAQs by tags
You can make specific topics appear for customers when they click on Contact Us option from the FAQ screen. For this, use the filterContactUsByTags API in FAQOptions instance in showFAQs() API.
Example: To display all topics related to payment failure, tag the topics with the the term "payment_failure".1 2 3 4 5 6 7 8 | List<String> tags = new ArrayList<>(); tags.add("payment_failure"); FaqOptions faqOptions = new FaqOptions() .filterContactUsByTags(tags, "Payments"); //tags, filtered screen title Freshchat.showFAQs(MainActivity.this, faqOptions); |
1 2 3 4 5 | val tagsList: MutableList<String> = ArrayList() tagsList.add("payment_failure") val faqOptions = FaqOptions() faqOptions.filterContactUsByTags(tagsList, “Payment Failure”) Freshchat.showFAQs(context, faqOptions) |
1 2 3 | FAQOptions *options = [FAQOptions new]; [options filterContactUsByTags:@[@"filter_tags"] withTitle:"Filtered_Message_Us_View_title"]; [[Freshchat sharedInstance]showFAQs:self withOptions:options]; |
1 2 3 | let options = FAQOptions.init() options.filterContactUs(byTags: ["filter_tags"], withTitle: "Filtered_Message_Us_View_title") Freshchat.sharedInstance().showFAQs(self, with: options) |
1 2 3 4 5 6 7 | import { FaqOptions } from 'react-native-freshchat-sdk'; var faqOptions = new FaqOptions(); faqOptions.tags = ["payment_failure"]; faqOptions.filteredViewTitle = "Payments"; faqOptions.filterType = FaqOptions.FilterType.ARTICLE; faqOptions.contactusFilterTags = ["payments"]; Freshchat.showFAQs(faqOptions); |
1 2 3 4 | Freshchat.showFAQs(faqTitle:"Payments", faqTags:["payment_failure"], faqFilterType:FaqFilterType.Article, contactUsTags:["payments"]); |
Note: The default behavior for "Contact Us" from within FAQ flow is the same as invoking showConversations() i.e it will display all Topics that are marked "Visible to all users", except when filtering of Topics is enabled by passing tags to filterContactUsByTags API.
Manage user conversations
Introduction
In response to specific UI events like a menu selection or button on click event, invoke the showConversations() API to launch the conversation Flow. If the app has multiple topics configured, the user will see the topic list. The topic list is ordered as specified in the Dashboard (link to the Topics list in the dashboard) if there are no messages. If messages exist, the order is based on the most recently interacted topics.
Note: Only Topics with visibility set to "Visible to all users" will be displayed when using showConversations() API
Launching conversation list
1 2 3 4 5 6 | myConversationsButton.setOnClickListener(new OnClickListener() { @Override public void onClick(View view) { Freshchat.showConversations(getApplicationContext()); } }); |
1 2 3 | showConversationButton.setOnClickListener{ Freshchat.showConversations(context) } |
1 2 3 | - (IBAction)showFeedbackOverlay:(id)sender { [[Freshchat sharedInstance] showConversations:self]; } |
1 2 3 | func presentConversation(sender: Any) { Freshchat.sharedInstance().showConversations(self) } |
1 | Freshchat.showConversations(); |
1 | Freshchat.showConversations(); |
Filtering Conversation Topics
To filter and display only topics tagged with a specific term, use the filterByTags API in ConversationOptions instance in showConversations() API.
Example: To link and display specific Topics from the orders page in your app, tag the Topics the term "order_queries".1 2 3 4 5 | List<String> tags = new ArrayList<>(); tags.add("order_queries"); ConversationOptions options = new ConversationOptions() .filterByTags(tags, "Order Queries"); Freshchat.showConversations(MainActivity.this, options); |
1 2 3 4 5 | val tagsList: MutableList<String> = ArrayList() tagsList.add("order_queries") val convOptions = ConversationOptions() convOptions.filterByTags(tagsList, “Order Queries”) Freshchat.showConversations(context, convOptions) |
1 2 3 | ConversationOptions *options = [ConversationOptions new]; [options filterByTags:@[ @"all", @"paiduser" ] withTitle:@"Filter_View_Title"]; [[Freshchat sharedInstance] showConversations:self withOptions: options]; |
1 2 3 4 5 | let options = ConversationOptions.init() let tags: [String] = ["all","paidUser"] //Your filter tags options.filter(byTags: tags, withTitle: "Filter_View_Title") Freshchat.sharedInstance().showConversations(self, with: options) |
1 2 3 4 5 | import { ConversationOptions } from 'react-native-freshchat-sdk'; var conversationOptions = new ConversationOptions(); conversationOptions.tags = ["premium"]; conversationOptions.filteredViewTitle = "Premium Support"; Freshchat.showConversations(conversationOptions); |
1 | Freshchat.showConversations(filteredViewTitle:"Premium Support",tags:["premium"]); |
Notes:
- If no matching Topics are found, the user will be redirected to the default Topic.
- Topics that are not visible when using showConversations() API, will also be displayed when tagged and the specific tag is passed to filterByTags API of ConversationOptions instance passed to showConversations() API.
Displaying Unread Messages Count
To obtain the number of unread messages for the user at app launch or any other specific event, use the getUnreadCountAsync API and display the count.
Note: Before using this function, ensure to set up the push notifications.
1 2 3 4 5 6 7 | Freshchat.getInstance(getApplicationContext()).getUnreadCountAsync(new UnreadCountCallback() { @Override public void onResult(FreshchatCallbackStatus freshchatCallbackStatus, int unreadCount) { //Assuming "badgeTextView" is a text view to show the count on badgeTextView.setText(Integer.toString(unreadCount)); } }); |
1 2 3 4 5 | Freshchat.getInstance(applicationContext) .getUnreadCountAsync { freshchatCallbackStatus, unreadCount -> //Assuming "badgeTextView" is a text view to show the count on badgeTextView.setText(unreadCount.toString()) } |
1 2 3 | [[Freshchat sharedInstance] unreadCountWithCompletion:^(NSInteger count) { NSLog(@"your unread count : %d", (int)count); }]; |
1 2 3 | Freshchat.sharedInstance().unreadCount { (count:Int) -> Void in print("Unread count (Async) :\(count)") } |
1 2 3 4 | Freshchat.getUnreadCountAsync((data) => { console.log(data); }); |
1 2 3 4 | void getUnreadCount async { var unreadCount = await Freshchat.getUnreadCountAsync } |
Updating unread messages count
The app can also choose to listen to changes to unread count when the app is open. The way to listen to the broadcast is described below.
1 2 3 4 5 6 7 8 9 10 11 12 13 14 15 16 17 18 19 20 21 22 23 | // Registering the broadcast receiver IntentFilter intentFilter = new IntentFilter(Freshchat.FRESHCHAT_UNREAD_MESSAGE_COUNT_CHANGED); getLocalBroadcastManager(getApplicationContext()).registerReceiver(unreadCountChangeReceiver, intentFilter); // Listening to unread count changes BroadcastReceiver unreadCountChangeReceiver = new BroadcastReceiver() { @Override public void onReceive(Context context, Intent intent) { Freshchat.getInstance(getApplicationContext()).getUnreadCountAsync(new UnreadCountCallback() { @Override public void onResult(FreshchatCallbackStatus freshchatCallbackStatus, int unreadCount) { //Assuming "badgeTextView" is a text view to show the count on badgeTextView.setText(Integer.toString(unreadCount)); } }); } } // Unregistering the broadcast receiver getLocalBroadcastManager(getApplicationContext()).unregisterReceiver(unreadCountChangeReceiver); |
1 2 3 4 5 6 7 8 9 10 11 12 13 14 15 16 17 18 19 20 | // Registering the broadcast receiver val intentFilterUnreadMessageCount = IntentFilter(Freshchat.FRESHCHAT_UNREAD_MESSAGE_COUNT_CHANGED) LocalBroadcastManager.getInstance(applicationContext).registerReceiver(unreadCountChangeReceiver,intentFilterUnreadMessageCount) // Listening to unread count changes var unreadCountChangeReceiver: BroadcastReceiver = object : BroadcastReceiver() { override fun onReceive(context: Context, intent: Intent) { Freshchat.getInstance(applicationContext) .getUnreadCountAsync { freshchatCallbackStatus, unreadCount -> //Assuming "badgeTextView" is a text view to show the count on badgeTextView.setText(unreadCount.toString()) } } } // Unregistering the broadcast receiver LocalBroadcastManager.getInstance(applicationContext).unregisterReceiver(unreadCountChangeReceiver) |
1 2 3 4 5 6 7 8 9 10 11 12 13 14 15 16 17 | // Registering the broadcast receiver [[NSNotificationCenter defaultCenter] addObserver:self selector: @selector(methodOfReceivedNotification:) name:@"FRESHCHAT_UNREAD_MESSAGE_COUNT_CHANGED" object:nil]; // Listening to unread count changes - (void)methodOfReceivedNotification:(NSNotification *)notification { [[Freshchat sharedInstance] unreadCount:^(int count) { NSLog(@"Unread count (Async): %d", count); }]; } // Unregistering the broadcast receiver [[NSNotificationCenter defaultCenter]removeObserver:FRESHCHAT_UNREAD_MESSAGE_COUNT_CHANGED]; |
1 2 3 4 5 6 7 8 9 10 11 12 13 14 15 16 17 | // Registering the broadcast receiver NotificationCenter.default.addObserver(self, selector: #selector(self.methodOfReceivedNotification(notification:)), name: Notification.Name(FRESHCHAT_UNREAD_MESSAGE_COUNT_CHANGED), object: nil) // Listening to unread count changes func methodOfReceivedNotification(notification: Notification) { Freshchat.sharedInstance().unreadCount { (count:Int) -> Void in print("Unread count (Async) :\(count)") } } // Unregistering the broadcast receiver NotificationCenter.default.removeObserver(self, name: NSNotification.Name(rawValue: "FRESHCHAT_UNREAD_MESSAGE_COUNT_CHANGED"), object: nil) |
1 2 3 4 5 6 7 8 9 10 11 12 13 14 15 16 17 18 19 | Freshchat.addEventListener( Freshchat.EVENT_UNREAD_MESSAGE_COUNT_CHANGED, () => { console.log("onUnreadMessageCountChanged triggered"); Freshchat.getUnreadCountAsync((data) => { var count = data.count; var status = data.status; if (status) { console.log("Message count: " + count); } else { console.log("getUnreadCountAsync unsuccessful"); } }); } ); |
1 2 3 4 5 6 7 | // Open a stream to onMessageCountUpdate and listen to it var unreadCountStream = Freshchat.onMessageCountUpdate; unreadCountSubscription = unreadCountStream.listen((event) { print("New message generated: " + event.toString()); }); |
Displaying unread message count across conversations
You can filter and display an unread count tagged with a specific tag. These tags can be set up from the dashboard.
1 2 3 4 5 6 7 8 | List<String> tags = new ArrayList<>(); tags.add("premium"); // Tags to filter conversations by Freshchat.getInstance(getApplicationContext()).getUnreadCountAsync(new UnreadCountCallback() { @Override public void onResult(FreshchatCallbackStatus FreshchatCallbackStatus, int unreadCount) { badgeTextView.setText(Integer.toString(unreadCount)); } }, tags); |
1 2 3 4 5 6 7 | val tagsList: MutableList<String> = ArrayList() tagsList.add("payment_failure") Freshchat.getInstance(applicationContext) .getUnreadCountAsync( { freshchatCallbackStatus, unreadCount -> //Assuming "badgeTextView" is a text view to show the count on badgeTextView.setText(unreadCount.toString()) }, tagsList) |
1 2 3 4 | [[Freshchat sharedInstance] unreadCountForTags:@[@"tag1",@"tag2"] withCompletion:^(NSInteger count) { self.yourTagsCountLabel.text = [NSString stringWithFormat:@"UT %d",count]; NSLog(@"--With tags : %d",count); }]; |
1 2 3 | Freshchat.sharedInstance().unreadCount(forTags: ["tag1", "tag2"]) { count in self.yourTagsCountLabel.text = "UT \(count)" } |
1 2 3 4 5 6 7 | const getUnreadCountAsyncForTags = () => { Freshchat.getUnreadCountAsync({ tags: ["new", "test"] }, (data) => { console.log(data); }); }; |
1 2 3 4 5 | List<String> tags = ["sampleTag1","sampleTag2"]; void getUnreadCount async { var unreadCount = await Freshchat.getUnreadCountAsyncForTags(tags); } |
Note: To display unread message count, make sure that push notifications are already set up.
Localization
Freshchat React Native SDK is a wrapper for Freshchat Android and iOS SDKs.
So theme customisation has to be done in Android and iOS platform layer separately.
Language Localization
Localizing default SDK texts
All strings in SDK can be modified by overriding them in the respective locale strings.xml file. All Freshchat SDK texts can be found here.
For example, to change the title for the message Topics list page, include the following string in strings.xml:1 | <string name="freshchat_activity_title_channel_list">Conversations</string> |
Localizing FAQs and Topics
Once FAQs and Topics are localized in the Freshchat web app, SDK automatically updates content based on the user's app/device locale.
Localizing default SDK texts
All strings used in the Freshchat SDK UI can be customized and localized in multiple languages. You can do the following to customize your SDK.
Creating a bundle
Locate the FCLocalization.bundle in the FreshchatSDK pod or download the FCLocalization.bundle from here.
You can rename the file to a custom name.
The structure of the bundle folder would be as follows,
Sample bundle structure containing strings for English for Indian region, English for Australian region, French and German.
YouCustomBundle.bundle
-en-IN.Iproj
- FCLocalizable.strings
-en-AU.Iproj
- FCLocalizable.strings
-fr.Iproj
- FCLocalizable.strings
-de.Iproj
- FCLocalizable.strings
Note: To choose localization regions and scripts to define, refer to this link.
Changing strings
- In order to change a specific string used in the SDK UI, just update the appropriate key in FCLocalizable.strings. The keynames in the file are categorized by UI and the keys used are self-explanatory.
- Do the same for all the languages you want to support
- SDK comes with only English at the moment, but you will be able to use translations for any language you want.
Linking to project
- Once you have changed all the required strings in the languages that you are supporting, link it under “Build Phases” > “Copy Bundle Resources”.
- When you are initializing the SDK, specify that bundle name as part of Freshchat config.
- Define your custom bundle resources
1 | config.stringsBundle = @"MyCustomBundle"; |
1 | config.stringsBundle = @"MyCustomBundle"; |
1. Bundle name is case-sensitive
2. Extension .bundle is not required
Runtime App Locale Change
If your app can support different locales (languages) apart from the default locale of the device, follow the steps below to update the locale in your Freshchat SDK.
To enable language/locale changes within the app, you should use the ChangeLocale() method.
This function updates the default locale, sets the locale in the configuration, and updates the
configuration and display metrics accordingly.
It supports both older and newer versions of Android by checking the SDK version.
1 2 3 4 5 6 7 8 9 10 11 12 13 14 15 16 17 18 19 20 21 22 23 24 25 26 | * @param context The context of the application/activity. * @param language The language/locale to be set (e.g., "ar" for Arabic). public static void changeLocale(Context activityContext, String lang) { Locale locale = new Locale(lang); Locale.setDefault(locale); Resources res = activityContext.getApplicationContext().getResources(); DisplayMetrics dm = res.getDisplayMetrics(); Configuration conf = res.getConfiguration(); if (Build.VERSION.SDK_INT >= Build.VERSION_CODES.JELLY_BEAN_MR1) { conf.setLocale(locale); } else { conf.locale = locale; } res.updateConfiguration(conf, dm); Resources res2 = activityContext.getResources(); DisplayMetrics dm2 = res2.getDisplayMetrics(); Configuration conf2 = res2.getConfiguration(); if (Build.VERSION.SDK_INT >= Build.VERSION_CODES.JELLY_BEAN_MR1) { conf2.setLocale(locale); } else { conf2.locale = locale; } res2.updateConfiguration(conf2, dm2); } |
1 2 3 4 5 6 7 8 9 10 11 12 13 14 15 16 17 18 19 20 21 22 23 24 25 | * @param context The context of the application/activity. * @param language The language/locale to be set (e.g., "ar" for Arabic). fun changeLocale(activityContext: Context, lang: String?) { val locale = Locale(lang) Locale.setDefault(locale) val res = activityContext.applicationContext.resources val dm = res.displayMetrics val conf: Configuration = res.configuration if (Build.VERSION.SDK_INT >= Build.VERSION_CODES.JELLY_BEAN_MR1) { conf.setLocale(locale) } else { conf.locale = locale } res.updateConfiguration(conf, dm) val res2 = activityContext.resources val dm2 = res2.displayMetrics val conf2: Configuration = res2.configuration if (Build.VERSION.SDK_INT >= Build.VERSION_CODES.JELLY_BEAN_MR1) { conf2.setLocale(locale) } else { conf2.locale = locale } res2.updateConfiguration(conf2, dm2) } |
2. Invoke the changeLocale() method wherever the app Locale wants to be changed. Once the app changes locale, notify the SDK about the app locale change.
1 2 | changeLocale(applicationContext, appLanguage) Freshchat.notifyAppLocaleChange(activityContext); |
1 2 | changeLocale(applicationContext, appLanguage) Freshchat.notifyAppLocaleChange(applicationContext) |
3. Freshchat internally uses webview as part of SDK. From Android OS version 7.0, webview changes locale during the webview load. To fix this, we have provided a callback method onLocaleChangedByWebView(), where you need to reset the locale again inside this function.
To implement FreshchatWebViewListener
1 2 3 4 5 6 7 8 9 10 11 12 | private FreshchatWebViewListener webviewListener = new FreshchatWebViewListener() { @Override public void onLocaleChangedByWebView(@NonNull WeakReference<Context> activityContext) { if (activityContext.get() == null) { return; } // Reset the run time locale here changeLocale(activityContext, appLocale); } }; |
1 2 3 4 5 6 7 8 | private val webViewListener: FreshchatWebViewListener = object : FreshchatWebViewListener { override fun onLocaleChangedByWebView(context: WeakReference<Context>) { if (context.get() == null) { return } changeLocale(context.get()!!, appLocale) } } |
Set webview listener to Freshchat Instance. We recommend you to do this in onCreate() of Application class.
1 | Freshchat.getInstance(this).setWebviewListener(webviewListener); |
1 | Freshchat.getInstance(this).setWebviewListener(webViewListener) |
If your app supports runtime locale change, add local notification name FRESHCHAT_USER_LOCALE_CHANGED event into your locale change method.
1 | [[NSNotificationCenter defaultCenter] postNotificationName:FRESHCHAT_USER_LOCALE_CHANGED Object:self]; |
1 | NotificationCenter.default.post(name: NSNotification.Name(rawValue: FRESHCHAT_USER_LOCALE_CHANGED), object: self, userInfo: nil) |
UI Customization
Themes Customizations
- To customize themes in Freshchat Android SDK, please refer to this document.
- To customize themes in Freshchat iOS SDK, please refer to this document.
Customizing Interactions
Custom Image Loader(For Android only)
By default, Freshchat SDK includes Picasso 2.5.2 library to download images. If you want to use any other version of Picasso or any other image download library, you can set your custom image downloader using the etImageLoader() API.
Note: Please ensure not to override the library.
Examples
1. Implement the custom image loader.
1 2 3 4 5 6 7 8 9 10 11 12 13 14 15 16 17 18 19 20 21 22 23 24 25 26 | public class CustomImageLoader implements FreshchatImageLoader { @Override public void load(@NonNull FreshchatImageLoaderRequest request, @NonNull ImageView imageView) { // your code to download image and set to imageView } @Nullable @Override public Bitmap get(@NonNull FreshchatImageLoaderRequest request) { // code to download and return bitmap image } @Override public void fetch(@NonNull FreshchatImageLoaderRequest request) { // code to download image } @Override public void loadInto(@NonNull FreshchatImageLoaderRequest request, @NonNull ImageView target, @NonNull final FreshchatCallback freshchatCallback) { // code to download image and set to imageview and takecare of callbacks } } |
1 2 3 4 5 6 7 8 9 10 11 12 13 14 | class CustomImageLoader : FreshchatImageLoader { override fun load(p0: FreshchatImageLoaderRequest, p1: ImageView) { // your code to download image and set to imageView } override fun get(p0: FreshchatImageLoaderRequest): Bitmap? { // code to download and return bitmap image } override fun fetch(p0: FreshchatImageLoaderRequest) { // code to download image } override fun loadInto(p0: FreshchatImageLoaderRequest, p1: ImageView, p2: FreshchatCallback) { // your code to download image and set to imageView with callback } } |
2. Call Freshchat.setImageLoader() in onCreate() of your Application class.
1 2 3 4 5 6 7 | public class MyApp extends Application { @Override public void onCreate() { super.onCreate(); Freshchat.setImageLoader(new CustomImageLoader()); } } |
1 | Freshchat.setImageLoader(CustomImageLoader()) |
Intercept and handle non-Freshchat links in app
Freshchat provides lets you handle all non Freshchat hyperlinks clicks by apps. Register a LinkHandler with Freshchat that provides a callback when a user clicks a link.
1 2 3 4 5 6 7 8 9 10 11 12 13 14 15 | //We recommend setting the link handler in the Application class. private LinkHandler linkHandler = new LinkHandler() { @Override public boolean handleLink(@NonNull String url, @Nullable Bundle bundle) { if (urlHandledByApp) { return true; // true, if handled by app } else { return false; // false, to let Freshchat SDK handle the link } } }; // Set link handler to override links Freshchat.getInstance(context).setCustomLinkHandler(linkHandler); |
1 2 3 4 5 6 7 8 | //We recommend setting the link handler in the Application class. val linkHandler: LinkHandler = LinkHandler { var1, var2 -> if (urlHandledByApp) { return@LinkHandler true } else { return@LinkHandler false } } |
1 2 3 4 5 6 7 8 | // We recommend to add where launching Freshchat support or in AppDelegate class. [Freshchat sharedInstance].customLinkHandler = ^BOOL(NSURL * url) { //Your code for handling link within app, forwarding link to another viewcontroller return YES; //Return "NO" if you want to open the link in the default browser like Safari. }; |
1 2 3 4 5 6 7 | // We recommend to add where launching Freshchat support or in AppDelegate class. Freshchat.sharedInstance().customLinkHandler = ({ (url) in //Your code for handling link within app, forwarding link to another viewcontroller return true //Return "false" if you want to open the link in the default browser like Safari. }) |
1 2 3 4 5 6 7 8 9 10 11 12 | Freshchat.addEventListener( Freshchat.FRESHCHAT_NOTIFICATION_CLICKED, (data) => { console.log("onNotificationClicked triggered : ", data); if (authenticated/loggedIn) { Freshchat.openFreshchatDeeplink(data.url); } else { // Customer needs to handle the failure case // Open Freshchat screen when required } } ); |
1 2 3 4 5 6 7 8 9 | var linkHandlerStream = Freshchat.onRegisterForOpeningLink; linkHandlerStreamSubscrption = linkHandlerStream.listen((event) { String url = event[“url”]; }); |