Overview
The Freshworks SDK empowers businesses to seamlessly integrate live chat and messaging capabilities into their mobile apps and websites. This allows you to foster real-time communication between users and support agents.
Real-time messaging: Implement the web widget within a mobile web view for instant updates.
Customizable: Change the appearance to suit your agent experience across platforms.
Intelligent Routing: Communicate across multiple team members and channels
Robust: Integrates with other tools and continuously improves with analytics
Secure: Developer-friendly documentation and APIs
Integration
Freshworks Android SDK is distributed through Maven Central. To use it you need to add the following Gradle dependency to the build.gradle file of your android app module (NOT the root file).
1 2 3 | dependencies { implementation "com.freshworks.sdk:core:{sdkVersion}" } |
- Add FreshworksSDK pod file to your project and install pods; OR
-
To add package dependencies:
- Navigate to the Project > Package Dependencies section.
- Add 'https://github.com/freshworks/freshworks-ios-sdk' as a Swift Package Repository in Xcode, and then proceed to add FreshworksSDK as a Swift Package to your project.
Platform Requirements
Freshworks Android SDK supports apps running android 6.0 and above.
- Freshworks iOS SDK contains a slice for arm64 architecture.
- Freshworks iOS SDK supports apps running iOS version 14.0 and above.
Inititalization
1. Initialization for Non JWT-Enabled Accounts:
To commence the integration of the Freshworks SDK, please follow these steps:
1.1 Required Parameters:- App ID
- App Key
- Domain
- JS Source Path
- Widget ID (optional)
1.2 Retrieving Values:
- Retrieve AppId, AppKey & Domain:
- Within your Freshworks admin settings, navigate to "Admin settings" > "Mobile SDK" to locate the required AppId, AppKey & Domain under "App Keys."

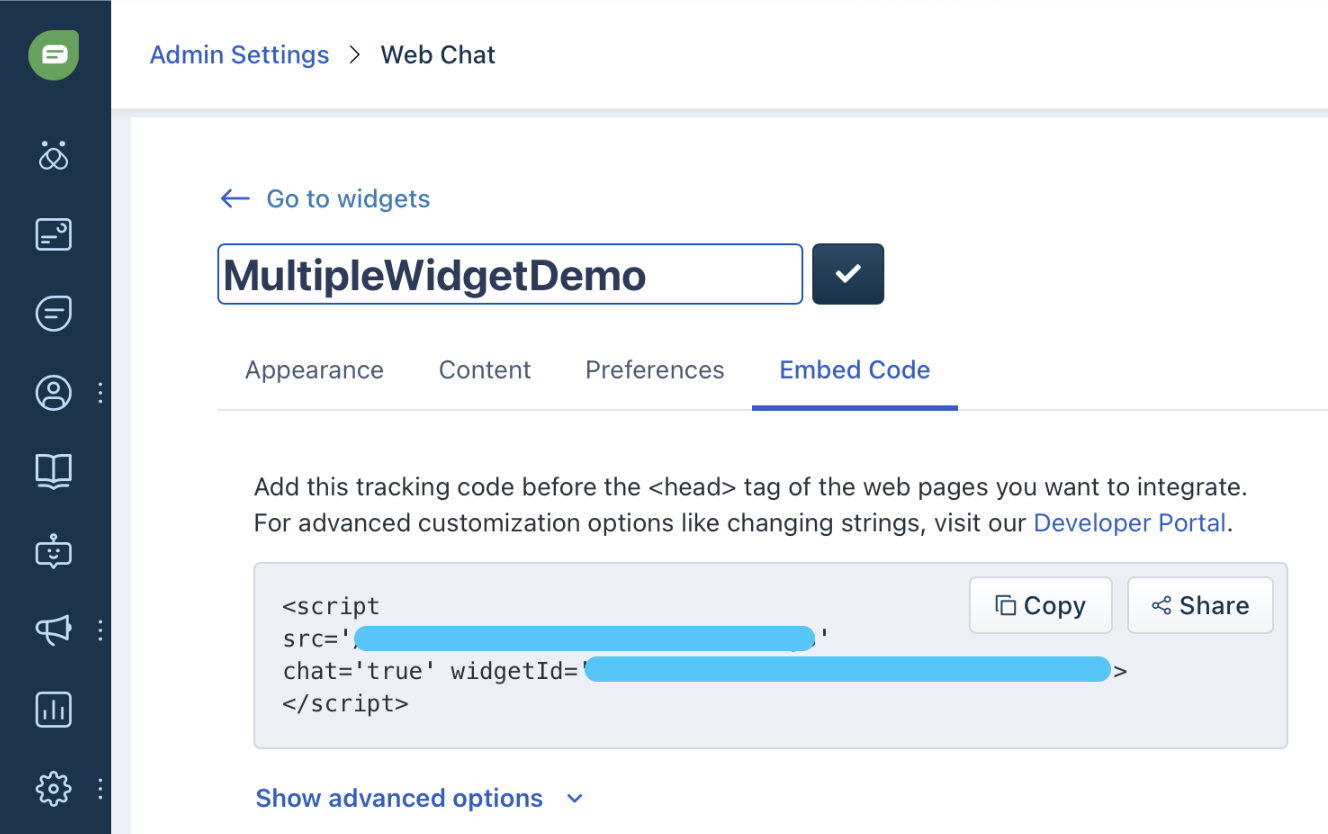
- Access JS Source Path & WidgetId:
- Navigate to "Admin settings" > "Web" > "Web Widget" in your Freshworks admin panel. Select the desired widget, click on "Embed," and use the provided ‘src’ as the JS Source Path (Copy the contents between the single quotes).
NOTE: Widget ID is required if multiple widgets are configured and a specific one needs to be opened. If only a single widget is configured or the default widget is to be accessed, skip the widget ID parameter during initialization. Otherwise, pass the widget ID along with other parameters as shown in the code snippet below.
With these details in hand, proceed to integrate the Freshworks SDK into your application to enable its functionalities.
1 2 3 4 5 6 7 8 9 | FreshworksSDK.initialize(this, SDKConfig( appId = "YOUR_APP_ID", appKey = "YOUR_APP_KEY", domain = "YOUR_APP_DOMAIN", widgetUrl = "YOUR_JS_SOURCE_PATH", widgetId = "YOUR_WIDGET_ID") ) { //Call back when SDK initialization is complete. } |
1 2 3 4 5 6 7 8 9 10 | func application(_ application: UIApplication, didFinishLaunchingWithOptions launchOptions: [UIApplication.LaunchOptionsKey: Any]?) -> Bool { Freshworks.shared.initializeFreshworksSDK(with: SDKConfig( source: "YOUR_JS_SOURCE_PATH", appID: "YOUR_APP_ID", appKey: "YOUR_APP_KEY", domain: "YOUR_APP_DOMAIN", widgetId: "YOUR_WIDGET_ID" )) return true } |
2. Initialization for JWT-Enabled Accounts:
To initialize the SDK for JWT enabled accounts, retrieve the JS source path, app ID, app key and domain as mentioned above and refer section 'Managing JWT Users' under 'User Management'
Launch Chat
After completing the integration and initialization steps mentioned above, you can proceed to launch the conversation experience using the following API.
API:
1 2 3 4 | fun showConversations( context: Context, convTags: List<String> ) |
1 2 3 4 | func showConversations( _ viewController: UIViewController, convTags: [String] ) |
1. Launching Conversation List
To open the list of all conversations, you can skip passing any tags. However, if there is only a single topic configured, it will directly open the conversation.
1 2 3 | FreshworksSDK.showConversations( context ) |
1 2 | // Show all conversations Freshworks.shared.showConversations(self) |
2. Filtering conversation topics
Additionally, you have the option to filter out conversations associated with a specific topic using the convTags parameter.
1 2 3 4 | FreshworksSDK.showConversations( context, listOf("customTag1") // The tags that will be used to filter the topics. ) |
1 2 | // Show conversations with tags "customTag1" & "customTag2" Freshworks.shared.showConversations(self, convTags: ["customTag1", "customTag2"]) |
Launch FAQs
showFAQs API can be used to list all the FAQs configured in the admin portal. Furthermore, the faqOptions parameter can be leveraged to filter faqs using tags or to display categories or articles.
API:
1 | fun showFAQs(context: Context, faqOptions: FaqOptions?) |
1 | func showFAQs(_ viewController: UIViewController, faqOptions: FAQOptions) |
1. Display all FAQs
To show all available FAQs, passing faqOptions can be skipped.
1 | FreshworksSDK.showFAQs(context) |
1 2 | // Show all FAQs Freshworks.shared.showFAQs(self) |
2. Filtering FAQ Categories
Using faqOptions, the results can be configured to show all the FAQ 'categories' associated with specified 'tag(s)'.
1 2 3 4 | FreshworksSDK.showFAQs(context, faqTags { tags = arrayListOf("customTag1") filterType = WebWidgetConfig.FilterType.CATEGORY }) |
1 2 3 4 | var faqOptions = FAQOptions() faqOptions.tags = ["customTag1", "customTag2"] faqOptions.filterType = .category Freshworks.shared.showFAQs(self, faqOptions: faqOptions) |
3. Filtering FAQ Articles
Similar to filtering FAQ categories, using faqOptions, the results can also be configured to show all the FAQ 'articles' associated with specified 'tag(s)'
1 2 3 4 | FreshworksSDK.showFAQs(context, faqTags { tags = arrayListOf("customTag1") filterType = WebWidgetConfig.FilterType.ARTICLE }) |
1 2 3 4 | var faqOptions = FAQOptions() faqOptions.tags = ["customTag1", "customTag2"] faqOptions.filterType = .article Freshworks.shared.showFAQs(self, faqOptions: faqOptions) |
User Management
The Freshworks SDK offers powerful APIs for seamlessly creating new users, allowing you to tailor their chat experience by setting specific properties. Moreover, it provides a robust mechanism to identify users using external IDs, supplied by your host application, and restore IDs, generated by Freshworks. This ensures smooth handling of scenarios such as user logouts or device changes, guaranteeing a frictionless experience for your users.
1. Managing Normal User
1.1 Create User / Set User Details
Before creating a user, a listener needs to be configured to receive the events for user creation, as follows.
1 2 3 4 5 6 7 8 9 10 11 | LocalBroadcastManager.getInstance(this).registerReceiver(object: BroadcastReceiver() { override fun onReceive(context: Context?, intent: Intent?) { when (intent?.action) { EventID.USER_CREATED -> { Log.d("FreshworksSDK", "User created") } } } }, IntentFilter().apply { addAction(EventID.USER_CREATED) }) |
1 2 3 4 5 6 7 | // Register Listener (in viewDidLoad or viewWillAppear) NotificationCenter.default.addObserver(self, selector: #selector(self.onUserCreated(_:)), name: Notification.Name(FRESHWORKS_USER_CREATED), object: nil) // Handle user creation event @objc func onUserCreated(_ notification: NSNotification) { print("User created: \(notification.object ?? "")") } |
Once the listener is added, the setUserDetails API can be used to create a user or update the details
1 2 3 4 5 6 7 8 | FreshworksSDK.setUserDetails( firstName = "firstName", lastName = "lastName", email = "user@email.com", phone = "1234567890", phoneCountry = "+91", properties = mapOf("cf_custom_field_name" to "field value") ) |
1 2 3 4 5 6 7 8 9 | // Set user with required properties Freshworks.shared.setUserDetails( firstName: "firstName", lastName: "lastName", email: "user@email.com", phone: "9876543210", phoneCountry: "+91", customProperties: ["cf_custom_field_name": "field value"] ) |
NOTE: The custom properties must be declared in the freshchat portal before using in the SDK.
1.2 Retrieve User
To get the current user information, getUser API can be used.
1 2 3 | FreshworksSDK.getUser { user -> Log.d("FreshworksSDK", user.toString()) } |
1 2 3 | Freshworks.shared.getUser { [weak self] user in print(user) } |
1.3 Identify User
To identify a user, there are following steps:
- Add listener for receiving restore identifier
- Set an external identifier for the user
- Identify the user using the combination of above external and restore identifier
This step entails the addition for the listener to retrive the restore identifier generated by Freshworks
1 2 3 4 5 6 7 8 9 10 11 12 13 14 | LocalBroadcastManager.getInstance(this).registerReceiver(object: BroadcastReceiver() { override fun onReceive(context: Context?, intent: Intent?) { when (intent?.action) { EventID.USER_CREATED -> { FreshworksSDK.getUser { user -> Log.d("FreshworksSDK", "Restore ID : ${user.restoreId}") Log.d("FreshworksSDK" : "User Alias: ${user.alias}") } } } } }, IntentFilter().apply { addAction(EventID.USER_CREATED) }) |
1 2 3 4 5 6 7 | // Register Listener(in viewDidLoad or viewDidAppear) NotificationCenter.default.addObserver(self, selector: #selector(self.onRestoreIdReceived(_:)), name: Notification.Name(FRESHWORKS_USER_RESTORE_ID_GENERATED), object: nil) // Handle restore identifier generation event @objc func onRestoreIdReceived(_ notification: NSNotification) { print("Restore ID Generated: \(notification.object ?? "")") } |
For a new user, the API identifyUser has to be called. This API will require a unique external identifier, mapped to the user, which is created by the host app. Once this API is triggered, an event will be received with the unique restore identifier created by Freshworks. This restore identifier needs to saved and mapped with the user at the client end.
1 | FreshworksSDK.identifyUser("externalId") |
1 2 | // Pass a unique ID for the user as the external ID to generate a new restore ID Freshworks.shared.identifyUser(externalId: "externalId") |
Once the external identifier and the restore identifier are mapped with the user, when the same user logs in the next time, both values are to be passed in the identifyUser API and the user will be restored.
1 | FreshworksSDK.identifyUser("externalId", "restoreId") |
1 2 | // Pass the unique combination of external ID and restore ID mapped with the user to be restored Freshworks.shared.identifyUser(externalId: "externalId", restoreId: "restoreId") |
1.4 Reset User
To reset a user, simply call the resetUser API.
1 | FreshworksSDK.resetUser(onSuccess: () -> Unit, onFailure: () -> Unit)) |
1 | Freshworks.shared.resetUser() |
2. Managing JWT User
The Freshworks SDK leverages JSON Web Token (JWT), ensuring that only authenticated users can kickstart a conversation via the messenger. With each interaction, the SDK sends a callback, providing real-time updates on the authentication status of the user and any events pertaining to the messenger. This empowers you to effectively manage user interactions while maintaining security and authentication standards.
Step 1: Create the JWT without UUID using the public & private keys.
Step 2: Initiate the SDK with the JWT created in the above step.
1 2 3 4 5 6 7 8 9 | FreshworksSDK.initialize(this, SDKConfig( appId = "YOUR_APP_ID", appKey = "YOUR_APP_KEY", domain = "YOUR_APP_DOMAIN", widgetUrl = "YOUR_JS_SOURCE_PATH", jwtAuthToken = "YOUR_JWT_AUTH_TOKEN") ) { //Call back when SDK initialization is complete. } |
Note: If your account is JWT enabled, it is mandatory to pass JWT while SDK initialization.
Step 3: Please make sure to set up your broadcast receiver to receive the user state event in your application class. You can refer to the code snippet provided below for guidance.
1 2 3 4 5 6 7 8 9 10 11 | LocalBroadcastManager.getInstance(this).registerReceiver(object: BroadcastReceiver() { override fun onReceive(context: Context?, intent: Intent?) { when (intent?.action) { EventID.USER_STATE -> { Log.d("FreshworksSDK", intent.getStringExtra(EventID.USER_STATE)) } } } }, IntentFilter().apply { addAction(EventID.USER_STATE) }) |
Step 4: Once the user states update is received, if the user state is NOT_LOADED, UNLOADED, NOT_CREATED, NOT_AUTHENTICATED, then fetch the UUID from 'FreshworksSDK.getUUID()'
1 2 3 4 5 6 7 8 9 10 11 12 13 14 15 16 17 18 19 20 21 22 23 24 25 26 27 28 29 30 | private val _userState: MutableLiveData<String> = MutableLiveData() val userState: LiveData<String> = _userState LocalBroadcastManager.getInstance(this).registerReceiver(object : BroadcastReceiver() { override fun onReceive(context: Context?, intent: Intent?) { when (intent?.action) { EventID.USER_STATE -> { when (userState) { UserState.UNDEFINED -> { // Do nothing } UserState.NOT_LOADED, UserState.UNLOADED, UserState.NOT_CREATED, UserState.NOT_AUTHENTICATED -> { FreshworksSDK.getUUID() } else -> { Log.d("FreshworksSDK", "User state is $userState") } } } EventID.GET_UUID_SUCCESS -> { Log.d("FreshworksSDK", intent.getStringExtra(EventID.GET_UUID_SUCCESS)) } } } }, IntentFilter().apply { addAction(EventID.USER_STATE) addAction(EventID.GET_UUID_SUCCESS) }) |
Step 5: Create a valid JWT using the UUID received from Step 4. Then, update the user using the API Call provided below.
1 2 3 | FreshworksSDK.updateUser( jwt = "UPDATED_JWT" // Valid JWT created using the UUID ) |
Note: The above API (Freshworks.shared.updateUser) will also be responsible for updating the user details. While creating the JWT, the details which need to be updated should be added in the payload.
Step 1: Create the JWT without UUID using the public & private keys.
Step 2: Initiate the SDK with the above JWT.
1 2 3 4 5 6 7 | Freshworks.shared.initializeFreshworksSDK(with: SDKConfig( source: "YOUR_JS_SOURCE_PATH", appID: "YOUR_APP_ID", appKey: "YOUR_APP_KEY", domain: "YOUR_APP_DOMAIN", jwtAuthToken: "YOUR_JWT_AUTH_TOKEN" )) |
Note: If your account is JWT enabled, it is mandatory to pass JWT while SDK initialization.
Step 3: Set 'YourClass' as the delegate to receive user state change updates.
1 | Freshworks.shared.setJWTDelegate(self) // 'self' is the instance of 'YourClass' |
Step 4: Implement the 'FreshworksJWTDelegate' function to receive the user state change updates. Once user state change update is received, if the user is not authenticated, fetch the UUID from 'Freshworks.shared.getUUID { uuid in }'
1 2 3 4 5 6 7 8 9 10 11 12 13 14 15 16 17 18 19 | extension <YourClass>: FreshworksJWTDelegate { func userStateChanged(_ userState: UserState) { switch userState { case .authenticated, .created, .loaded, .identified, .restored: break case .unloaded, .notLoaded, .notCreated, .notAuthenticated: fetchUUID() @unknown default: break } } // func fetchUUID() { Freshworks.shared.getUUID { [weak self] uuid in // Use this uuid to generate a valid JWT } } } |
Step 5: Create a valid JWT using the UUID recevied from step 4 and update the same.
1 | Freshworks.shared.updateUser("YOUR_VALID_JWT_AUTH_TOKEN") // Valid JWT created using the UUID |
Note: The above API (Freshworks.shared.updateUser) will also be responsible for updating the user details. While creating the JWT, the details which need to be updated should be added in the payload.
Localization
FreshworksSDK provides multilanguage support. The list of all supported languages and their keys are provided in the table below.
| LANGUAGE CODE | LANGUAGE |
|---|---|
| ar | Arabic Language (RTL) |
| en | English |
| ca | Catalan |
| zh-HANS | Chinese (Simplified) |
| zh-HANT | Chinese (Traditional) |
| cs | Czech |
| da | Danish |
| nl | Dutch |
| de | German |
| et | Estonian |
| fi | Finnish |
| fr | French |
| hu | Hungarian |
| id | Indonesian |
| it | Italian |
| ko | Korean |
| lv | Latvian |
| nb | Norwegian |
| pl | Polish |
| pt | Portuguese |
| pt-BR | Portuguese - Brazil |
| ro | Romanian |
| ru | Russian |
| sk | Slovak |
| sl | Slovenian |
| es | Spanish |
| es-LA | Spanish - Latin America |
| sv | Swedish |
| th | Thai |
| tr | Turkish |
| uk | Ukrainian |
| vi | Vietnamese |
Widget Locale Change
The language displayed in the widget is determined based on the following priority:
- Configured Language:
The highest priority is given to the language specified during the initialization of the Freshworks SDK or when the changeWidgetLanguage public API is called. For example:
1 2 3 4 5 6 7 8 9 | FreshworksSDK.initialize(this, SDKConfig( appId = "YOUR_APP_ID", appKey = "YOUR_APP_KEY", domain = "YOUR_APP_DOMAIN", widgetUrl = "YOUR_JS_SOURCE_PATH", languageCode = "YOUR_LANGUAGE_CODE") ) { // Callback when SDK initialization is complete. } |
1 2 3 4 5 6 7 | Freshworks.shared.initializeFreshworksSDK(with: SDKConfig( source: "YOUR_JS_SOURCE_PATH", appID: "YOUR_APP_ID", appKey: "YOUR_APP_KEY", domain: "YOUR_APP_DOMAIN", locale: "YOUR_LANGUAGE_CODE" )) |
Alternatively, after normal initialization, you can use:
1 | FreshworksSDK.setLocale("en") |
1 | Freshworks.shared.changeWidgetLanguage(locale: "en") |
- Default Language:
The lowest priority is given to the Default Language set in your Freshchat account. This language serves as the primary language specified on your Freshchat Account.
User Locale Change
If you wish to dynamically change the language of the Freshchat widget based on user selection, such as through a language dropdown, you need to set the locale when the dropdown is changed.
Use the following code for this purpose:
1 | FreshworksSDK.setUserLocale("en") |
1 | Freshworks.shared.changeUserLanguage(locale: "en") |
Push Notifications
With Freshworks push notifications, you can stay connected and informed even when your chat or app is inactive. Your users can receive instant updates and alerts, ensuring that they never miss important messages.
To set up the configuration for notifications:
1 2 3 4 | FreshworksSDK.setNotificationConfig(NotificationConfig(true, //Sound enabled R.drawable.ic_launcher_background, //Notification icon importance = android.app.NotificationManager.IMPORTANCE_HIGH) ) |
1 2 3 4 | override fun onNewToken(token: String) { super.onNewToken(token) FreshworksSDK.setPushRegistrationToken(token) } |
1 2 3 4 5 6 | override fun onMessageReceived(message: RemoteMessage) { super.onMessageReceived(message) if(FreshworksSDK.isFreshworksSDKNotification(message.data)) { FreshworksSDK.handleFCMNotification(message.data) } } |
First, request for notifications permissions:
1 2 3 4 5 6 7 8 9 10 | func registerNotifications() { UNUserNotificationCenter.current().delegate = self UNUserNotificationCenter.current().requestAuthorization(options: [.alert, .sound, .badge]) { (granted, error) in if granted { DispatchQueue.main.async { UIApplication.shared.registerForRemoteNotifications() } } } } |
Once token is generated, pass the token to FW-SDK
1 2 3 4 | func application(_ application: UIApplication, didRegisterForRemoteNotificationsWithDeviceToken deviceToken: Data) { // Send token across to SDK Freshworks.shared.setPushRegistrationToken(deviceToken) } |
You will start receiving notifications now. To manage the tap event of notifications, implement the following code in willPresent & didReceive notification functions as shown:
1 2 3 4 5 6 7 8 9 10 11 12 13 14 15 16 17 18 19 20 | func userNotificationCenter(_ center: UNUserNotificationCenter, willPresent notification: UNNotification, withCompletionHandler completionHandler: @escaping (UNNotificationPresentationOptions) -> Void) { let userInfo = notification.request.content.userInfo if Freshworks.shared.isFreshworksNotification(userInfo) { Freshworks.shared.handleRemoteNotification(userInfo) { completionHandler( [.banner, .badge, .sound]) } } else { completionHandler( [.banner, .badge, .sound]) } } func userNotificationCenter(_ center: UNUserNotificationCenter, didReceive response: UNNotificationResponse, withCompletionHandler completionHandler: @escaping () -> Void) { if Freshworks.shared.isFreshworksNotification(response) { Freshworks.shared.handleRemoteNotification(response) { completionHandler() } } else { completionHandler() } } |
Parallel Conversations
Utilize parallel conversations in Freshworks SDK to facilitate multiple discussion threads on the same topic. By providing a unique conversationReferenceId with the openConversation API, users can initiate and manage distinct topic-specific conversations effortlessly.
API:
1 2 3 4 5 | fun showConversation( context: Context, conversationReferenceId: String, topicName: String ) |
1 2 3 4 5 | func openConversation( _ viewController: UIViewController, conversationReferenceId: String, topicName: String ) |
Usage:
1 2 3 4 5 | FreshworksSDK.showConversation( context, “unique-ref-id”, // The external reference ID of the conversation to be opened. “topic-name” // The topic name in which the conversation is present. ) |
1 2 3 4 5 | Freshworks.shared.openConversation( self, conversationReferenceId: “unique-ref-id”, // The external reference ID of the conversation to be opened. topicName: “topic-name” // The topic name in which the conversation is present. ) |
Conversation Properties
In the Freshworks Mobile SDK, you can configure values for conversation properties.
The various custom property types you can set are text, dropdown, number, decimal, date, checkbox, multiline text and multi select dropdown. Additionally, you can set the value for default field priority.
These properties need to be passed as a valid JSON string. Here is an example:
          {

            "cf_sample": "Example",

            "cf_multi_choice": ["Choice1", "Choice2 one"],

            "cf_multi_line_text": "This is a multiline text",

            "cf_number": 33,

            "cf_decimal": 3.5,

            "cf_date": "2023-03-12",

            "cf_checkbox": true,

            "cf_drpdn": "one",

            "priority": "Low"

          }
In case an invalid JSON is provided, there will be a console log indicating the same.
NOTE: Please note that this functionality is available only for users who signed up for Freshchat after June 27, 2022.
1 2 3 4 5 6 7 8 9 10 11 12 13 14 | val properties = """ { "cf_sample": "Example", "cf_multi_choice": ["Choice1", "Choice2 one"], "cf_multi_line_text": "This is a multiline text", "cf_number": 33, "cf_decimal": 3.5, "cf_date": "2023-03-12", "cf_checkbox": true, "cf_drpdn": "one", "priority": "Low" } """ FreshworksSDK.setConversationProperties(properties) |
1 2 3 4 5 6 7 8 9 10 11 12 13 14 | let properties = """ { "cf_sample": "Example", "cf_multi_choice": ["Choice1", "Choice2 one"], "cf_multi_line_text": "This is a multiline text", "cf_number": 33, "cf_decimal": 3.5, "cf_date": "2023-03-12", "cf_checkbox": true, "cf_drpdn": "one", "priority": "Low" } """ Freshworks.shared.setConversationProperties(jsonString: properties) |
Bot Variables
You can now send bot variables using the conversations widget. These properties are currently forwarded to bots which can internally use these properties to route the bot flows
These properties need to be passed as a valid JSON string. Here is an example:
          {


            "status": "active"


          }
In case an invalid JSON is provided, there will be a console log indicating the same.
1 2 3 4 5 6 | val variables = """ { "status": "active" } """ FreshworksSDK.setBotVariables(botVariables) |
1 2 3 4 5 6 | let variables = """ { "status": "active" } """ Freshworks.shared.setBotVariables(jsonString: variables) |
Theme Customisation
For Freshworks SDK customization, there are two types:
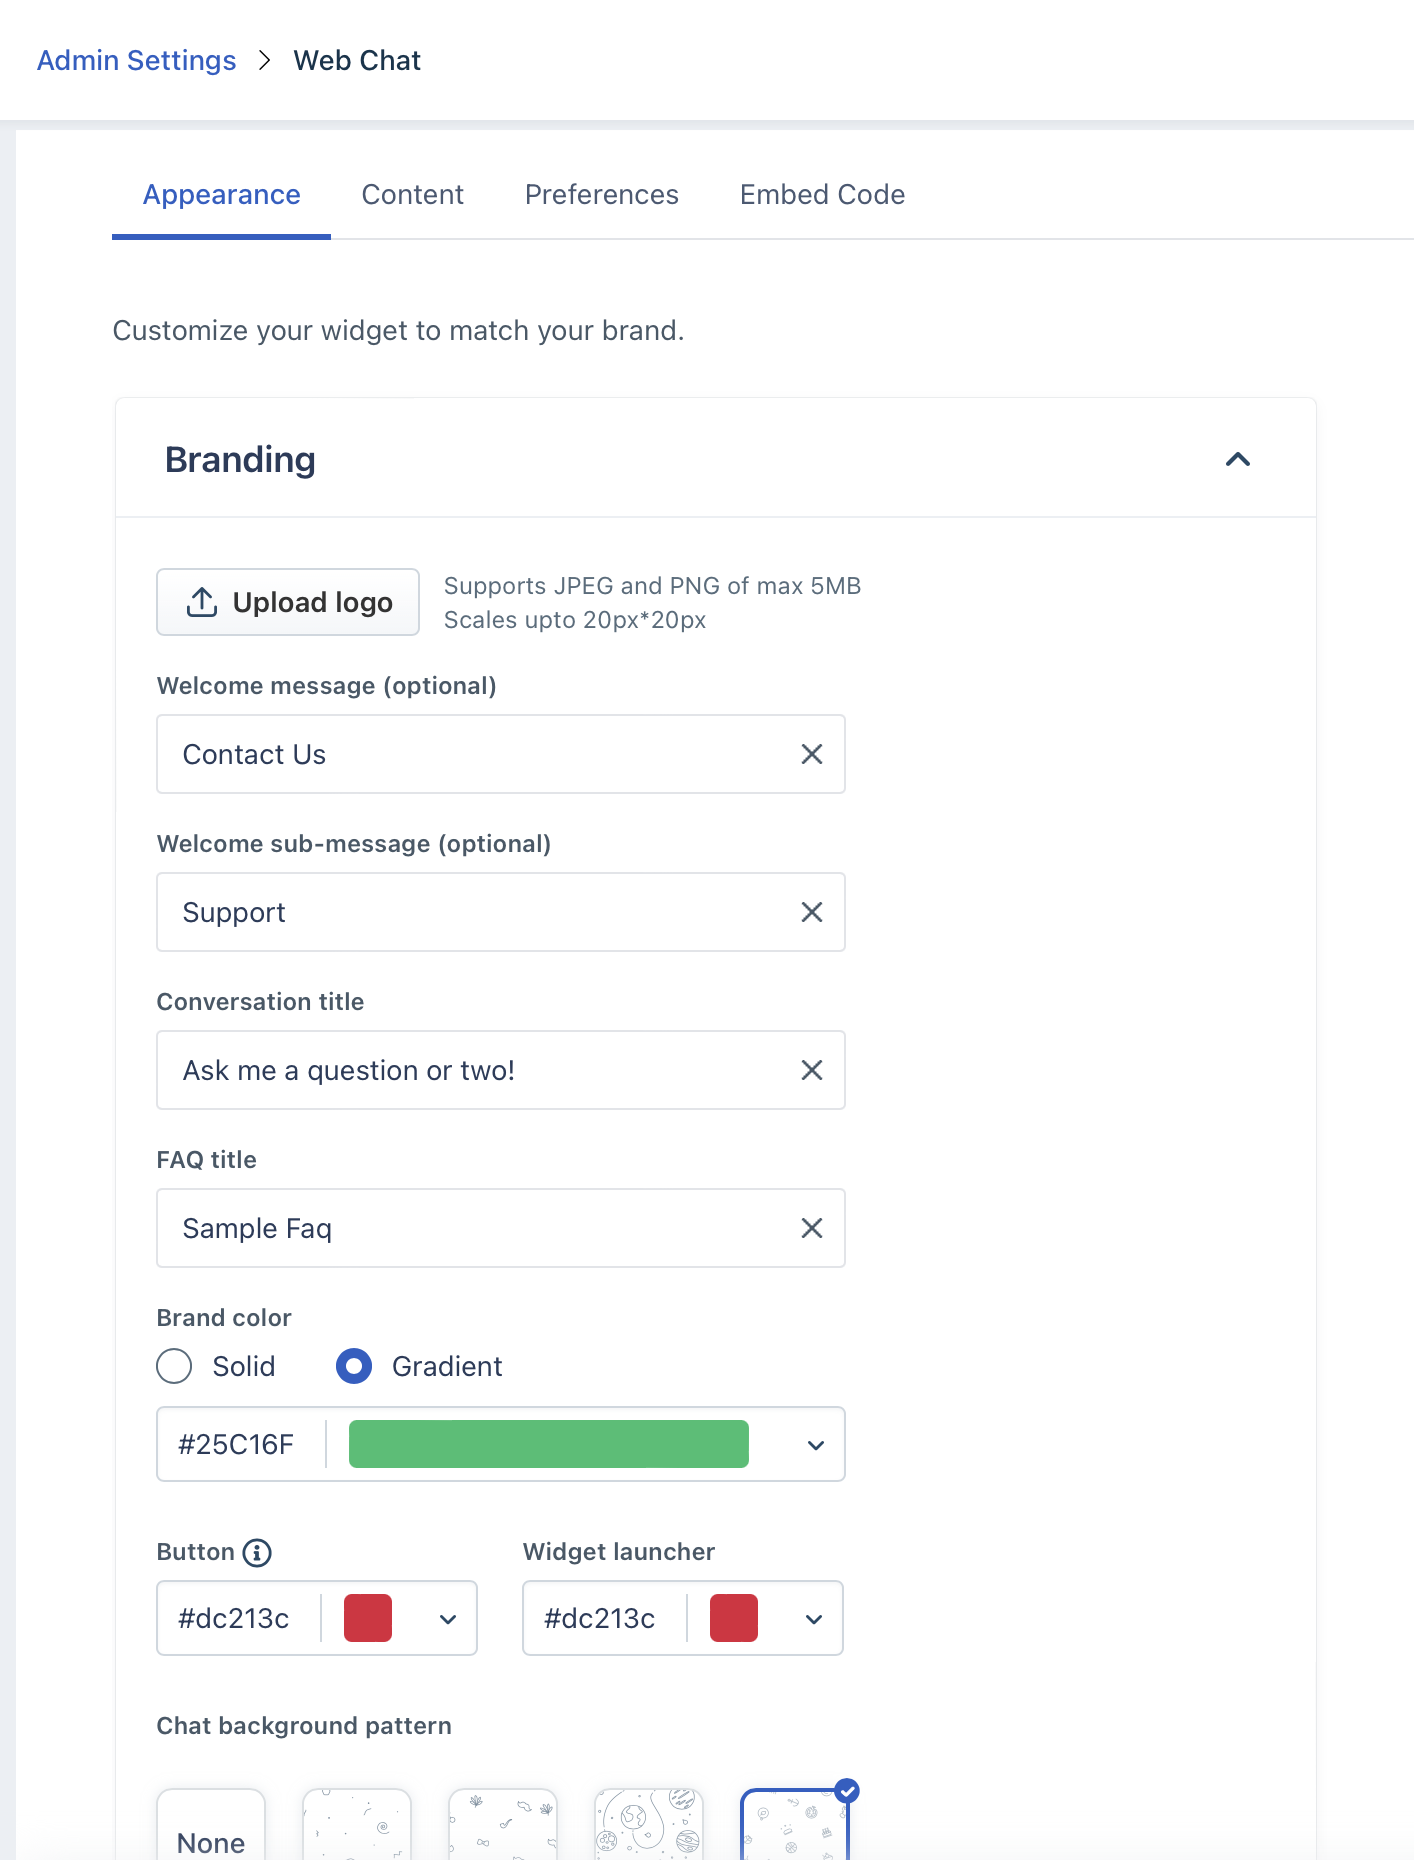
1. Appearance Customizations:
These can be configured in Admin Settings under Web Chat > Web Widget > Appearance. You can adjust various visual elements here.
2. Default Text/Value Updates:
These updates can be made using the API:
1 2 3 4 | fun setConfigProperties( headerProperties: String?, contentProperties: String? ) |
1 2 3 4 | func updateConfig( headerProperty: [String : Any]?, contentProperty: [String : Any]? ) |
1. Header Properties: Any change in the app name or logo has to be made through this property.
Here are the available 'keys':
1 2 3 4 | "headerProperty": { "appName": "Gadget God", "appLogo": "https://d1qb2nb5cznatu.cloudfront.net/startups/i/2473-2c38490d8e4c91660d86ff54ba5391ea-medium_jpg.jpg?buster=1518574527" } |
2. Content Properties: Any change in default texts/values has to be made through this property.
Here are the available 'keys':
1 2 3 4 5 6 7 8 9 10 11 12 13 14 15 16 17 18 19 20 21 22 23 24 25 26 27 28 29 30 31 32 33 34 35 36 37 38 39 40 41 42 43 | "content": { "welcomeMessage": "Chat with Us", "welcomeSubMessage": "Solution Articles", "placeholders": { "search_field": "Search", "reply_field": "Reply", "csat_reply": "Add your comments here" }, "actions": { "csat_yes": "Yes", "csat_no": "No", "push_notify_yes": "Yes", "push_notify_no": "No", "csat_submit": "Submit" }, "headers": { "chat": "Chat with Us", "faq": "Solution Articles", "faq_search_not_available": "No articles were found for {{query}}", "faq_useful": "Was this article helpful?", "faq_thankyou": "Thank you for your feedback", "faq_message_us": "Message Us", "push_notification": "Do not miss out on any replies! Allow push notifications?", "csat_question": "Did we address your concerns?", "csat_yes_question": "How would you rate this interaction?", "csat_no_question": "How could we have helped better?", "csat_thankyou": "Thanks for the response", "csat_rate_here": "Submit your rating here", "channel_response": { "offline": "We are currently away. Please leave us a message", "online": { "minutes": { "one": "Currently replying in {!time!} minutes ", "more": "Typically replies in {!time!} minutes" }, "hours": { "one": "Currently replying in under an hour", "more": "Typically replies in {!time!} hours" } } } } } |
These properties allow for detailed customization of text and values within the Freshworks SDK.
NOTE: Please ensure that when passing the keys and values, you maintain the same nesting structure as demonstrated in the provided format
1 2 3 4 5 6 7 8 9 10 11 12 13 14 15 16 17 18 19 20 21 22 23 24 25 | val headerProperties = """ { "appName": "App-Name", "appLogo": "App-Logo-URL" } """ val contentProperties = """ { "welcomeMessage": "Hello Welcome", "placeholders": { "search_field": "Search here" }, "headers": { "faq": "Faqs-Sections", "chat": "Chat with us - Say Hi", "csat_question": "Did we address your queries?" } } """ FreshworksSDK.setConfigProperties( headerProperties, contentProperties ) |
1 2 3 4 5 6 7 8 9 10 11 12 13 14 15 16 | let headerProperties: [String: Any] = { "appName": "App-Name", "appLogo": "App-Logo-URL" } let contentProperties: [String: Any] = [ "welcomeMessage": "Hello Welcome", "placeholders": [ "search_field": "Search here" ], "headers": [ "faq": "Faqs-Sections", "chat": "Chat with us - Say Hi", "csat_question": "Did we address your queries?" ] ] Freshworks.shared.updateConfig(headerProperty: headerProperties, contentProperty: contentProperties) |
Track Custom Events
Freshworks SDK allows you to track any events performed by your users. It can be anything, ranging from updating their profile picture to adding 5 items to the cart. You can use these events as context while engaging with the user. Events can also be used to set up triggered messages or to segment users for campaigns
1 | FreshworksSDK.trackEvent(eventName, eventData) |
1 | Freshworks.shared.trackUserEvents(name: "eventName", payload: ["eventName":"eventValue"]) |
Outbound Events
The Freshworks SDK triggers the following custom events, each of which can be listened to by the host app:
1. New user has been created.
2. Restore ID has been generated for the user.
3. User data has been cleared.
4. Change in the count of unread messages.
5. Message has been successfully sent.
6. Message has been received.
7. Customer Satisfaction (CSAT) score has been received.
8. CSAT score has been updated.
9. File download has been initiated.
1 2 3 4 5 6 7 8 9 10 11 12 13 14 15 16 17 18 19 20 21 22 23 24 25 26 27 28 29 30 31 32 33 34 35 36 37 38 39 40 41 42 43 44 45 46 47 48 49 50 51 52 53 54 55 56 57 58 59 60 61 62 63 64 65 66 67 68 69 70 71 72 73 74 75 76 77 78 79 80 81 82 | private fun registerBroadcastReceiver() { val myReceiver = object : BroadcastReceiver() { override fun onReceive(context: Context?, intent: Intent?) { when (intent?.action) { EventID.UNREAD_COUNT -> { _unreadCount.value = intent.getIntExtra(EventID.UNREAD_COUNT, 0) context?.logEvent(UNREAD_COUNT, _unreadCount.value.toString(), true) } EventID.RESTORE_ID_GENERATED -> { val restoreId = intent.getStringExtra(EventID.RESTORE_ID_GENERATED) DataStore.setRestoreId(restoreId ?: "") context?.logEvent(RESTORE_ID, restoreId ?: "", true) } EventID.GET_UUID_SUCCESS -> { _uUID.value = intent.getStringExtra(EventID.GET_UUID_SUCCESS) context?.logEvent(GET_UUID_SUCCESS, _uUID.value ?: "", true) } EventID.MESSAGE_SENT -> { context?.logEvent(MESSAGE_SENT, "${intent.extras}") } EventID.MESSAGE_RECEIVED -> { context?.logEvent(MESSAGE_RECEIVED, "${intent.extras}") } EventID.CSAT_RECEIVED -> { context?.logEvent(CSAT_RECEIVED, "${intent.extras}") } EventID.CSAT_UPDATED -> { context?.logEvent(CSAT_UPDATED, "${intent.extras}") } EventID.DOWNLOAD_FILE -> { context?.logEvent(DOWNLOAD_FILE, "${intent.extras}") } else -> userEvents(intent, context) } } } LocalBroadcastManager.getInstance(this) .registerReceiver( myReceiver, IntentFilter().apply { addAction(EventID.USER_CREATED) addAction(EventID.RESTORE_ID_GENERATED) addAction(EventID.UNREAD_COUNT) addAction(EventID.USER_STATE) addAction(EventID.GET_UUID_SUCCESS) addAction(EventID.MESSAGE_SENT) addAction(EventID.MESSAGE_RECEIVED) addAction(EventID.CSAT_RECEIVED) addAction(EventID.CSAT_UPDATED) addAction(EventID.DOWNLOAD_FILE) addAction(EventID.USER_CLEARED) } ) } fun userEvents(intent: Intent?, context: Context?) { when (intent?.action) { EventID.USER_CREATED -> { val user: User? = if (Build.VERSION.SDK_INT >= Build.VERSION_CODES.TIRAMISU) { intent.extras?.getParcelable(EventID.USER_CREATED, User::class.java) } else { intent.extras?.getParcelable(EventID.USER_CREATED) as? User } user?.let { DataStore.setUserAlias(it.alias) if (DataStore.getRestoreId().isEmpty()) { DataStore.setRestoreId(it.restoreId ?: "") } context?.logEvent(USER_CREATED, user.alias, true) } } EventID.USER_STATE -> { _userState.value = intent.getStringExtra(EventID.USER_STATE) context?.logEvent(USER_STATE, _userState.value ?: "", true) } EventID.USER_CLEARED -> { context?.logEvent(USER_CLEARED, "") } } } |
1 2 3 4 5 6 7 8 9 10 11 12 13 14 15 16 17 18 | // The following function adds the observers for the events. You can call this where you want to register the listeners, for example in viewDidLoad method. func addFWObservers() { NotificationCenter.default.addObserver(self, selector: #selector(self.onFreshworksEventTriggered(_:)), name: Notification.Name(FWEvents.userCreated.rawValue), object: nil) NotificationCenter.default.addObserver(self, selector: #selector(self.onFreshworksEventTriggered(_:)), name: Notification.Name(FWEvents.restoreIdGenerated.rawValue), object: nil) NotificationCenter.default.addObserver(self, selector: #selector(self.onFreshworksEventTriggered(_:)), name: Notification.Name(FWEvents.unreadCount.rawValue), object: nil) NotificationCenter.default.addObserver(self, selector: #selector(self.onFreshworksEventTriggered(_:)), name: Notification.Name(FWEvents.messageSent.rawValue), object: nil) NotificationCenter.default.addObserver(self, selector: #selector(self.onFreshworksEventTriggered(_:)), name: Notification.Name(FWEvents.messageReceived.rawValue), object: nil) NotificationCenter.default.addObserver(self, selector: #selector(self.onFreshworksEventTriggered(_:)), name: Notification.Name(FWEvents.csatUpdated.rawValue), object: nil) NotificationCenter.default.addObserver(self, selector: #selector(self.onFreshworksEventTriggered(_:)), name: Notification.Name(FWEvents.csatReceived.rawValue), object: nil) NotificationCenter.default.addObserver(self, selector: #selector(self.onFreshworksEventTriggered(_:)), name: Notification.Name(FWEvents.downloadFile.rawValue), object: nil) NotificationCenter.default.addObserver(self, selector: #selector(self.onFreshworksEventTriggered(_:)), name: Notification.Name(FWEvents.userCleared.rawValue), object: nil) } // This is the handler for all events @objc func onFreshworksEventTriggered(_ notification: NSNotification) { print("Event name: \(notification.name) ") print("Event data: \(notification.object ?? "") ") } |
Unread Count
Once the action is registered to the Broadcast Receiver during initialization, users can listen to event and retrieve the unread count.
1 2 3 4 5 6 7 8 9 10 11 | LocalBroadcastManager.getInstance(this).registerReceiver(object: BroadcastReceiver() { override fun onReceive(context: Context?, intent: Intent?) { when (intent?.action) { EventID.UNREAD_COUNT -> { Log.d("FreshworksSDK", intent.getIntExtra(EventID.UNREAD_COUNT, 0)) } } } }, IntentFilter().apply { addAction(EventID.UNREAD_COUNT) }) |
1 2 3 4 5 6 7 8 9 10 | // Register for unread count change event (in viewDidLoad or viewWillAppear) NotificationCenter.default.addObserver(self, selector: #selector(self.onUnreadCount(_:)), name: Notification.Name(FWEvents.unreadCount.rawValue), object: nil) // Handle the updated unread count @objc func onUnreadCount(_ notification: NSNotification) { var eventInfo = notification.name.rawValue if let unreadCount = notification.object as? Int { print(unreadCount) } } |